数据模型“docs”中的每个文档。各项
包含一个文件图标、用于在网络上打开文件的链接以及 last updatedDate。
接下来,我们需要告知 Angular 哪个控制器将监督此模板的渲染。为此,我们
使用 ngController 指令指示 DocsController 掌控模板
:
<body data-ng-controller="DocsController">
<section id="main">
<ul>
  <li data-ng-repeat="doc in docs">
    <img data-ng-src=""> <a href=""></a>

    <span class="date"></span>
  </li>
</ul>
</section>
</body>
请注意,这里没有为数据连接事件监听器或属性
绑定。Angular 能为我们完成这方面的繁重工作!
最后一步是让 Angular 点亮我们的模板。实现此目的的常见方法是添加
ngApp 指令的完整路径:
<html data-ng-app="gDriveApp">
如果需要,您还可以将应用范围缩小到网页的较小部分。我们只有
一个控制器,但如果稍后添加更多控制器,只需将 ngApp 置于最顶端
元素可让整个页面为 Angular 做好准备。
main.html 的最终产品如下所示:
<html data-ng-app="gDriveApp">
<head>
  …

  <base target="_blank">
</head>
<body data-ng-controller="DocsController">
<section id="main">
  <nav>
    <h2>Google Drive Uploader</h2>
    <button class="btn" data-ng-click="fetchDocs()">Refresh</button>
    <button class="btn" id="close-button" title="Close"></button>
  </nav>
  <ul>
    <li data-ng-repeat="doc in docs">
      <img data-ng-src=""> <a href=""></a>
      <span class="date"></span>
    </li>
  </ul>
</section>
内容安全政策简述
与许多其他 JS MVC 框架不同,Angular v1.1.0+ 无需任何调整即可在严格的
CSP。开箱即可使用!
但是,如果您使用的是版本在 v1.0.1 到 v1.1.0 之间的旧版 Angular,则需要
要在“内容安全模式”下运行的 Angular。为此,可以加入 ngCsp 指令
和 ngApp 搭配使用:
<html data-ng-app data-ng-csp>
处理授权
数据模型不是由应用本身生成的,而是通过外部 API(即
Google Drive API)。因此,填充应用数据需要进行一些工作。
在发出 API 请求之前,我们需要获取用户的 Google 账号的 OAuth 令牌。
为此,我们创建了一个方法,用于封装对 chrome.identity.getAuthToken() 的调用并存储
accessToken,我们可以在将来调用 Drive API 时重复使用它。
GDocs.prototype.auth = function(opt_callback) {
  try {
    chrome.identity.getAuthToken({interactive: false}, function(token) {
      if (token) {
        this.accessToken = token;
        opt_callback && opt_callback();
      }
    }.bind(this));
  } catch(e) {
    console.log(e);
  }
};
获得令牌后,就可以向 Drive API 发出请求并填充模型了。
骷髅控制器
“模型”是一个简单的对象数组(称为 docs),这些对象将显示为
这些
:
var gDriveApp = angular.module('gDriveApp', []);

gDriveApp.factory('gdocs', function() {
  var gdocs = new GDocs();
  return gdocs;
});

function DocsController($scope, $http, gdocs) {
  $scope.docs = [];

  $scope.fetchDocs = function() {
     ...
  };

  // Invoke on ctor call. Fetch docs after we have the oauth token.
  gdocs.auth(function() {
    $scope.fetchDocs();
  });

}
请注意,gdocs.auth() 是作为 DocumentController 构造函数的一部分进行调用的。Angular 的
内部创建控制器,因此我们保证有一个新的 OAuth 令牌等待用户。
正在提取数据
模板已布局。控制器支架式。OAuth 令牌。接下来该怎么做呢?
现在可以定义主控制器方法 fetchDocs() 了。它是控制器的主力
负责请求用户的文件,并使用来自 API 响应的数据提交 docs 数组。
$scope.fetchDocs = function() {
  $scope.docs = []; // First, clear out any old results

  // Response handler that doesn't cache file icons.
  var successCallback = function(resp, status, headers, config) {
    var docs = [];
    var totalEntries = resp.feed.entry.length;

    resp.feed.entry.forEach(function(entry, i) {
      var doc = {
        title: entry.title.$t,
        updatedDate: Util.formatDate(entry.updated.$t),
        updatedDateFull: entry.updated.$t,
        icon: gdocs.getLink(entry.link,
                            'http://schemas.google.com/docs/2007#icon').href,
        alternateLink: gdocs.getLink(entry.link, 'alternate').href,
        size: entry.docs$size ? '( ' + entry.docs$size.$t + ' bytes)' : null
      };

      $scope.docs.push(doc);

      // Only sort when last entry is seen.
      if (totalEntries - 1 == i) {
        $scope.docs.sort(Util.sortByDate);
      }
    });
  };

  var config = {
    params: {'alt': 'json'},
    headers: {
      'Authorization': 'Bearer ' + gdocs.accessToken,
      'GData-Version': '3.0'
    }
  };

  $http.get(gdocs.DOCLIST_FEED, config).success(successCallback);
};
fetchDocs() 使用 Angular 的 $http 服务通过 XHR 检索主 Feed。OAuth 访问
令牌与其他自定义标头和参数一起包含在 Authorization 标头中。
successCallback 处理 API 响应,并为
Feed。
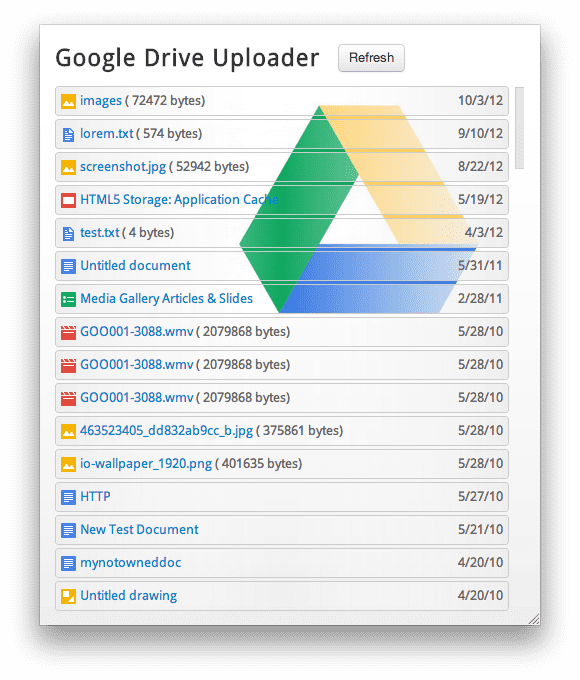
如果您现在运行 fetchDocs(),一切正常,屏幕上会显示文件列表:
耶!
等等,我们找不到那些干净利落的文件图标了。What gives? 快速查看一下控制台,您会发现许多
与 CSP 相关的错误:

原因是我们要尝试将图标 img.src 设置为外部网址。这违反了 CSP。例如:https://ssl.gstatic.com/docs/doclist/images/icon_10_document_list.png。为了解决这个问题
您需要将这些远程资源本地提取到应用
导入远程图片素材资源
为了让 CSP 停止对我们大喊大叫,我们使用 XHR2 来“导入”将文件图标设置为 Blob,然后将
img.src 到应用创建的 blob: URL。
以下是更新后的 successCallback,其中包含添加的 XHR 代码:
var successCallback = function(resp, status, headers, config) {
  var docs = [];
  var totalEntries = resp.feed.entry.length;

  resp.feed.entry.forEach(function(entry, i) {
    var doc = {
      ...
    };

    $http.get(doc.icon, {responseType: 'blob'}).success(function(blob) {
      console.log('Fetched icon via XHR');

      blob.name = doc.iconFilename; // Add icon filename to blob.

      writeFile(blob); // Write is async, but that's ok.

      doc.icon = window.URL.createObjectURL(blob);

      $scope.docs.push(doc);

      // Only sort when last entry is seen.
      if (totalEntries - 1 == i) {
        $scope.docs.sort(Util.sortByDate);
      }
    });
  });
};
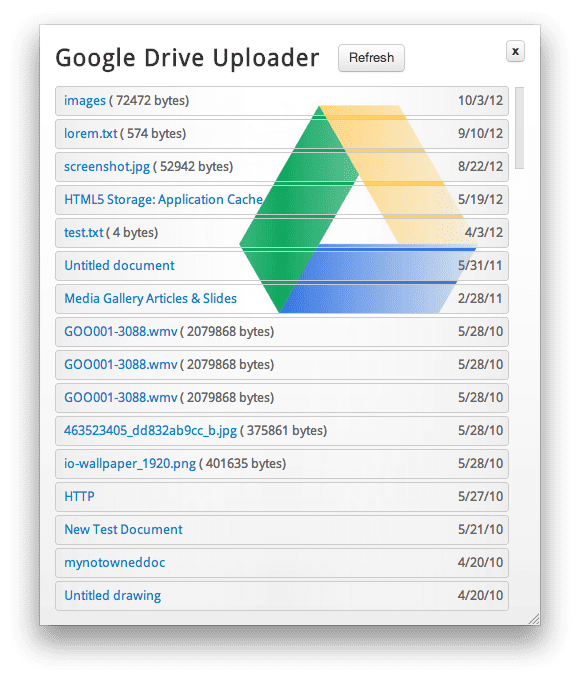
我们现在又对 CSP 很满意,因此我们为您提供了实用的文件图标:

离线:缓存外部资源
需要进行的显而易见的优化:不要对上的每个文件图标发出数百个 XHR 请求
对 fetchDocs() 的每次调用。请在开发者工具控制台中按“刷新”按钮进行验证
按钮多次播放。每次提取 n 张图片:

我们来修改 successCallback 以添加缓存层。新增以粗体突出显示:
$scope.fetchDocs = function() {
  ...

  // Response handler that caches file icons in the filesystem API.
  var successCallbackWithFsCaching = function(resp, status, headers, config) {
    var docs = [];
    var totalEntries = resp.feed.entry.length;

    resp.feed.entry.forEach(function(entry, i) {
      var doc = {
        ...
      };

      // 'https://ssl.gstatic.com/doc_icon_128.png' -> 'doc_icon_128.png'
      doc.iconFilename = doc.icon.substring(doc.icon.lastIndexOf('/') + 1);

      // If file exists, it we'll get back a FileEntry for the filesystem URL.
      // Otherwise, the error callback will fire and we need to XHR it in and
      // write it to the FS.
      var fsURL = fs.root.toURL() + FOLDERNAME + '/' + doc.iconFilename;
      window.webkitResolveLocalFileSystemURL(fsURL, function(entry) {
        doc.icon = entry.toURL(); // should be === to fsURL, but whatevs.

        $scope.docs.push(doc); // add doc to model.

        // Only want to sort and call $apply() when we have all entries.
        if (totalEntries - 1 == i) {
          $scope.docs.sort(Util.sortByDate);
          $scope.$apply(function($scope) {}); // Inform angular that we made changes.
        }

      }, function(e) {
        // Error: file doesn't exist yet. XHR it in and write it to the FS.

        $http.get(doc.icon, {responseType: 'blob'}).success(function(blob) {
          console.log('Fetched icon via XHR');

          blob.name = doc.iconFilename; // Add icon filename to blob.

          writeFile(blob); // Write is async, but that's ok.

          doc.icon = window.URL.createObjectURL(blob);

          $scope.docs.push(doc);

          // Only sort when last entry is seen.
          if (totalEntries - 1 == i) {
            $scope.docs.sort(Util.sortByDate);
          }
        });

      });
    });
  };

  var config = {
    ...
  };

  $http.get(gdocs.DOCLIST_FEED, config).success(successCallbackWithFsCaching);
};
请注意,在 webkitResolveLocalFileSystemURL() 回调中,当出现以下情况时,我们将调用 $scope.$apply():
只能看到最后一个条目。通常不需要调用 $apply()。Angular 检测数据更改
模型。不过,在本例中,我们还额外添加了一个异步回调层,
Angular 则不知情。当模型更新时,我们必须明确告知 Angular。
首次运行时,这些图标不会出现在 HTML5 文件系统中,且对
window.webkitResolveLocalFileSystemURL() 将导致调用其错误回调。为此
我们可以重复使用之前的技术并提取图片。这次唯一的区别是
确保每个 blob 都会写入文件系统(请参阅 writeFile())。控制台会验证
行为:

下次运行(或按下“刷新”按钮)时,传递至
“webkitResolveLocalFileSystemURL()”已存在,因为该文件之前已缓存。该应用将
将 doc.icon 添加到文件的 filesystem: URL,并避免为图标生成代价高昂的 XHR。
拖放上传
如果上传程序应用无法上传文件,就是虚假广告!
app.js 通过实现一个围绕 HTML5 拖放的小型库(称为
DnDFileController。它支持从桌面拖入文件并进行上传
保存到 Google 云端硬盘。
只需将以下代码添加到 gdocs 服务即可:
gDriveApp.factory('gdocs', function() {
  var gdocs = new GDocs();

  var dnd = new DnDFileController('body', function(files) {
    var $scope = angular.element(this).scope();
    Util.toArray(files).forEach(function(file, i) {
      gdocs.upload(file, function() {
        $scope.fetchDocs();
      });
    });
  });

  return gdocs;
});