擴充功能由不同但連貫的元件組成。元件可包含背景 指令碼、內容指令碼、選項頁面、UI 元素和各種邏輯檔案。 擴充功能元件是透過網頁開發技術建立:HTML、CSS 和 JavaScript。一個 擴充功能的元件需視其功能而定,且可能不需要所有選項。
本教學課程會建構一個擴充功能,可讓使用者變更任何應用程式的背景顏色 developer.chrome.com。這層會使用許多核心元件來介紹 請務必以真實的指令
首先,請建立新目錄來存放擴充功能的檔案。
如要查看已完成的擴充功能,請按這裡。
建立資訊清單
擴充功能會以資訊清單為開頭,建立名為 manifest.json 的檔案,並加入
下方的程式碼。
{
  "name": "Getting Started Example",
  "version": "1.0",
  "description": "Build an Extension!",
  "manifest_version": 2
}
在開發人員模式中,您可以在開發人員模式下,將保存資訊清單檔案的目錄新增為擴充功能 目前狀態
- 前往
chrome://extensions開啟「擴充功能管理」頁面。- 您也可以在 Chrome 選單上按一下滑鼠, 選取「更多工具」,然後選取「擴充功能」。
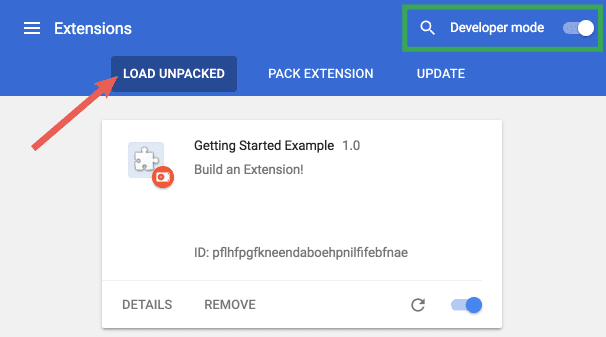
- 按一下「開發人員模式」旁的切換鈕,即可啟用開發人員模式。
- 按一下「LOAD UNPACKED」按鈕,然後選取擴充功能目錄。

好啊!已成功安裝擴充功能。由於 在資訊清單中,系統就會為這個擴充功能建立通用的工具列圖示。
新增操作說明
這項擴充功能已安裝,卻沒有指示。加入背景指令碼
方法是建立標題為 background.js 的檔案,並放在
擴充功能目錄來進行測試
背景指令碼和其他許多重要元件必須在資訊清單中註冊。 在資訊清單中註冊背景指令碼,可讓擴充功能知道該參照哪個檔案,以及執行方式 檔案應能正常運作
{
  "name": "Getting Started Example",
  "version": "1.0",
  "description": "Build an Extension!",
  "background": {
    "scripts": ["background.js"],
    "persistent": false
  },
  "manifest_version": 2
}
現在,這個擴充功能含有非持續性的背景指令碼,會掃描該擴充功能的 所註冊的重要事件。
安裝這項擴充功能後,就會需要從永久變數取得資訊。開始日期
,包括在背景指令碼中加入 runtime.onInstalled 的監聽事件。內部
onInstalled 事件監聽器,擴充功能會使用 storage API 設定值。這樣一來,
存取並更新該值。
chrome.runtime.onInstalled.addListener(function() {
  chrome.storage.sync.set({color: '#3aa757'}, function() {
    console.log("The color is green.");
  });
});
多數 API (包括 儲存空間 API) 都必須註冊在 "permissions" 欄位的
清單,以便讓擴充功能使用。
{
  "name": "Getting Started Example",
  "version": "1.0",
  "description": "Build an Extension!",
  "permissions": ["storage"],
  "background": {
    "scripts": ["background.js"],
    "persistent": false
  },
  "manifest_version": 2
}
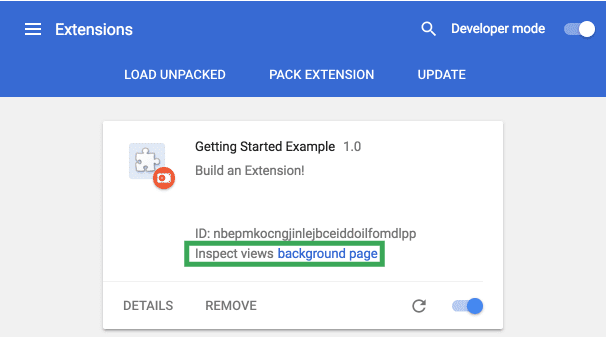
返回擴充功能管理頁面,然後按一下「重新載入」連結。新欄位「Inspect」 觀看次數,這個圖示則以藍色連結背景頁面為例。

點選連結即可查看背景指令碼的控制台記錄「The color is green.」
導入使用者介面
擴充功能可以有許多形式的使用者介面,但這個介面會使用彈出式視窗。
建立檔案並將名為 popup.html 的檔案新增至目錄。這個
擴充功能會使用按鈕變更背景顏色。
<!DOCTYPE html>
<html>
  <head>
    <style>
      button {
        height: 30px;
        width: 30px;
        outline: none;
      }
    </style>
  </head>
  <body>
    <button id="changeColor"></button>
  </body>
</html>
和背景指令碼一樣,這個檔案必須在下方的資訊清單裡指定為彈出式視窗
page_action。
{
  "name": "Getting Started Example",
  "version": "1.0",
  "description": "Build an Extension!",
  "permissions": ["storage"],
  "background": {
    "scripts": ["background.js"],
    "persistent": false
  },
  "page_action": {
    "default_popup": "popup.html"
  },
  "manifest_version": 2
}
工具列圖示的設計也包括在 default_icons 欄位中的 page_action 底下。
請從這裡下載圖片資料夾,解壓縮後放在擴充功能的目錄中。最新消息
資訊清單,讓擴充功能知道如何使用圖片。
{
  "name": "Getting Started Example",
  "version": "1.0",
  "description": "Build an Extension!",
  "permissions": ["storage"],
  "background": {
    "scripts": ["background.js"],
    "persistent": false
  },
  "page_action": {
    "default_popup": "popup.html",
    "default_icon": {
      "16": "images/get_started16.png",
      "32": "images/get_started32.png",
      "48": "images/get_started48.png",
      "128": "images/get_started128.png"
    }
  },
  "manifest_version": 2
}
擴充功能也會在擴充功能管理頁面顯示圖片、權限警告,以及
網站小圖示這些映像檔會在 icons 的資訊清單中標示。
{
  "name": "Getting Started Example",
  "version": "1.0",
  "description": "Build an Extension!",
  "permissions": ["storage"],
  "background": {
    "scripts": ["background.js"],
    "persistent": false
  },
  "page_action": {
    "default_popup": "popup.html",
    "default_icon": {
      "16": "images/get_started16.png",
      "32": "images/get_started32.png",
      "48": "images/get_started48.png",
      "128": "images/get_started128.png"
    }
  },
  "icons": {
    "16": "images/get_started16.png",
    "32": "images/get_started32.png",
    "48": "images/get_started48.png",
    "128": "images/get_started128.png"
  },
  "manifest_version": 2
}
如果在這個階段重新載入擴充功能,擴充功能會顯示灰階圖示,但不會包含以下內容
任何功能差異由於 page_action 在資訊清單中宣告,因此取決於
擴充功能,通知瀏覽器使用者何時能與 popup.html 互動。
使用 declarativeContent API,在背景指令碼中新增宣告的規則,位置在
runtime.onInstalled 事件監聽器事件。
chrome.runtime.onInstalled.addListener(function() {
  chrome.storage.sync.set({color: '#3aa757'}, function() {
    console.log('The color is green.');
  });
  chrome.declarativeContent.onPageChanged.removeRules(undefined, function() {
    chrome.declarativeContent.onPageChanged.addRules([{
      conditions: [new chrome.declarativeContent.PageStateMatcher({
        pageUrl: {hostEquals: 'developer.chrome.com'},
      })
      ],
          actions: [new chrome.declarativeContent.ShowPageAction()]
    }]);
  });
});
這項擴充功能需要權限,才能存取資訊清單中的 declarativeContent API。
{
  "name": "Getting Started Example",
...
  "permissions": ["declarativeContent", "storage"],
...
}

當使用者進行瀏覽時,瀏覽器會在工具列中顯示全彩網頁動作圖示
改為包含 "developer.chrome.com" 的網址。當圖示呈現全彩時,使用者只要點按它,
查看 pop.html
彈出式使用者介面的最後一個步驟,是為按鈕加上顏色。建立及新增名為
將 popup.js 替換為以下程式碼至擴充功能目錄。
let changeColor = document.getElementById('changeColor');

chrome.storage.sync.get('color', function(data) {
  changeColor.style.backgroundColor = data.color;
  changeColor.setAttribute('value', data.color);
});
此程式碼會從 popup.html 擷取按鈕,並要求儲存空間中的顏色值。然後
將顏色套用為按鈕的背景。在以下位置加入 popup.js 的指令碼標記:
popup.html。
<!DOCTYPE html>
<html>
...
  <body>
    <button id="changeColor"></button>
    <script src="popup.js"></script>
  </body>
</html>
重新載入擴充功能,顯示綠色按鈕。
圖層邏輯
擴充功能現在會知道 developer.chrome.com 使用者應顯示這個彈出式視窗,
會顯示彩色按鈕,但需要邏輯進一步使用者互動。將 popup.js 更新為
加入下列程式碼
let changeColor = document.getElementById('changeColor');
...
changeColor.onclick = function(element) {
  let color = element.target.value;
  chrome.tabs.query({active: true, currentWindow: true}, function(tabs) {
    chrome.tabs.executeScript(
        tabs[0].id,
        {code: 'document.body.style.backgroundColor = "' + color + '";'});
  });
};
更新後的程式碼會在按鈕上新增 onclick 事件,以觸發透過程式輔助方式插入的項目
內容指令碼。這會讓頁面的背景顏色與按鈕相同。使用
程式輔助插入功能可讓使用者叫用內容指令碼,而不是自動插入不必要的內容
導入網頁的程式碼
資訊清單必須具備 activeTab 權限,才能允許擴充功能暫時存取
tabs API。這樣做可讓擴充功能呼叫 tabs.executeScript。
{
  "name": "Getting Started Example",
...
  "permissions": ["activeTab", "declarativeContent", "storage"],
...
}
擴充功能現在可完全正常運作!請重新載入擴充功能、重新整理這個頁面、開啟彈出式視窗,然後 按一下按鈕,讓它變成綠色!不過,部分使用者可能會想將背景 不同的顏色
為使用者提供選項
這項擴充功能目前僅允許使用者將背景改成綠色。提供選項 網頁,可讓使用者進一步掌控擴充功能的功能,並進一步自訂瀏覽方式 無須專人管理
首先,請在名為 options.html 的目錄中建立檔案,並加入下列程式碼。
<!DOCTYPE html>
<html>
  <head>
    <style>
      button {
        height: 30px;
        width: 30px;
        outline: none;
        margin: 10px;
      }
    </style>
  </head>
  <body>
    <div id="buttonDiv">
    </div>
    <div>
      <p>Choose a different background color!</p>
    </div>
  </body>
  <script src="options.js"></script>
</html>
接著在資訊清單中註冊選項頁面
{
  "name": "Getting Started Example",
  ...
  "options_page": "options.html",
  ...
  "manifest_version": 2
}
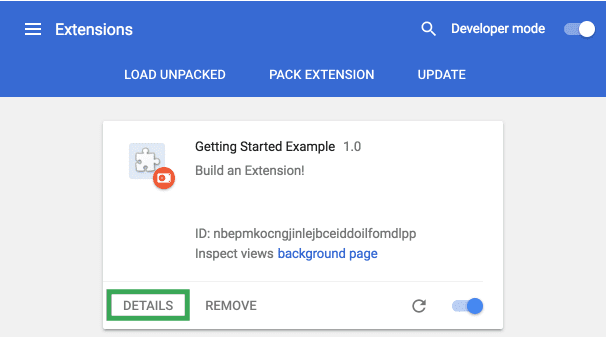
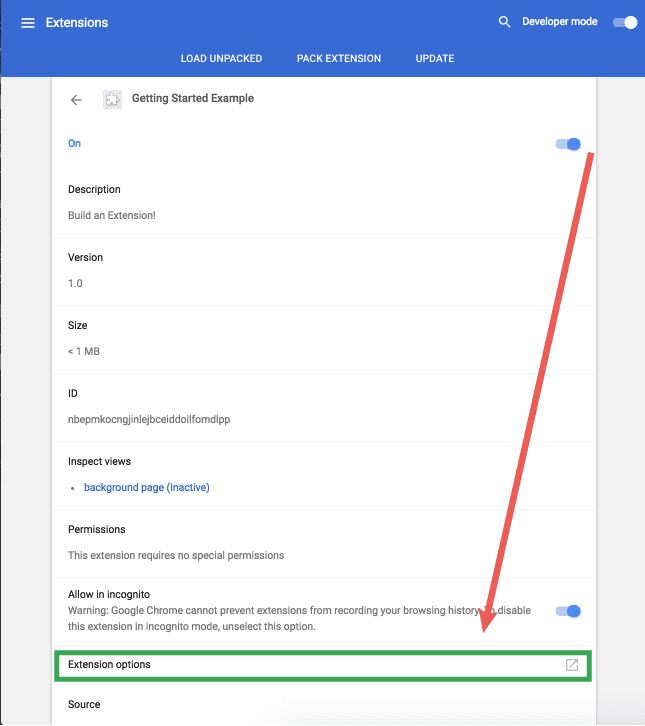
重新載入擴充功能,然後按一下「詳細資料」。

向下捲動詳細資料頁面並選取「擴充功能選項」,即可查看選項頁面 目前會顯示為空白

最後一步是新增選項邏輯。在擴充功能目錄中建立名為 options.js 的檔案
替換為下列程式碼
let page = document.getElementById('buttonDiv');
const kButtonColors = ['#3aa757', '#e8453c', '#f9bb2d', '#4688f1'];
function constructOptions(kButtonColors) {
  for (let item of kButtonColors) {
    let button = document.createElement('button');
    button.style.backgroundColor = item;
    button.addEventListener('click', function() {
      chrome.storage.sync.set({color: item}, function() {
        console.log('color is ' + item);
      })
    });
    page.appendChild(button);
  }
}
constructOptions(kButtonColors);
在此提供四種顏色選項,然後以按鈕形式在含有「click」事件的選項頁面上產生按鈕 接聽程式。使用者只要按一下按鈕,即可更新擴充功能的全域化顏色值 如果 30 天內讀取資料不到一次 建議使用 Coldline Storage擴充功能的所有檔案都會從全域儲存空間提取色彩資訊 這些值需要更新
後續行動
恭喜!此目錄現在擁有功能完整、儘管簡單明瞭的 Chrome 擴充功能。
後續步驟
- Chrome 擴充功能總覽會備份部分內容,並填入 一般擴充功能架構,以及開發人員想熟悉的一些特定概念 。
- 如要瞭解對擴充功能偵錯時可用的選項,請參閱偵錯教學課程。
- Chrome 擴充功能可以存取範圍更出色的 API,超越開放網路可用的 API。 chrome.*API 說明文件 將帶您瞭解各個 API。
- 開發人員指南提供數十種其他相關說明文件的連結, 建立進階額外資訊
