
本指南說明各種從分頁、視窗或
使用 chrome.tabCapture 或
getDisplayMedia()。
錄製螢幕畫面
如要錄製螢幕畫面,請呼叫 getDisplayMedia() 來觸發對話方塊
如下所示。讓使用者能自行選取想要的分頁、視窗或畫面
分享並明確指出錄影正在進行。
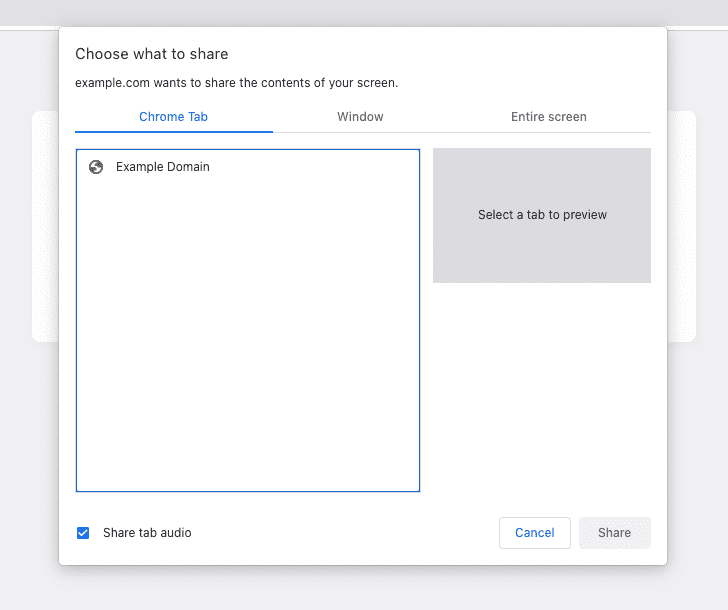
以下範例要求錄製音訊和視訊的權限。
const stream = await navigator.mediaDevices.getDisplayMedia({ audio: true, video: true });
如果在內容指令碼中呼叫,系統會在使用者瀏覽新的內容時自動結束錄製。
頁面。如要在背景錄製及瀏覽其他內容,請使用
螢幕外文件,並附上 DISPLAY_MEDIA 原因。
根據使用者手勢擷取分頁
呼叫 getDisplayMedia() 後,瀏覽器就會顯示對話方塊,詢問
使用者想分享的內容然而,在某些情況下
動作按鈕來叫用特定分頁的擴充功能,進而
這樣就能在不顯示此提示的情況下,立即開始擷取分頁。
在背景中錄音和錄影
從 Chrome 116 版開始,您可以在 Service Worker 中呼叫 chrome.tabCapture API
來取得串流 ID。即可將這個檔案傳遞至螢幕外文件
開始錄製。
在 Service Worker 中:
chrome.action.onClicked.addListener(async (tab) => {
  const existingContexts = await chrome.runtime.getContexts({});

  const offscreenDocument = existingContexts.find(
    (c) => c.contextType === 'OFFSCREEN_DOCUMENT'
  );

  // If an offscreen document is not already open, create one.
  if (!offscreenDocument) {
    // Create an offscreen document.
    await chrome.offscreen.createDocument({
      url: 'offscreen.html',
      reasons: ['USER_MEDIA'],
      justification: 'Recording from chrome.tabCapture API',
    });
  }

  // Get a MediaStream for the active tab.
  const streamId = await chrome.tabCapture.getMediaStreamId({
    targetTabId: tab.id
  });

  // Send the stream ID to the offscreen document to start recording.
  chrome.runtime.sendMessage({
    type: 'start-recording',
    target: 'offscreen',
    data: streamId
  });
});
接著,在螢幕外文件中:
chrome.runtime.onMessage.addListener(async (message) => {
  if (message.target !== 'offscreen') return;

  if (message.type === 'start-recording') {
    const media = await navigator.mediaDevices.getUserMedia({
      audio: {
        mandatory: {
          chromeMediaSource: "tab",
          chromeMediaSourceId: message.data,
        },
      },
      video: {
        mandatory: {
          chromeMediaSource: "tab",
          chromeMediaSourceId: message.data,
        },
      },
    });

    // Continue to play the captured audio to the user.
    const output = new AudioContext();
    const source = output.createMediaStreamSource(media);
    source.connect(output.destination);

    // TODO: Do something to recording the MediaStream.
  }
});
如需完整範例,請參閱「分頁擷取 - 錄音工具」範例。
在新分頁錄製音訊和影片
在 Chrome 116 之前,您無法在chrome.tabCapture
或稱該 API 建立的串流 ID。您可以
符合上述做法的規定。
你可以改為在新分頁或視窗中開啟擴充功能頁面,然後直接取得串流。組合
targetTabId 屬性來擷取正確的分頁。
首先,開啟擴充功能頁面 (可能在彈出式視窗或 Service Worker 中):
chrome.windows.create({ url: chrome.runtime.getURL("recorder.html") });
接著,在擴充功能頁面中:
chrome.tabCapture.getMediaStreamId({ targetTabId: tabId }, async (id) => {
  const media = await navigator.mediaDevices.getUserMedia({
    audio: {
      mandatory: {
        chromeMediaSource: "tab",
        chromeMediaSourceId: id,
      },
    },
    video: {
      mandatory: {
        chromeMediaSource: "tab",
        chromeMediaSourceId: id,
      },
    },
  });

  // Continue to play the captured audio to the user.
  const output = new AudioContext();
  const source = output.createMediaStreamSource(media);
  source.connect(output.destination);
});
您也可以考慮使用螢幕錄影功能, 錄製在背景執行,但顯示讓使用者選取分頁的對話方塊 錄製來源、視窗或螢幕畫面。
在彈出式視窗中錄音
如果只需要錄製音訊,可以直接在擴充功能的彈出式視窗中,使用 chrome.tabCapture.capture。彈出式視窗關閉後,系統會停止錄製。
chrome.tabCapture.capture({ audio: true }, (stream) => {
  // Continue to play the captured audio to the user.
  const output = new AudioContext();
  const source = output.createMediaStreamSource(stream);
  source.connect(output.destination);

  // TODO: Do something with the stream (e.g record it)
});
如果需要在各導覽間保留錄製內容,建議使用 請參閱上一節的說明。
其他注意事項
想進一步瞭解如何錄製串流,請參閱 MediaRecorder API。