
คู่มือนี้จะอธิบายวิธีต่างๆ ในการบันทึกเสียงและวิดีโอจากแท็บ หน้าต่าง หรือ
โดยใช้ API เช่น chrome.tabCapture หรือ
getDisplayMedia()
การบันทึกหน้าจอ
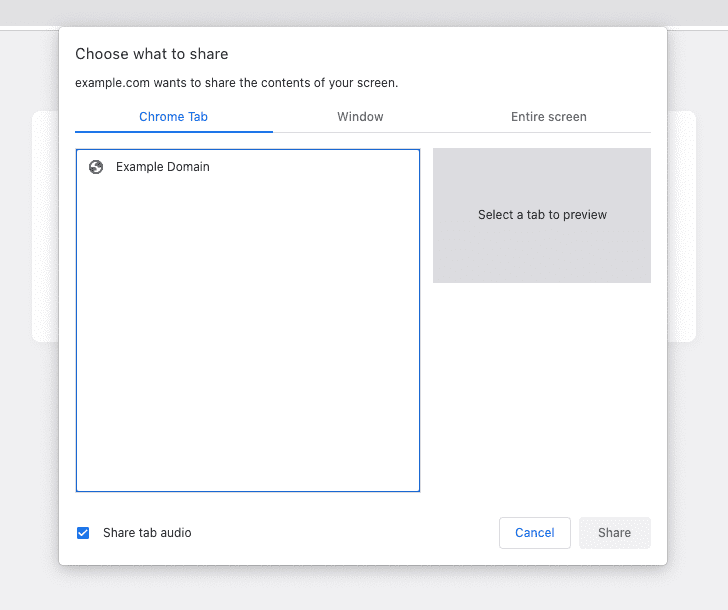
สำหรับการบันทึกหน้าจอ ให้โทร getDisplayMedia() ซึ่งจะเรียกให้กล่องโต้ตอบทำงาน
ดังที่แสดงด้านล่าง ทำให้ผู้ใช้สามารถเลือกแท็บ หน้าต่าง หรือหน้าจอที่ต้องการ
เพื่อแชร์และระบุอย่างชัดเจนว่ากำลังจะมีการบันทึก
ตัวอย่างต่อไปนี้ขอสิทธิ์เข้าถึงเพื่อบันทึกทั้งเสียงและวิดีโอ
const stream = await navigator.mediaDevices.getDisplayMedia({ audio: true, video: true });
หากมีการเรียกภายในสคริปต์เนื้อหา การบันทึกจะสิ้นสุดลงโดยอัตโนมัติเมื่อผู้ใช้ไปยัง
หากต้องการบันทึกในเบื้องหลังและในการนําทาง ให้ใช้
เอกสารนอกหน้าจอ พร้อมเหตุผลDISPLAY_MEDIA
การจับภาพแท็บตามท่าทางสัมผัสของผู้ใช้
การเรียกใช้ getDisplayMedia() จะส่งผลให้เบราว์เซอร์แสดงกล่องโต้ตอบที่ถามว่า
สิ่งที่ผู้ใช้ต้องการแชร์ แต่ในบางกรณีผู้ใช้เพิ่งคลิกที่
ปุ่มดำเนินการเพื่อเรียกส่วนขยายสำหรับบางแท็บ และต้องการ
เริ่มจับภาพแท็บทันทีโดยไม่มีข้อความแจ้งนี้
บันทึกเสียงและวิดีโอขณะล็อกหน้าจอหรือขณะใช้แอปอื่น
ตั้งแต่ Chrome 116 เป็นต้นไป คุณสามารถเรียกใช้ chrome.tabCapture API ใน Service Worker ได้
เพื่อรับรหัสสตรีมตามท่าทางสัมผัสของผู้ใช้ สามารถส่งผ่านไปยังเอกสารนอกหน้าจอเพื่อ
เริ่มบันทึก
ใน Service Worker
chrome.action.onClicked.addListener(async (tab) => {
  const existingContexts = await chrome.runtime.getContexts({});

  const offscreenDocument = existingContexts.find(
    (c) => c.contextType === 'OFFSCREEN_DOCUMENT'
  );

  // If an offscreen document is not already open, create one.
  if (!offscreenDocument) {
    // Create an offscreen document.
    await chrome.offscreen.createDocument({
      url: 'offscreen.html',
      reasons: ['USER_MEDIA'],
      justification: 'Recording from chrome.tabCapture API',
    });
  }

  // Get a MediaStream for the active tab.
  const streamId = await chrome.tabCapture.getMediaStreamId({
    targetTabId: tab.id
  });

  // Send the stream ID to the offscreen document to start recording.
  chrome.runtime.sendMessage({
    type: 'start-recording',
    target: 'offscreen',
    data: streamId
  });
});
จากนั้นให้ทำตามขั้นตอนต่อไปนี้ในเอกสารนอกหน้าจอ
chrome.runtime.onMessage.addListener(async (message) => {
  if (message.target !== 'offscreen') return;

  if (message.type === 'start-recording') {
    const media = await navigator.mediaDevices.getUserMedia({
      audio: {
        mandatory: {
          chromeMediaSource: "tab",
          chromeMediaSourceId: message.data,
        },
      },
      video: {
        mandatory: {
          chromeMediaSource: "tab",
          chromeMediaSourceId: message.data,
        },
      },
    });

    // Continue to play the captured audio to the user.
    const output = new AudioContext();
    const source = output.createMediaStreamSource(media);
    source.connect(output.destination);

    // TODO: Do something to recording the MediaStream.
  }
});
ดูตัวอย่างทั้งหมดได้ในตัวอย่าง Tab Capture - Recorder
บันทึกเสียงและวิดีโอในแท็บใหม่
ก่อนที่จะมี Chrome 116 คุณจะใช้ chrome.tabCapture API ใน
Service Worker หรือใช้รหัสสตรีมที่สร้างโดย API นั้นในเอกสารนอกหน้าจอ ทั้ง 2 อย่างนี้
เป็นข้อกำหนดสำหรับวิธีการข้างต้น
แต่คุณสามารถเปิดหน้าส่วนขยายในแท็บหรือหน้าต่างใหม่ แล้วรับสตรีมโดยตรงแทนได้ ตั้งค่า
พร็อพเพอร์ตี้ targetTabId เพื่อบันทึกแท็บที่ถูกต้อง
เริ่มต้นด้วยการเปิดหน้าส่วนขยาย (อาจอยู่ในป๊อปอัปหรือ Service Worker) ดังนี้
chrome.windows.create({ url: chrome.runtime.getURL("recorder.html") });
จากนั้นให้ทำตามขั้นตอนต่อไปนี้ในหน้าส่วนขยาย
chrome.tabCapture.getMediaStreamId({ targetTabId: tabId }, async (id) => {
  const media = await navigator.mediaDevices.getUserMedia({
    audio: {
      mandatory: {
        chromeMediaSource: "tab",
        chromeMediaSourceId: id,
      },
    },
    video: {
      mandatory: {
        chromeMediaSource: "tab",
        chromeMediaSourceId: id,
      },
    },
  });

  // Continue to play the captured audio to the user.
  const output = new AudioContext();
  const source = output.createMediaStreamSource(media);
  source.connect(output.destination);
});
หรือลองใช้วิธีบันทึกหน้าจอ ซึ่งช่วยให้ดำเนินการต่อไปนี้ได้ บันทึกในเบื้องหลังโดยใช้เอกสารนอกหน้าจอ แต่แสดงกล่องโต้ตอบเพื่อเลือกแท็บให้ผู้ใช้เห็น หน้าต่างหรือหน้าจอที่จะบันทึก
บันทึกเสียงในป๊อปอัป
หากคุณเพียงต้องการบันทึกเสียง คุณสามารถรับสตรีมจากป๊อปอัปส่วนขยายได้โดยตรงโดยใช้ chrome.tabCapture.capture เมื่อปิดป๊อปอัป การบันทึกจะหยุดลง
chrome.tabCapture.capture({ audio: true }, (stream) => {
  // Continue to play the captured audio to the user.
  const output = new AudioContext();
  const source = output.createMediaStreamSource(stream);
  source.connect(output.destination);

  // TODO: Do something with the stream (e.g record it)
});
หากต้องการคงการบันทึกเพื่อไปยังส่วนต่างๆ ในการนำทาง ให้ใช้วิธีการที่อธิบายไว้ ในส่วนก่อนหน้านี้
ข้อควรพิจารณาอื่นๆ
ดูข้อมูลเพิ่มเติมเกี่ยวกับวิธีบันทึกสตรีมได้ที่ MediaRecorder API