
要点
小秘密:您可能不需要在下一个应用中使用 scroll 事件。我将使用 IntersectionObserver 介绍如何在 position:sticky 元素固定或停止固定时触发自定义事件。所有这些都无需使用滚动监听器。我们甚至还提供了一个出色的演示来证明这一点:
sticky-change 事件简介
使用 CSS 粘性定位的实际限制之一是,它不提供平台信号来了解该属性何时处于活动状态。换句话说,没有任何事件可用于了解元素何时变为固定或何时停止固定。
下面的示例将 <div class="sticky"> 固定在其父级容器顶部的 10px 处:
.sticky {
  position: sticky;
  top: 10px;
}
如果浏览器能告知元素何时达到该标记,那不是很棒吗?
显然,我并不是唯一这么认为的人。position:sticky 信号可以解锁多种用例:
- 在横幅粘贴时为其应用阴影。
- 在用户阅读您的内容时,记录 Google Analytics 命中数据,以了解其阅读进度。
- 当用户滚动页面时,将浮动目录 widget 更新为当前部分。
考虑到这些用例,我们制定了一个最终目标:创建一个事件,以便在 position:sticky 元素固定时触发。我们将其称为 sticky-change 事件:
document.addEventListener('sticky-change', e => {
  const header = e.detail.target;  // header became sticky or stopped sticking.
  const sticking = e.detail.stuck; // true when header is sticky.
  header.classList.toggle('shadow', sticking); // add drop shadow when sticking.

  document.querySelector('.who-is-sticking').textContent = header.textContent;
});
演示使用此事件在标题固定后为其添加阴影。它还会更新页面顶部的新标题。
无滚动事件的滚动效果?
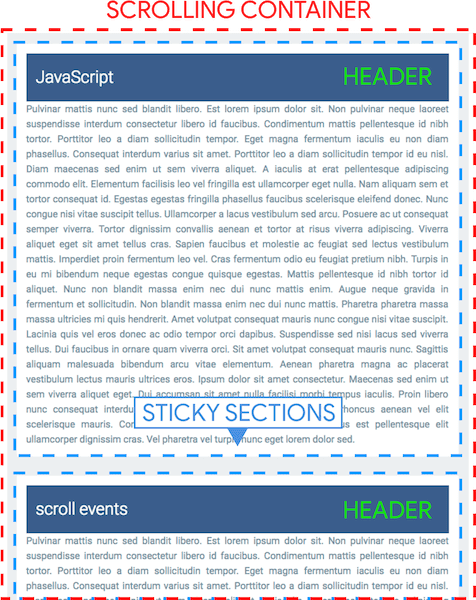
我们先来了解一些术语,以便我在本文的其余部分中引用这些名称:
- 滚动容器 - 包含“博文”列表的内容区域(可见视口)。
- 标题 - 每个包含
position:sticky的版块中的蓝色标题。 - 固定版块 - 每个内容版块。在固定标题下滚动的文本。
- “粘滞模式” - 当
position:sticky应用于元素时。
为了了解哪个标题进入了“粘性模式”,我们需要某种方法来确定滚动容器的滚动偏移量。这样,我们就可以计算出当前显示的标题。不过,如果没有 scroll 事件,就很难做到这一点 :) 另一个问题是,position:sticky 会在元素固定后将其从布局中移除。
因此,如果没有滚动事件,我们将无法对标题执行与布局相关的计算。
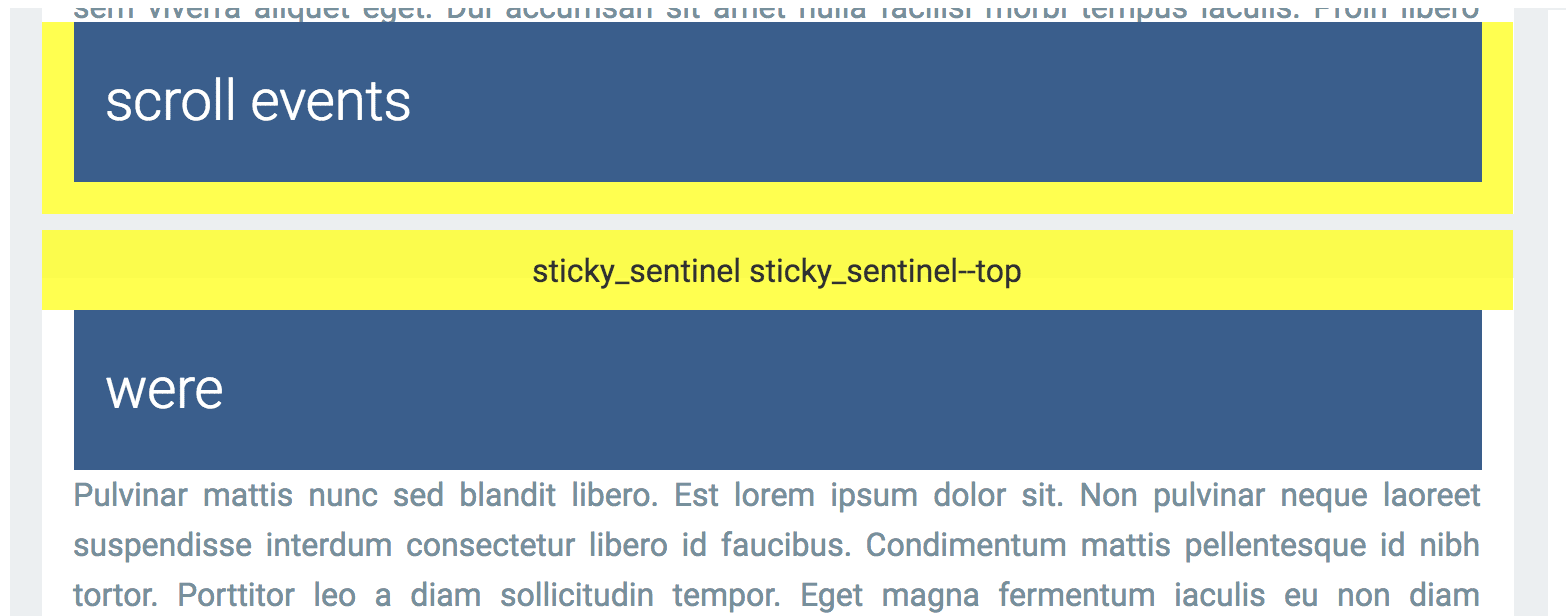
添加了虚构 DOM 以确定滚动位置
我们将使用 IntersectionObserver 来确定标题何时进入和退出固定模式,而不是使用 scroll 事件。在每个固定版块中添加两个节点(也称为哨兵),一个位于顶部,一个位于底部,它们将用作用于确定滚动位置的路点。当这些标记进入和离开容器时,它们的可见性会发生变化,并且 Intersection Observer 会触发回调。
我们需要两个哨兵来涵盖上下滚动的四种情况:
- 向下滚动 - 当标题的顶部哨兵超出容器顶部时,标题会变为固定。
- 向下滚动 - 标题到达该部分底部且其底部哨兵越过容器顶部时,会退出固定模式。
- 向上滚动 - 当标题的顶部哨兵从顶部滚动回视野时,标题会退出固定模式。
- 向上滚动 - 标题会变为固定标题,因为其底部哨兵从顶部返回到视野中。
建议您按发生顺序观看 1-4 的屏幕录制内容:
CSS
哨兵位于每个部分的顶部和底部。.sticky_sentinel--top 位于标题顶部,.sticky_sentinel--bottom 位于该部分底部:
:root {
  --default-padding: 16px;
  --header-height: 80px;
}
.sticky {
  position: sticky;
  top: 10px; /* adjust sentinel height/positioning based on this position. */
  height: var(--header-height);
  padding: 0 var(--default-padding);
}
.sticky_sentinel {
  position: absolute;
  left: 0;
  right: 0; /* needs dimensions */
  visibility: hidden;
}
.sticky_sentinel--top {
  /* Adjust the height and top values based on your on your sticky top position.
  e.g. make the height bigger and adjust the top so observeHeaders()'s
  IntersectionObserver fires as soon as the bottom of the sentinel crosses the
  top of the intersection container. */
  height: 40px;
  top: -24px;
}
.sticky_sentinel--bottom {
  /* Height should match the top of the header when it's at the bottom of the
  intersection container. */
  height: calc(var(--header-height) + var(--default-padding));
  bottom: 0;
}
设置 Intersection Observer
交叉观察器会异步监控目标元素与文档视口或父级容器的交叉区域中的变化。在本例中,我们将观察与父容器的交叉情况。
魔法酱汁就是 IntersectionObserver。每个哨兵都会获得一个 IntersectionObserver,用于监控其在滚动容器中的交叉可见性。当哨兵滚动到可见视口中时,我们知道标题已固定或已停止固定。同样,当哨兵退出视口时。
首先,我为页眉和页脚哨兵设置了观察器:
/**
 * Notifies when elements w/ the `sticky` class begin to stick or stop sticking.
 * Note: the elements should be children of `container`.
 * @param {!Element} container
 */
function observeStickyHeaderChanges(container) {
  observeHeaders(container);
  observeFooters(container);
}

observeStickyHeaderChanges(document.querySelector('#scroll-container'));
然后,我添加了一个观察器,以便在 .sticky_sentinel--top 元素通过滚动容器顶部(无论是向任意方向)时触发。observeHeaders 函数会创建顶部哨兵并将其添加到每个部分。观察器会计算哨兵与容器顶部的相交情况,并确定它是进入视口还是离开视口。这些信息决定了分区标题是否固定。
/**
 * Sets up an intersection observer to notify when elements with the class
 * `.sticky_sentinel--top` become visible/invisible at the top of the container.
 * @param {!Element} container
 */
function observeHeaders(container) {
  const observer = new IntersectionObserver((records, observer) => {
    for (const record of records) {
      const targetInfo = record.boundingClientRect;
      const stickyTarget = record.target.parentElement.querySelector('.sticky');
      const rootBoundsInfo = record.rootBounds;

      // Started sticking.
      if (targetInfo.bottom < rootBoundsInfo.top) {
        fireEvent(true, stickyTarget);
      }

      // Stopped sticking.
      if (targetInfo.bottom >= rootBoundsInfo.top &&
          targetInfo.bottom < rootBoundsInfo.bottom) {
       fireEvent(false, stickyTarget);
      }
    }
  }, {threshold: [0], root: container});

  // Add the top sentinels to each section and attach an observer.
  const sentinels = addSentinels(container, 'sticky_sentinel--top');
  sentinels.forEach(el => observer.observe(el));
}
观察器使用 threshold: [0] 进行配置,因此其回调会在监视器变为可见状态后立即触发。
底部哨兵 (.sticky_sentinel--bottom) 的过程类似。系统会创建第二个观察器,以便在页脚穿过滚动容器底部时触发。observeFooters 函数会创建监视器节点并将其附加到每个部分。观察器会计算哨兵与容器底部的交点,并确定其是进入还是离开。该信息决定了分节标题是否固定。
/**
 * Sets up an intersection observer to notify when elements with the class
 * `.sticky_sentinel--bottom` become visible/invisible at the bottom of the
 * container.
 * @param {!Element} container
 */
function observeFooters(container) {
  const observer = new IntersectionObserver((records, observer) => {
    for (const record of records) {
      const targetInfo = record.boundingClientRect;
      const stickyTarget = record.target.parentElement.querySelector('.sticky');
      const rootBoundsInfo = record.rootBounds;
      const ratio = record.intersectionRatio;

      // Started sticking.
      if (targetInfo.bottom > rootBoundsInfo.top && ratio === 1) {
        fireEvent(true, stickyTarget);
      }

      // Stopped sticking.
      if (targetInfo.top < rootBoundsInfo.top &&
          targetInfo.bottom < rootBoundsInfo.bottom) {
        fireEvent(false, stickyTarget);
      }
    }
  }, {threshold: [1], root: container});

  // Add the bottom sentinels to each section and attach an observer.
  const sentinels = addSentinels(container, 'sticky_sentinel--bottom');
  sentinels.forEach(el => observer.observe(el));
}
观察器使用 threshold: [1] 进行配置,因此当整个节点都在视野内时,其回调就会触发。
最后,我提供了两个实用程序来触发 sticky-change 自定义事件并生成哨兵:
/**
 * @param {!Element} container
 * @param {string} className
 */
function addSentinels(container, className) {
  return Array.from(container.querySelectorAll('.sticky')).map(el => {
    const sentinel = document.createElement('div');
    sentinel.classList.add('sticky_sentinel', className);
    return el.parentElement.appendChild(sentinel);
  });
}

/**
 * Dispatches the `sticky-event` custom event on the target element.
 * @param {boolean} stuck True if `target` is sticky.
 * @param {!Element} target Element to fire the event on.
 */
function fireEvent(stuck, target) {
  const e = new CustomEvent('sticky-change', {detail: {stuck, target}});
  document.dispatchEvent(e);
}
大功告成!
最终演示
我们在带有 position:sticky 的元素变为固定时创建了自定义事件,并在不使用 scroll 事件的情况下添加了滚动效果。
总结
我常常在想,IntersectionObserver 是否是一款有用的工具,可用于替换多年来开发的一些基于 scroll 事件的界面模式。事实证明,答案既是肯定的,也是否定的。IntersectionObserver API 的语义使得它很难用于所有用例。不过,正如我在这里所展示的,您可以将其用于一些有趣的技术。
是否有其他方式可以检测样式更改?
不一定。我们需要一种方法来观察 DOM 元素的样式更改。 很遗憾,Web 平台 API 中没有任何可让您监控样式更改的功能。
MutationObserver 是合乎逻辑的首选,但在大多数情况下行不通。例如,在演示中,当 sticky 类添加到元素时,我们会收到回调,但当元素的计算样式发生变化时,我们不会收到回调。回想一下,我们已在网页加载时声明了 sticky 类。
未来,我们可能会推出“样式更改观察器”扩展程序,以便观察元素的计算样式发生的变化。position: sticky。