
要約
次のアプリでは scroll イベントが必要ない場合もあります。IntersectionObserver を使用して、position:sticky 要素が固定されたときや固定が解除されたときにカスタム イベントを発生させる方法を説明します。スクロール リスナーを使用せずに、すべて行えます。それを証明する素晴らしいデモもあります。
sticky-change イベントの導入
CSS のスティッキー ポジションを使用する実用的な制限の 1 つは、プロパティがアクティブになっていることを示すプラットフォーム シグナルが提供されないことです。つまり、要素がスティッキーになったときやスティッキーでなくなったときを検知するイベントはありません。
次の例では、親コンテナの上部から 10 ピクセルの <div class="sticky"> を固定しています。
.sticky {
  position: sticky;
  top: 10px;
}
要素がそのマークに達したときにブラウザが教えてくれたら便利だと思いませんか?私以外にも、そう考える人がいるようです。position:sticky のシグナルにより、次のようなユースケースが実現できる可能性があります。
- バナーが貼り付くようにドロップ シャドウを適用します。
- ユーザーがコンテンツを読み進めていくにつれて、アナリティクスのヒットを記録して進捗状況を把握します。
- ユーザーがページをスクロールすると、フローティング TOC ウィジェットを現在のセクションに更新します。
これらのユースケースを念頭に置いて、position:sticky 要素が固定されたときに発生するイベントを作成する最終目標を設定しました。これを sticky-change イベントと呼びます。
document.addEventListener('sticky-change', e => {
  const header = e.detail.target;  // header became sticky or stopped sticking.
  const sticking = e.detail.stuck; // true when header is sticky.
  header.classList.toggle('shadow', sticking); // add drop shadow when sticking.

  document.querySelector('.who-is-sticking').textContent = header.textContent;
});
デモでは、このイベントを使用して、固定されたときにヘッダーにドロップシャドウを適用しています。また、ページ上部の新しいタイトルも更新されます。
スクロール イベントのないスクロール エフェクト
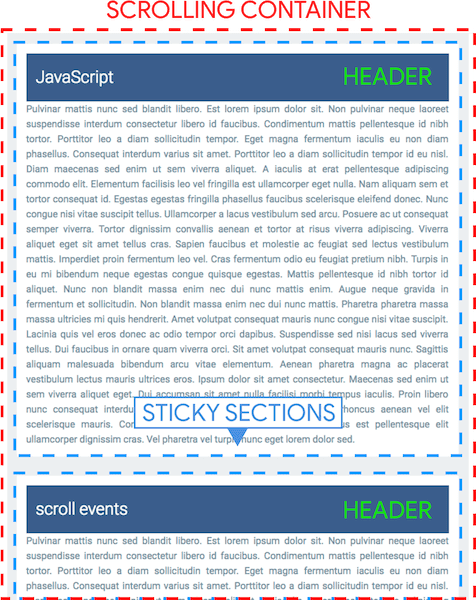
以降の投稿でこれらの名前を参照できるように、まずは用語を整理しておきましょう。
- スクロール コンテナ - 「ブログ投稿」のリストを含むコンテンツ領域(表示ビューポート)。
- ヘッダー -
position:stickyが付いている各セクションの青いタイトル。 - 固定セクション - 各コンテンツ セクション。固定ヘッダーの下にスクロールするテキスト。
- 「スティッキー モード」 -
position:stickyが要素に適用されている場合。
どのヘッダーが「固定モード」に入るかを把握するには、スクロール コンテナのスクロール オフセットを特定する方法が必要です。これにより、現在表示されているヘッダーを計算できるようになります。ただし、scroll イベントなしでこれを実現するのはかなり難しいです。もう一つの問題は、position:sticky が固定されると、要素がレイアウトから削除されることです。
そのため、スクロール イベントがないと、ヘッダーでレイアウト関連の計算を実行できなくなります。
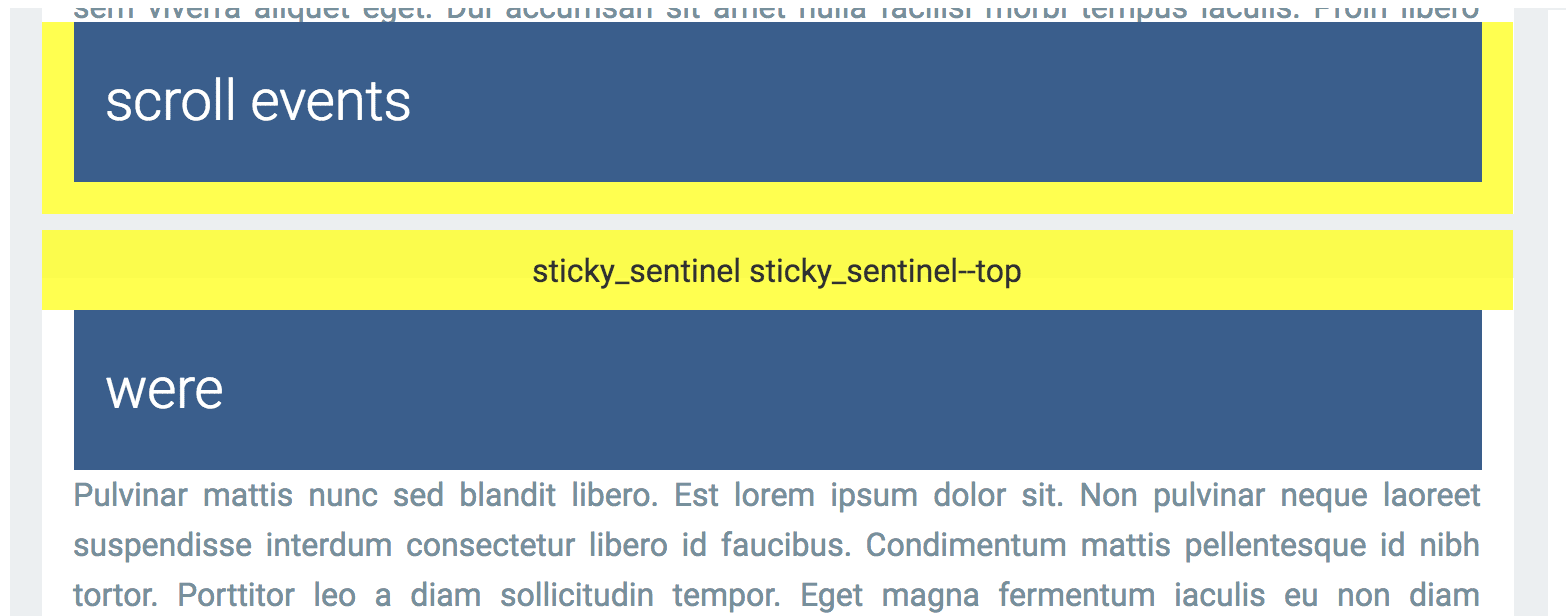
ダミー DOM を追加してスクロール位置を特定
scroll イベントの代わりに IntersectionObserver を使用して、ヘッダーが固定モードに移行および移行解除されるタイミングを判断します。各固定セクションに 2 つのノード(センチネル)を追加します(上部に 1 つ、下部に 1 つ)。これらは、スクロール位置を特定するためのウェイポイントとして機能します。これらのマーカーがコンテナに出入りすると、可視性が変化し、Intersection Observer がコールバックを呼び出します。

上下のスクロールには、次の 4 つのケースをカバーする2 つのセンチネルが必要です。
- 下にスクロールする - 上部のセンチネルがコンテナの上部を越えると、ヘッダーが固定されます。
- 下にスクロールする - ヘッダーは、セクションの下部に達し、下部センチネルがコンテナの上部を越えると、固定モードを終了します。
- 上方向へのスクロール - ヘッダーは、上部のセンチネルが上からスクロールして表示に戻ると、固定モードを終了します。
- 上方向へのスクロール - 下部のセンチネルが上部から再びビュー内に入ると、ヘッダーが固定されます。
1 ~ 4 の順に発生する様子を示すスクリーンキャストをご覧ください。
CSS
センチネルは各セクションの上部と下部に配置されます。.sticky_sentinel--top はヘッダーの上部に配置され、.sticky_sentinel--bottom はセクションの下部に配置されます。
:root {
  --default-padding: 16px;
  --header-height: 80px;
}
.sticky {
  position: sticky;
  top: 10px; /* adjust sentinel height/positioning based on this position. */
  height: var(--header-height);
  padding: 0 var(--default-padding);
}
.sticky_sentinel {
  position: absolute;
  left: 0;
  right: 0; /* needs dimensions */
  visibility: hidden;
}
.sticky_sentinel--top {
  /* Adjust the height and top values based on your on your sticky top position.
  e.g. make the height bigger and adjust the top so observeHeaders()'s
  IntersectionObserver fires as soon as the bottom of the sentinel crosses the
  top of the intersection container. */
  height: 40px;
  top: -24px;
}
.sticky_sentinel--bottom {
  /* Height should match the top of the header when it's at the bottom of the
  intersection container. */
  height: calc(var(--header-height) + var(--default-padding));
  bottom: 0;
}
Intersection Observer を設定する
インターセクション オブザーバーは、ターゲット要素とドキュメント ビューポートまたは親コンテナの交差点の変化を非同期で監視します。この例では、親コンテナとの交差を監視します。
魔法のソースは IntersectionObserver です。各センチネルは IntersectionObserver を取得して、スクロール コンテナ内のインターセクションの可視性を監視します。センチネルが可視ビューポートにスクロールすると、ヘッダーが固定されたか、固定されなくなったことがわかります。同様に、センチネルがビューポートから外れた場合も同様です。
まず、ヘッダーとフッターのセンチネルのオブザーバーを設定します。
/**
 * Notifies when elements w/ the `sticky` class begin to stick or stop sticking.
 * Note: the elements should be children of `container`.
 * @param {!Element} container
 */
function observeStickyHeaderChanges(container) {
  observeHeaders(container);
  observeFooters(container);
}

observeStickyHeaderChanges(document.querySelector('#scroll-container'));
次に、.sticky_sentinel--top 要素がスクロール コンテナの上部を通過したときに(どちらの方向でも)発動するようにオブザーバーを追加しました。observeHeaders 関数は、上位のセンチネルを作成し、各セクションに追加します。オブザーバーは、センチネルとコンテナの上端の交差点を計算し、ビューポート内に入るか外れるかを判断します。この情報により、セクション ヘッダーが固定されているかどうかが決まります。
/**
 * Sets up an intersection observer to notify when elements with the class
 * `.sticky_sentinel--top` become visible/invisible at the top of the container.
 * @param {!Element} container
 */
function observeHeaders(container) {
  const observer = new IntersectionObserver((records, observer) => {
    for (const record of records) {
      const targetInfo = record.boundingClientRect;
      const stickyTarget = record.target.parentElement.querySelector('.sticky');
      const rootBoundsInfo = record.rootBounds;

      // Started sticking.
      if (targetInfo.bottom < rootBoundsInfo.top) {
        fireEvent(true, stickyTarget);
      }

      // Stopped sticking.
      if (targetInfo.bottom >= rootBoundsInfo.top &&
          targetInfo.bottom < rootBoundsInfo.bottom) {
       fireEvent(false, stickyTarget);
      }
    }
  }, {threshold: [0], root: container});

  // Add the top sentinels to each section and attach an observer.
  const sentinels = addSentinels(container, 'sticky_sentinel--top');
  sentinels.forEach(el => observer.observe(el));
}
オブザーバーは threshold: [0] で構成されているため、センチネルが表示されるとすぐにコールバックがトリガーされます。
下部センサー(.sticky_sentinel--bottom)の場合もプロセスは同様です。フッターがスクロール コンテナの下部を通過したときに発動するように、2 つ目のオブザーバーが作成されます。observeFooters 関数は、センチネル ノードを作成して各セクションに接続します。オブザーバーは、センチネルとコンテナの底との交差点を計算し、コンテナに進入または退出するかどうかを判断します。この情報に基づいて、セクション ヘッダーが固定されるかどうかが決まります。
/**
 * Sets up an intersection observer to notify when elements with the class
 * `.sticky_sentinel--bottom` become visible/invisible at the bottom of the
 * container.
 * @param {!Element} container
 */
function observeFooters(container) {
  const observer = new IntersectionObserver((records, observer) => {
    for (const record of records) {
      const targetInfo = record.boundingClientRect;
      const stickyTarget = record.target.parentElement.querySelector('.sticky');
      const rootBoundsInfo = record.rootBounds;
      const ratio = record.intersectionRatio;

      // Started sticking.
      if (targetInfo.bottom > rootBoundsInfo.top && ratio === 1) {
        fireEvent(true, stickyTarget);
      }

      // Stopped sticking.
      if (targetInfo.top < rootBoundsInfo.top &&
          targetInfo.bottom < rootBoundsInfo.bottom) {
        fireEvent(false, stickyTarget);
      }
    }
  }, {threshold: [1], root: container});

  // Add the bottom sentinels to each section and attach an observer.
  const sentinels = addSentinels(container, 'sticky_sentinel--bottom');
  sentinels.forEach(el => observer.observe(el));
}
オブザーバーは threshold: [1] で構成されているため、ノード全体がビュー内にあるときにコールバックがトリガーされます。
最後に、sticky-change カスタム イベントをトリガーしてセンチネルを生成する 2 つのユーティリティがあります。
/**
 * @param {!Element} container
 * @param {string} className
 */
function addSentinels(container, className) {
  return Array.from(container.querySelectorAll('.sticky')).map(el => {
    const sentinel = document.createElement('div');
    sentinel.classList.add('sticky_sentinel', className);
    return el.parentElement.appendChild(sentinel);
  });
}

/**
 * Dispatches the `sticky-event` custom event on the target element.
 * @param {boolean} stuck True if `target` is sticky.
 * @param {!Element} target Element to fire the event on.
 */
function fireEvent(stuck, target) {
  const e = new CustomEvent('sticky-change', {detail: {stuck, target}});
  document.dispatchEvent(e);
}
これで作業は完了です。
最終デモ
position:sticky を持つ要素が固定されたときのカスタム イベントを作成し、scroll イベントを使用せずにスクロール エフェクトを追加しました。
まとめ
長年にわたって開発されてきた scroll イベントベースの UI パターンの一部を置き換えるために、IntersectionObserver が有用なツールになるかどうか、私はよく考えていました。答えは「はい」と「いいえ」です。IntersectionObserver API のセマンティクスにより、すべての用途に使用するのは困難です。ただし、ここで説明したように、興味深いテクニックに使用できます。
スタイルの変更を検出する別の方法はありますか?
そうでもありません。必要なのは、DOM 要素のスタイル変更をモニタリングする方法でした。残念ながら、スタイルの変更を監視できるウェブ プラットフォーム API はありません。
MutationObserver が最初の選択肢として考えられますが、ほとんどの場合、これは機能しません。たとえば、デモでは、sticky クラスが要素に追加されたときにコールバックが受信されますが、要素の計算スタイルが変更されたときにはコールバックは受信されません。sticky クラスはページの読み込み時にすでに宣言されていることを思い出してください。
今後、要素の計算スタイルの変更を監視するために、Mutation Observer の「Style Mutation Observer」拡張機能が役立つ可能性があります。position: sticky