

คำแนะนำนี้จะอธิบายวิธีเพิ่มการโต้ตอบที่กําหนดเองลงในแท็บที่กำหนดเอง
เปิดใช้การดําเนินการแชร์เริ่มต้น
หากคุณไม่ได้ระบุการดำเนินการแชร์ที่กำหนดเอง คุณควรเปิดใช้การดำเนินการแชร์เริ่มต้นของเบราว์เซอร์ในเมนูรายการเพิ่มเติมเพื่อให้ผู้ใช้แชร์ลิงก์ไปยังเนื้อหาที่กําลังดูได้ง่ายขึ้น โดยทําดังนี้
    CustomTabsIntent.Builder intentBuilder = new CustomTabsIntent.Builder();
    intentBuilder.setShareState(CustomTabsIntent.SHARE_STATE_ON);
เพิ่มปุ่มการดำเนินการที่กำหนดเอง
สำหรับการดำเนินการที่สำคัญ แถบเครื่องมือแท็บที่กำหนดเองจะช่วยให้คุณผสานรวมปุ่มการดำเนินการที่กำหนดเองได้ ซึ่งอาจมีป้ายกำกับข้อความหรือไอคอนที่กำหนดเอง ไอคอนควรมีความสูง 24 dp และความกว้าง 24-48 dp
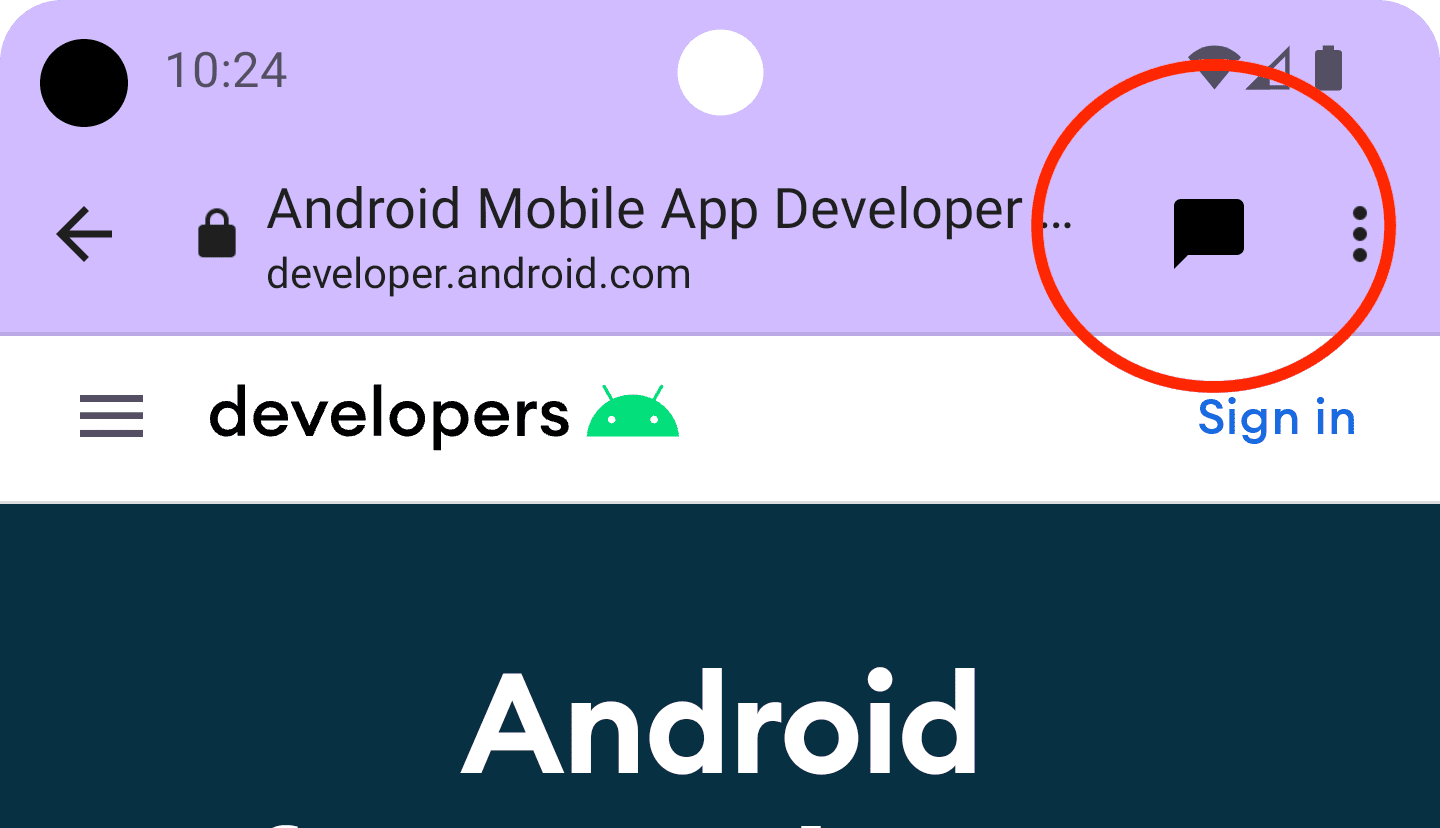
เช่น คุณสามารถเพิ่มการดําเนินการแชร์ที่กําหนดเองลงในแถบเครื่องมือ โดยสร้าง BroadcastReceiver ซึ่งจะเรียกใช้เมื่อผู้ใช้คลิกการดําเนินการแชร์ในแท็บที่กำหนดเอง
ลงทะเบียน BroadCastReceiver ในไฟล์ AndroidManifest.xml โดยทำดังนี้
<application …>
  <receiver android:name=".ShareBroadcastReceiver" />
</application>
จากนั้นเพิ่มคลาสใหม่ ShareBroadcastReceiver ในเมธอด onReceive() ให้ดึง URL ที่แสดงอยู่ในปัจจุบันออกจาก Intent และทริกเกอร์ Intent ส่ง
public class ShareBroadcastReceiver extends BroadcastReceiver {

    @Override
    public void onReceive(Context context, Intent intent) {
        String url = intent.getDataString();
        Intent sendIntent = new Intent();
        sendIntent.setAction(Intent.ACTION_SEND);
        sendIntent.putExtra(Intent.EXTRA_TEXT, url);
        sendIntent.setType("text/plain");
        Intent shareIntent = Intent.createChooser(sendIntent, null);
        shareIntent.setFlags(Intent.FLAG_ACTIVITY_NEW_TASK);
        context.startActivity(shareIntent);
    }
}
ตอนนี้ให้สร้าง PendingIntent สำหรับ ShareBroadcast และลงทะเบียนผ่าน setActionButton() ส่ง Intent ที่รอดำเนินการพร้อมกับไอคอนและคําอธิบาย
String shareDescription = getString(R.string.label_action_share);
Bitmap shareIcon = BitmapFactory.decodeResource(getResources(),
       android.R.drawable.ic_menu_share);

// Create a PendingIntent to your BroadCastReceiver implementation
Intent actionIntent = new Intent(
       this.getApplicationContext(), ShareBroadcastReceiver.class);
PendingIntent pendingIntent =
       PendingIntent.getBroadcast(getApplicationContext(), 0 /* request code */, actionIntent, PendingIntent.FLAG_MUTABLE);

//Set the pendingIntent as the action to be performed when the button is clicked.
CustomTabsIntent intentBuilder = new CustomTabsIntent.Builder()
    …
    .setActionButton(shareIcon, shareDescription, pendingIntent)
    .build();
เพิ่มรายการในเมนูที่กำหนดเอง
แท็บที่กำหนดเองมีการดําเนินการเริ่มต้นจากเบราว์เซอร์ถึง 5 รายการ ได้แก่ "ส่งต่อ" "ข้อมูลหน้าเว็บ" "รีเฟรช" "ค้นหาในหน้า" และ "เปิดในเบราว์เซอร์" นอกจากนี้ คุณยังเพิ่มได้สูงสุดอีก 7 รายการ ระบบจะแทรกรายการเมนูเหล่านี้ไว้ระหว่างแถวไอคอนกับรายการที่เบราว์เซอร์ระบุ (ดูรูปภาพด้านล่าง) จํานวนจริงขึ้นอยู่กับการใช้งานเบราว์เซอร์พื้นฐาน (เช่น ในเวอร์ชัน 117 Chrome ได้เพิ่มจำนวนรายการเมนูจาก 5 เป็น 7 รายการ) ดังนั้น คุณควรเพิ่มรายการที่สำคัญที่สุดก่อน
คุณเข้าถึงการดำเนินการที่กำหนดเองได้ผ่านเมนู 3 จุดที่มุมขวาบน โดยทำดังนี้
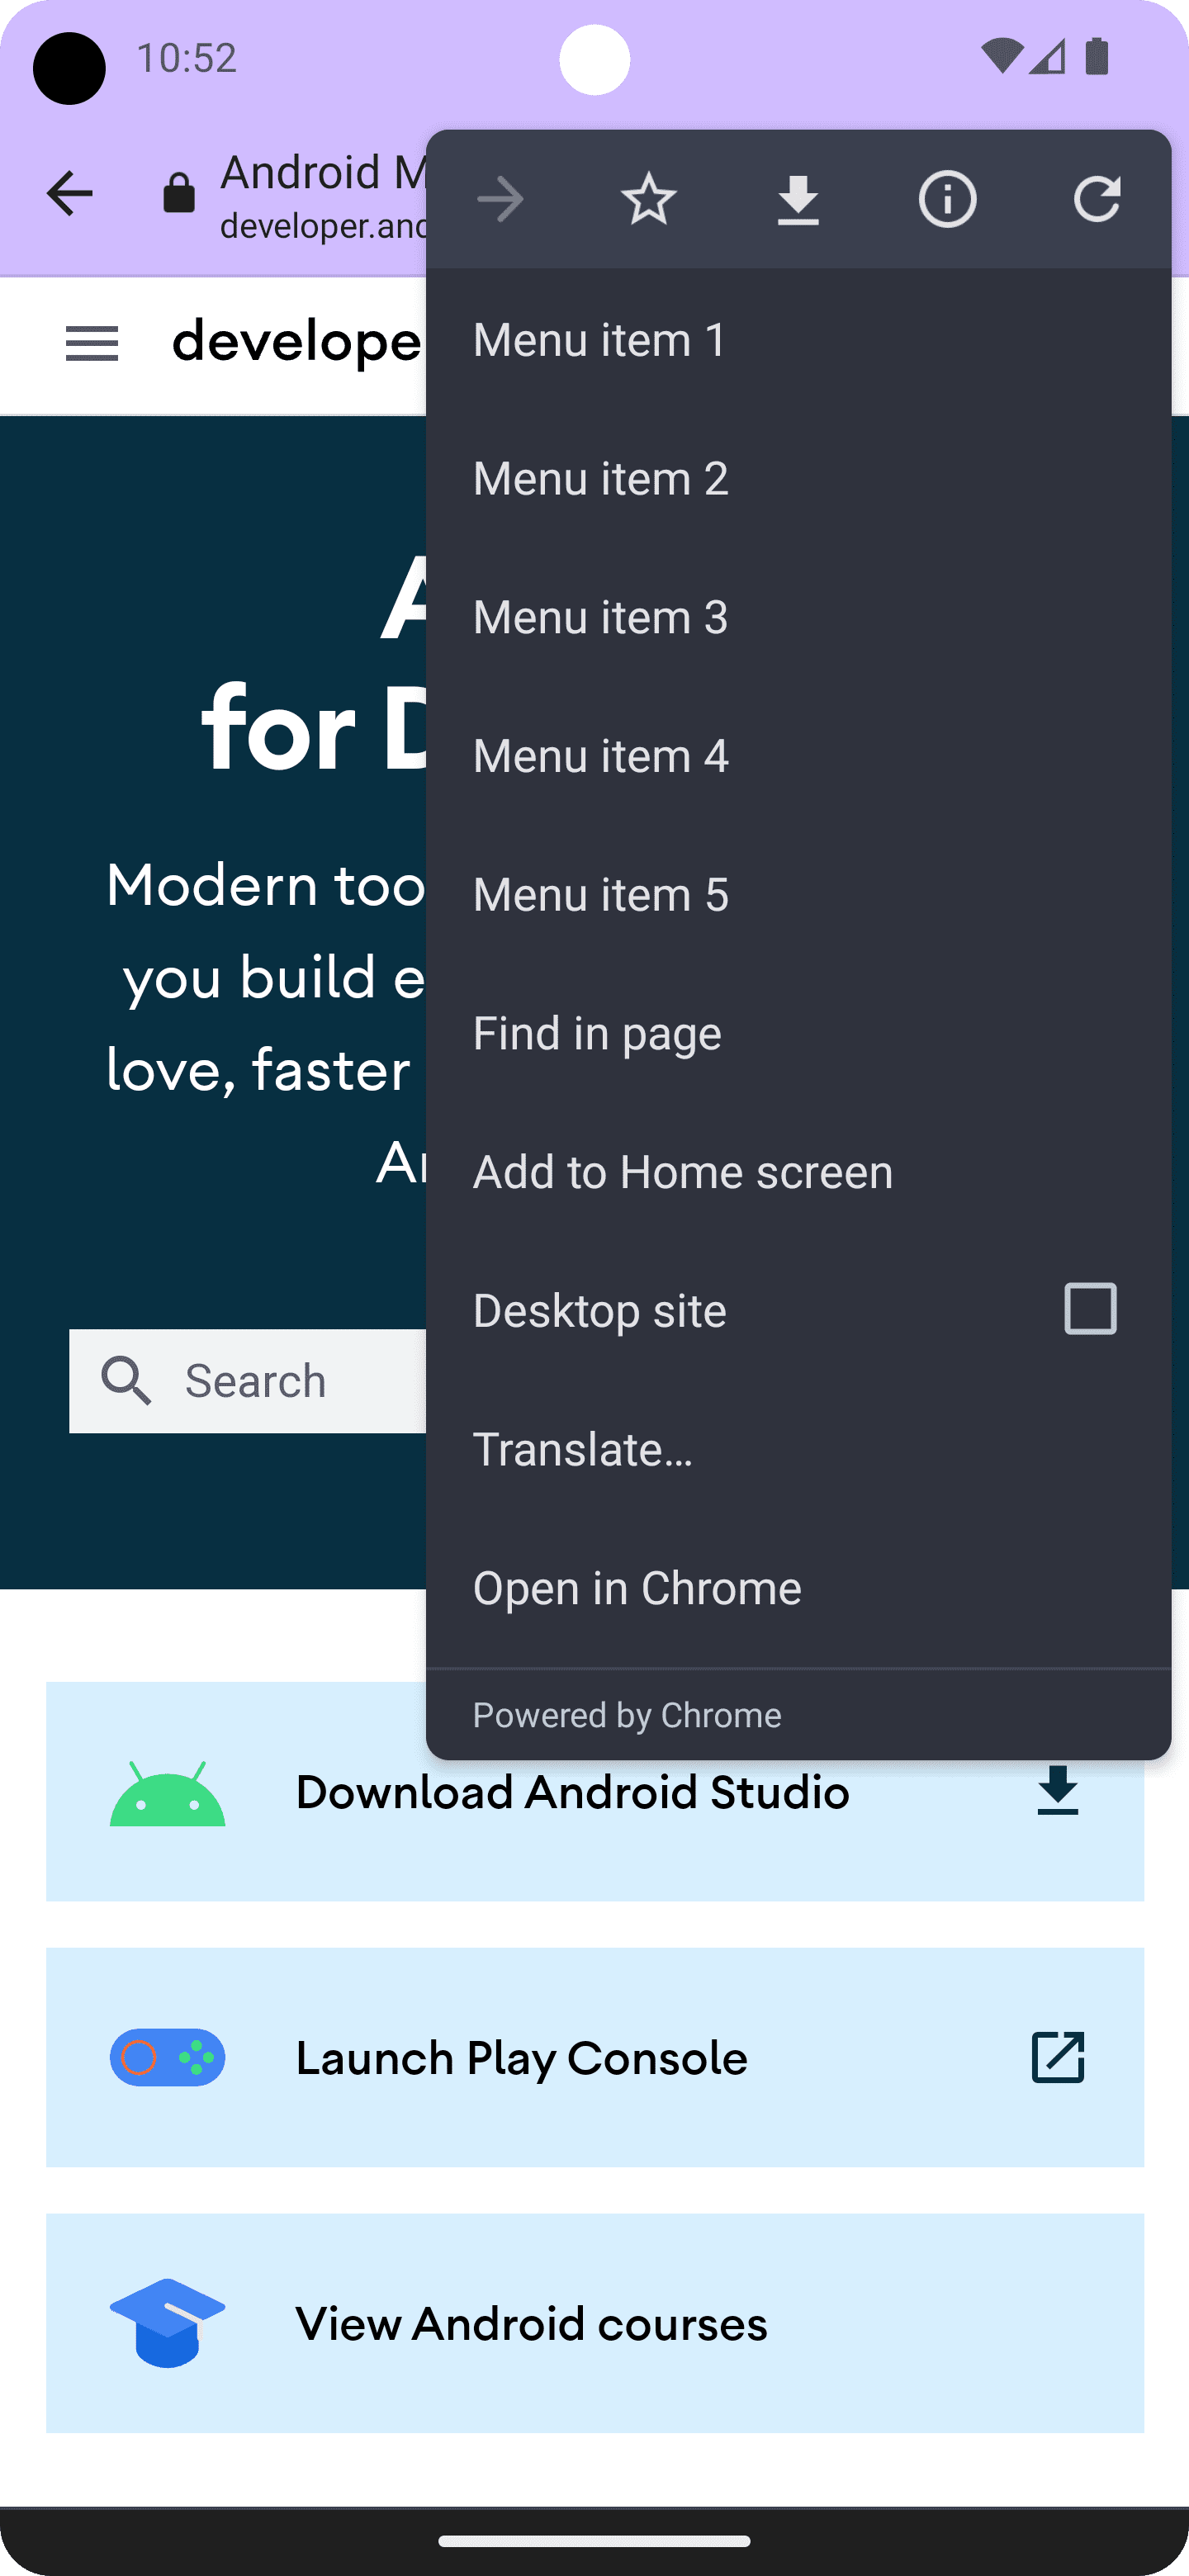
หากต้องการเพิ่มรายการในเมนู ให้เรียกใช้ CustomTabsIntent.Builder.addMenuItem() พร้อมชื่อและ PendingIntent เมื่อผู้ใช้แตะรายการเมนู เบราว์เซอร์จะเรียกใช้ PendingIntent
CustomTabsIntent intent = new CustomTabsIntent.Builder()
        ...
        .addMenuItem("Menu item 1", pendingIntent)
        .addMenuItem("Menu item 2", pendingIntent)
        .addMenuItem("Menu item 3", pendingIntent)
        .addMenuItem("Menu item 4", pendingIntent)
        .addMenuItem("Menu item 5", pendingIntent)
        .build();
ปรับแต่งปุ่มปิด
ปรับแต่งปุ่มปิดเพื่อให้ Custom Tab เข้ากับขั้นตอนของแอปได้ดียิ่งขึ้น หากต้องการให้ผู้ใช้รู้สึกว่าแท็บที่กำหนดเองเป็นกล่องโต้ตอบแบบโมดัล ให้ใช้ปุ่ม “X” เริ่มต้น หากต้องการให้ผู้ใช้รู้สึกว่าแท็บที่กำหนดเองเป็นส่วนหนึ่งของขั้นตอนการสมัคร ให้ใช้ลูกศรย้อนกลับ
CustomTabsIntent.Builder intentBuilder = new CustomTabsIntent.Builder();
intentBuilder.setCloseButtonIcon(BitmapFactory.decodeResource(
    getResources(), R.drawable.ic_arrow_back));
เพิ่มแถบเครื่องมือด้านล่าง
แถบเครื่องมือด้านล่างเป็นวิธีที่ยืดหยุ่นมากในการเพิ่มฟังก์ชันการทำงานอื่นๆ ลงในแท็บที่กำหนดเอง
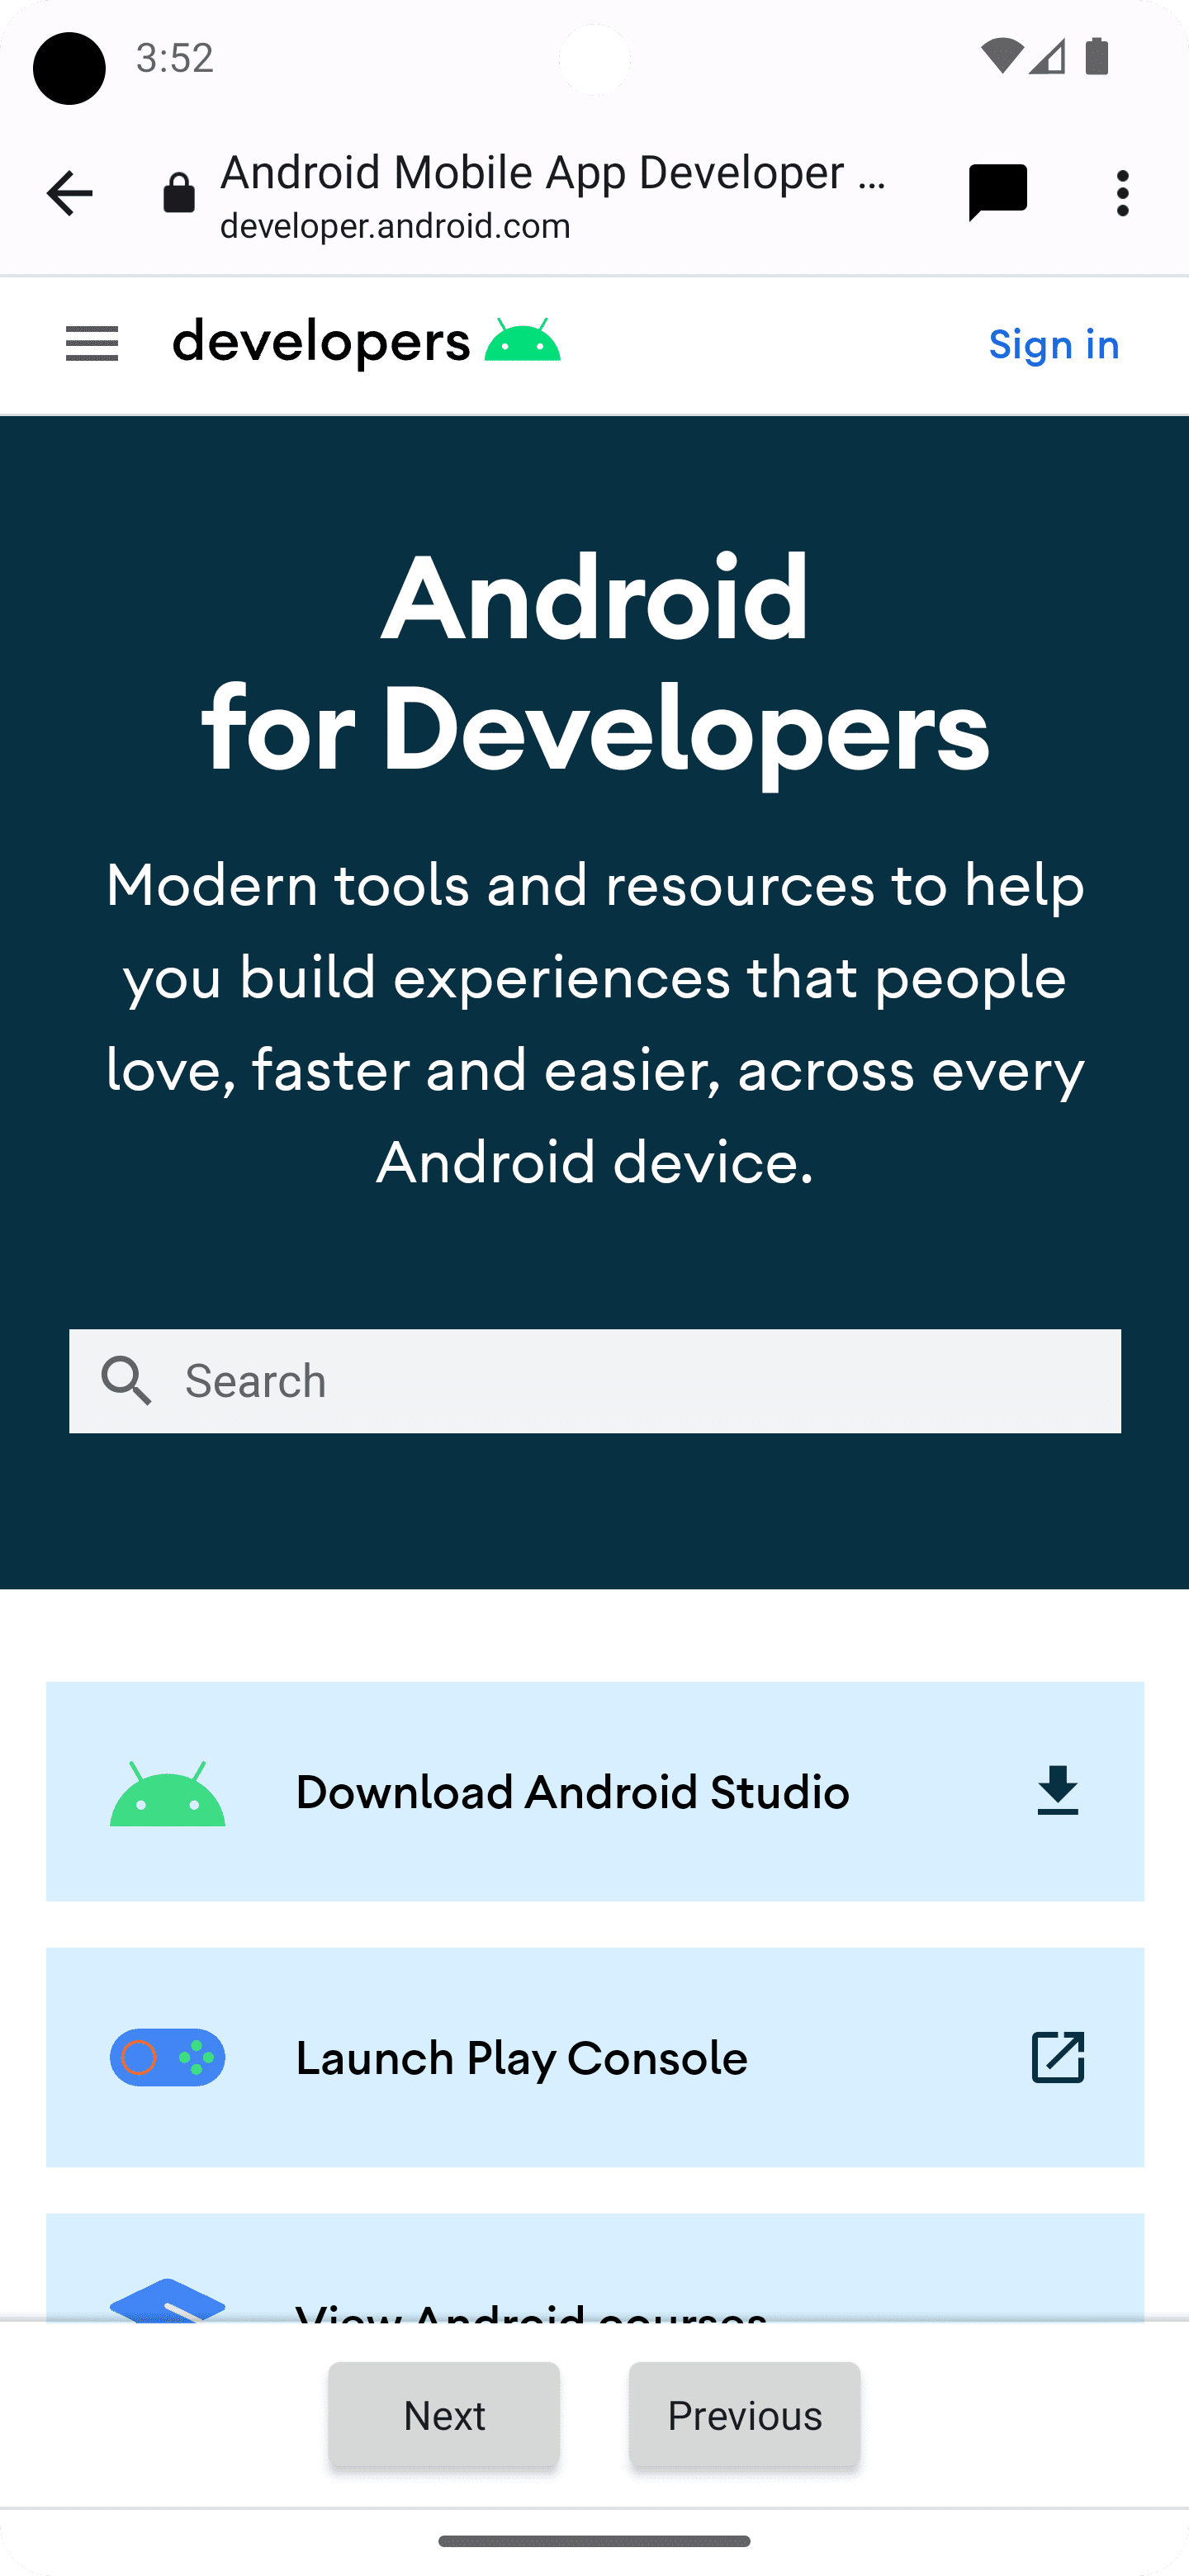
การส่งออบเจ็กต์ RemoteViews ไปยัง CustomTabIntent.Builder.setSecondaryToolbarViews() จะทำให้ปรับแต่งแถบเครื่องมือด้านล่างและอัปเดตแบบไดนามิกได้อย่างเต็มที่
ก่อนอื่น ให้ประกาศเลย์เอาต์แถบเครื่องมือโดยสร้างไฟล์เลย์เอาต์ใหม่ res/layout/custom_tab_toolbar.xml โดยทำดังนี้
<LinearLayout xmlns:android="http://schemas.android.com/apk/res/android"
    android:layout_width="match_parent"
    android:layout_height="wrap_content"
    android:orientation="horizontal"
    android:gravity="center">

    <Button xmlns:android="http://schemas.android.com/apk/res/android"
        android:id="@+id/ct_toolbar_next"
        android:layout_width="wrap_content"
        android:layout_height="48dp"
        android:layout_margin="8dp"
        android:padding="8dp"
        android:paddingStart="16dp"
        android:paddingEnd="16dp"
        android:text="Next" />

    <Button xmlns:android="http://schemas.android.com/apk/res/android"
        android:id="@+id/ct_toolbar_previous"
        android:layout_width="wrap_content"
        android:layout_height="48dp"
        android:layout_margin="8dp"
        android:padding="8dp"
        android:text="Previous" />
</LinearLayout>
ขั้นตอนถัดไปคือการลงทะเบียน BroadcastReceiver ซึ่งจัดการการโต้ตอบกับแถบเครื่องมือในไฟล์ AndroidManifest.xml โดยทำดังนี้
<application …>
  <receiver android:name=".CustomTabBottomToolbarBroadcastReceiver" />
</application>
จากนั้นใช้ BroadcastReceiver ซึ่งจะจัดการการโต้ตอบทั้งหมดกับแถบเครื่องมือด้านล่าง
public class BottomToolbarBroadcastReceiver extends BroadcastReceiver {

    @Override
    public void onReceive(Context context, Intent intent) {
        String url = intent.getDataString();
        int remoteViewId = intent.getIntExtra(EXTRA_REMOTEVIEWS_CLICKED_ID, -1);
        if (remoteViewId == R.id.ct_toolbar_previous) {
          // handle previous
        } else if (remoteViewId == R.id.ct_toolbar_next) {
          // handle next
        }
    }
}
สุดท้าย ให้ลงทะเบียนแถบเครื่องมือโดยทำดังนี้
// Create the pending intent
Intent actionIntent = new Intent(
       this.getApplicationContext(), BottomToolbarBroadcastReceiver.class);

PendingIntent pendingIntent =
       PendingIntent.getBroadcast(getApplicationContext(), 0 /* request code */, actionIntent, PendingIntent.FLAG_MUTABLE);

// Pass the toolbar layout to the RemoteViews instance
RemoteViews secondaryToolbarViews = new RemoteViews(getPackageName(), R.layout.custom_tab_toolbar);
// All toolbar buttons
int[] clickableIds = {R.id.ct_toolbar_next, R.id.ct_toolbar_previous};

// Register the bottom toolbar when creating a new custom tab intent
CustomTabsIntent intent = new CustomTabsIntent.Builder()
    .setSecondaryToolbarViews(secondaryToolbarViews, clickableIds, toolbarPendingIntent)
    .build();
บุ๊กมาร์กและปุ่มดาวน์โหลด
ปุ่มบุ๊กมาร์กและดาวน์โหลดในเมนู 3 จุดจะเปิดใช้โดยค่าเริ่มต้น หากต้องการปิดใช้ ให้ใช้โค้ดต่อไปนี้ใน CustomTabsIntent.Builder
CustomTabsIntent customTabsIntent = new CustomTabsIntent.Builder()
    .setBookmarksButtonEnabled(false)
    .setDownloadButtonEnabled(false)
    .build();
หัวข้อถัดไป: ดูวิธีเพิ่มความเร็วในการโหลดเนื้อหาเว็บในแท็บที่กำหนดเอง