發布日期:2024 年 5 月 10 日
CSS 錨點定位 API 是網頁開發的一大突破,因為這個 API 可讓您以原生方式,將元素定位在其他元素 (又稱錨點) 的相對位置。這個 API 可簡化許多介面功能 (例如選單和子選單、工具提示、選取器、標籤、資訊卡、設定對話方塊等) 的複雜版面配置需求。有了瀏覽器內建的錨點定位功能,您就能建構分層使用者介面,不必依賴第三方程式庫,開創無限創意可能。
錨定位置功能自 Chrome 125 版起開放使用。
核心概念:錨點和定位元素
這項 API 的核心是錨點和定位元素之間的關係。錨點是使用 anchor-name 屬性指定為參考點的元素。定位元素是指使用 position-anchor 屬性相對於錨點放置的元素,或是在定位邏輯中明確使用 anchor-name 的元素。

設定錨點
建立錨點的過程很簡單。將 anchor-name 屬性套用至所選元素,並指派專屬 ID。這個專屬 ID 必須加上雙破折號前置字元,就像 CSS 變數一樣。
.anchor-button {
    anchor-name: --anchor-el;
}
指派錨點名稱後,.anchor-button 會做為錨點,引導其他元素放置位置。您可以透過下列兩種方式,將這個錨點連結至其他元素:
隱含錨點
如要將錨點連結至其他元素,第一種方法是使用隱含錨點,如下列程式碼範例所示。position-anchor 屬性會新增至要連結至錨點的元素,並以錨點名稱 (本例中為 --anchor-el) 做為值。
.positioned-notice {
    position-anchor: --anchor-el;
}
使用隱含錨點關係時,您可以使用 anchor() 函式放置元素,而不必在第一個引數中明確指定錨點名稱。
.positioned-notice {
    position-anchor: --anchor-el;
    top: anchor(bottom);
}
明確錨點
或者,您也可以直接在錨點函式中使用錨點名稱 (例如 top: anchor(--anchor-el bottom)。這稱為「明確錨點」,如果您想錨定多個元素,這會很方便 (請繼續閱讀範例)。
.positioned-notice {
    top: anchor(--anchor-el bottom);
}
將元素定位在錨點的相對位置

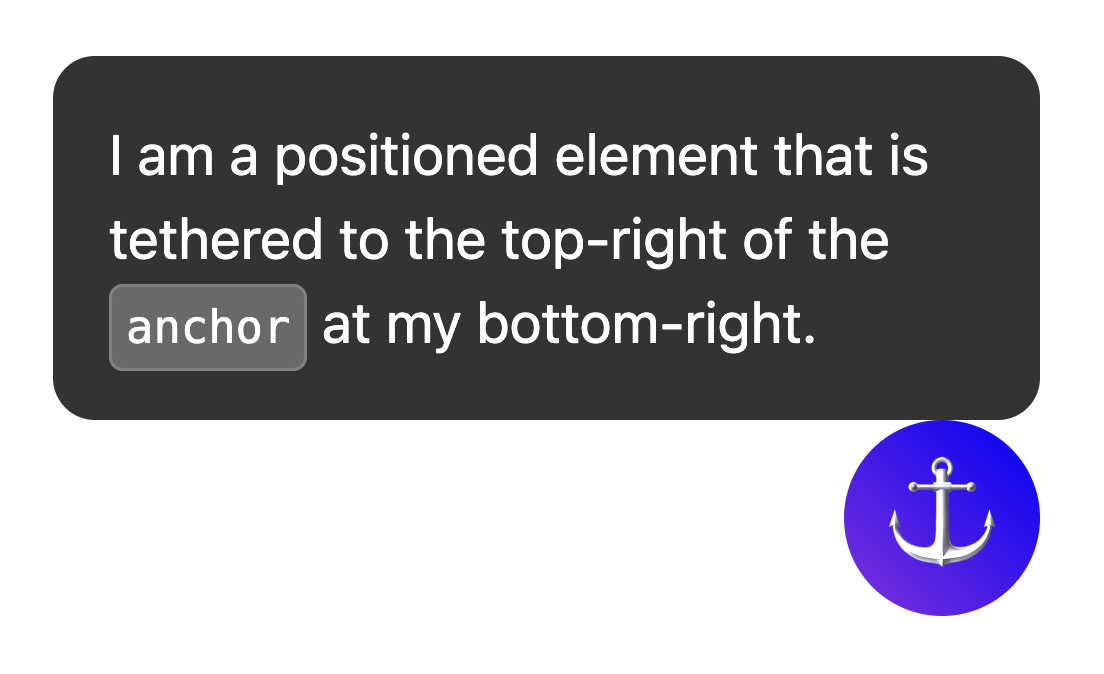
錨點定位功能是以 CSS 絕對定位為基礎建構而成。如要使用定位值,您需要在已定位的元素中新增 position: absolute。然後使用 anchor() 函式套用定位值。舉例來說,如要將錨定元素放在錨定元素的左上角,請使用下列定位方式:
.positioned-notice {
    position-anchor: --anchor-el;
    /* absolutely position the positioned element */
    position: absolute;
    /* position the right of the positioned element at the right edge of the anchor */
    right: anchor(right);
    /* position the bottom of the positioned element at the top edge of the anchor */
    bottom: anchor(top);
}

現在您已將一個元素錨定至另一個元素,如下圖所示。

如要對這些值使用邏輯定位,對應值如下:
top=inset-block-startleft=inset-inline-startbottom=inset-block-endright=inset-inline-end
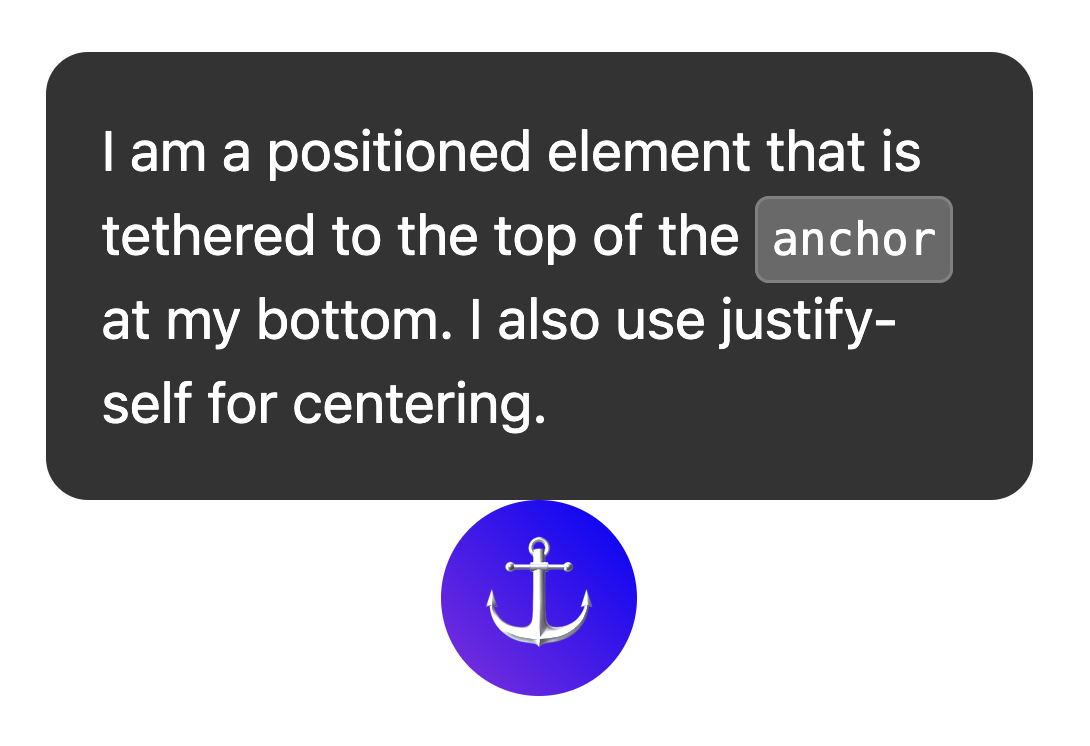
使用 anchor-center 將已定位的元素置中
為方便將錨定位置元素置中於錨點,我們新增了名為 anchor-center 的值,可用於 justify-self、align-self、justify-items 和 align-items 屬性。
這個範例會修改先前的範例,使用 justify-self: anchor-center 將定位元素置於錨點上方中央。
.positioned-notice {
  position: absolute;
  /*  Anchor reference  */
  position-anchor: --anchor-el;
  /*  Position bottom of positioned elem at top of anchor  */
  bottom: anchor(top);
  /*  Center justification to the anchor */
  justify-self: anchor-center;
}

多個錨點
元素可繫結至多個錨點。也就是說,您可能需要設定相對於多個錨點的位置值。如要這麼做,請使用 anchor() 函式,並在第一個引數中明確指出要參照的錨點。在下列範例中,定位元素的左上角會錨定至其中一個錨點的右下角,而定位元素的右下角會錨定至第二個錨點的左上角:
.anchored {
  position: absolute;
  top: anchor(--one bottom);
  left: anchor(--one right);
  right: anchor(--two left);
  bottom: anchor(--two top);
}

使用 inset-area 調整位置
除了絕對定位的預設方向定位外,錨定 API 還包含名為插邊區域的新版面配置機制。
內插區域可讓您輕鬆放置相對於各自錨點的錨點定位元素,並在 9 格格線中運作,錨點元素位於中心。
9 格格線顯示各種可能的插邊區域定位選項
如要使用插入區域而非絕對定位,請使用 inset-area 屬性,並搭配實體或邏輯值。例如:
- 頂端中央:
inset-area: top或inset-area: block-start - 左中:
inset-area: left或inset-area: inline-start - 正下方:
inset-area: bottom或inset-area: block-end - 右中:
inset-area: right或inset-area: inline-end

使用 anchor-size() 調整元素大小
anchor-size() 函式也是錨點定位 API 的一部分,可用於根據錨點的大小 (寬度、高度或內嵌和區塊大小),調整錨點定位元素的大小或位置。
以下 CSS 範例說明如何將這項功能用於高度,在 calc() 函式中使用 anchor-size(height),將工具提示的高度上限設為錨點高度的兩倍。
.positioned-notice {
  position-anchor: --question-mark;

  /*  set max height of the tooltip to 2x height of the anchor  */
  max-height: calc(anchor-size(height) * 2);
}

使用錨點搭配頂層元素,例如快顯視窗和對話方塊
錨點定位功能與頂層元素 (例如 popover) 搭配使用時,效果極佳。和 <dialog>。雖然這些元素會放置在與其餘 DOM 子樹狀結構不同的圖層中,但錨點定位功能可讓您將這些元素繫結回不在頂層的元素,並與這些元素一起捲動。這對分層介面來說是一大進展。
在下列範例中,系統會使用按鈕觸發開啟一組工具提示快訊。按鈕是錨點,工具提示則是定位元素。您可以像設定其他錨定元素一樣,設定定位元素的樣式。在這個特定範例中,anchor-name 和 position-anchor 是按鈕和工具提示的內嵌樣式。由於每個錨點都需要專屬錨點名稱,因此產生動態內容時,內嵌是達成這項要求的簡單方法。

使用 @position-try 調整錨點位置
取得初始錨點位置後,如果錨點到達所含區塊的邊緣,您可能需要調整位置。如要建立替代錨點位置,可以使用 @position-try 指示和 position-try-options 屬性。
在下列範例中,選單右側會顯示子選單。選單和子選單很適合搭配使用錨點定位 API 和 popover 屬性,因為這些選單通常會錨定至觸發按鈕。
如果水平空間不足,這個子選單可以改為顯示在選單下方。如要這麼做,請先設定初始位置:
#submenu {
  position: absolute;
  position-anchor: --submenu;

  /* initial position */
  margin-left: var(--padding);
  inset-area: right span-bottom;
}
接著,使用 @position-try 設定備用錨定位置:
/* alternate position */
@position-try --bottom {
  margin: var(--padding) 0 0 var(--padding);
  inset-area: bottom;
}
最後,使用 position-try-options 連接兩者。總而言之,看起來會像這樣:
#submenu {
  position: absolute;
  position-anchor: --submenu;
  /* initial position */
  margin-left: var(--padding);
  inset-area: right span-bottom;
  */ connect with position-try options */
  position-try-options: --bottom;
}

/* alternate position */
@position-try --bottom {
  margin: var(--padding) 0 0 var(--padding);
  inset-area: bottom;
}
錨點位置自動翻轉關鍵字
如果您要進行基本調整,例如從上到下或從左到右翻轉 (或兩者皆是),甚至可以略過建立自訂 @position-try 宣告的步驟,並使用瀏覽器支援的內建翻轉關鍵字,例如 flip-block 和 flip-inline。這些函式可做為自訂 @position-try 宣告的替代項目,且可搭配使用:
position-try-options: flip-block, flip-inline, flip-block flip-inline;
翻轉關鍵字可大幅簡化錨點程式碼。只要幾行程式碼,就能建立具有替代位置的完整錨點:
#my-tooltip {
  position-anchor: --question-mark;
  inset-area: top;
  position-try-options: flip-block;
}
position-visibility,適用於子捲軸中的錨點
在某些情況下,您可能需要在網頁的子捲軸內錨定元素。在這些情況下,您可以使用 position-visibility 控制錨點的顯示設定。錨點何時會保持在視野內?何時會消失?您可以透過這項功能控管這些選項。當您希望定位元素保持在檢視區塊中,直到錨點超出檢視區塊時,請使用 position-visibility: anchors-visible:
#tooltip {
  position: fixed;
  position-anchor: --anchor-top-anchor;
  position-visibility: anchors-visible;
  bottom: anchor(top);
}
或者,您也可以使用 position-visibility: no-overflow,防止錨點溢出容器。
#tooltip {
  position: absolute;
  position-anchor: --anchor-top-anchor;
  position-visibility: no-overflow;
  bottom: anchor(top);
}
特徵偵測和 Polyfill
由於目前瀏覽器支援有限,您可能需要採取一些預防措施,才能使用這項 API。首先,您可以使用 @supports 功能查詢,直接在 CSS 中檢查支援情形。如要這樣做,請將錨點樣式包裝在下列項目中:
@supports (anchor-name: --myanchor) {

  /* Anchor styles here */

}
此外,您可以使用 Oddbird 的 CSS 錨點定位 Polyfill,填補錨點定位功能,適用於 Firefox 54、Chrome 51、Edge 79 和 Safari 10。這個 Polyfill 支援大多數基本錨點位置功能,但目前的實作方式並不完整,且包含一些過時的語法。您可以使用 unpkg 連結,或直接在套件管理員中匯入。
無障礙功能注意事項
雖然錨點定位 API 可讓元素相對於其他元素定位,但不會在兩者之間建立任何有意義的語意關係。如果錨定元素和定位元素之間確實存在語意關係 (例如定位元素是錨定文字的側欄註解),其中一種做法是使用 aria-details 從錨定元素指向定位元素。螢幕閱讀器軟體仍在學習如何處理 aria-details,但支援功能已有所提升。
<div class="anchor" aria-details="sidebar-comment">Main content</div>
<div class="positioned" id="sidebar-comment">Sidebar content</div>
.anchor {
  anchor-name: --anchor;
}

.positioned {
  position: fixed;
  position-anchor: --anchor;
}
如果您使用 popover 屬性或 <dialog> 元素進行錨點定位,瀏覽器會處理焦點導覽修正,確保無障礙功能正常運作,因此您不必依 DOM 順序排列快顯視窗或對話方塊。如要進一步瞭解無障礙功能,請參閱規格中的附註。
結論
這項功能是全新推出,我們很期待看到您使用這項功能打造的成果。目前為止,我們已看到社群提供的一些實用案例,例如圖表中的動態標籤、連接線、註腳和視覺化交叉參照。在您實驗錨點位置時,歡迎提供意見回饋,如果發現任何錯誤,請告訴我們。

