

对于 Web 开发者,WebGPU 是一种 Web 图形 API,能够以统一且快速的 对 GPU 的访问权限。WebGPU 展示了现代硬件功能, 和计算操作,与 Direct3D 12、Metal 和 Vulkan 类似。
虽然是真的,但这个故事并不完整。WebGPU 是 其中包括 Apple、Google、Intel、Mozilla 和 Microsoft。其中有些人意识到了 WebGPU 不只是一个 JavaScript API,而是跨平台的图形资源 适用于整个生态系统的开发者的 API,Web 平台除外。
为实现主要用例, 在 Chrome 113 中引入。然而,另一个重要的 一个项目一起进行: webgpu.h C API。此 C 头文件列出了所有可用的过程和数据结构 。它可作为一个与平台无关的硬件抽象层, 通过提供一致的界面,构建特定于平台的应用 不同平台上的视频广告
在本文档中,您将学习如何使用 WebGPU 编写可在 Web 和特定平台上运行的小型 C++ 应用。剧透提醒:浏览器窗口和桌面窗口都会出现相同的红色三角形,但对代码库进行了细微的调整。
<ph type="x-smartling-placeholder">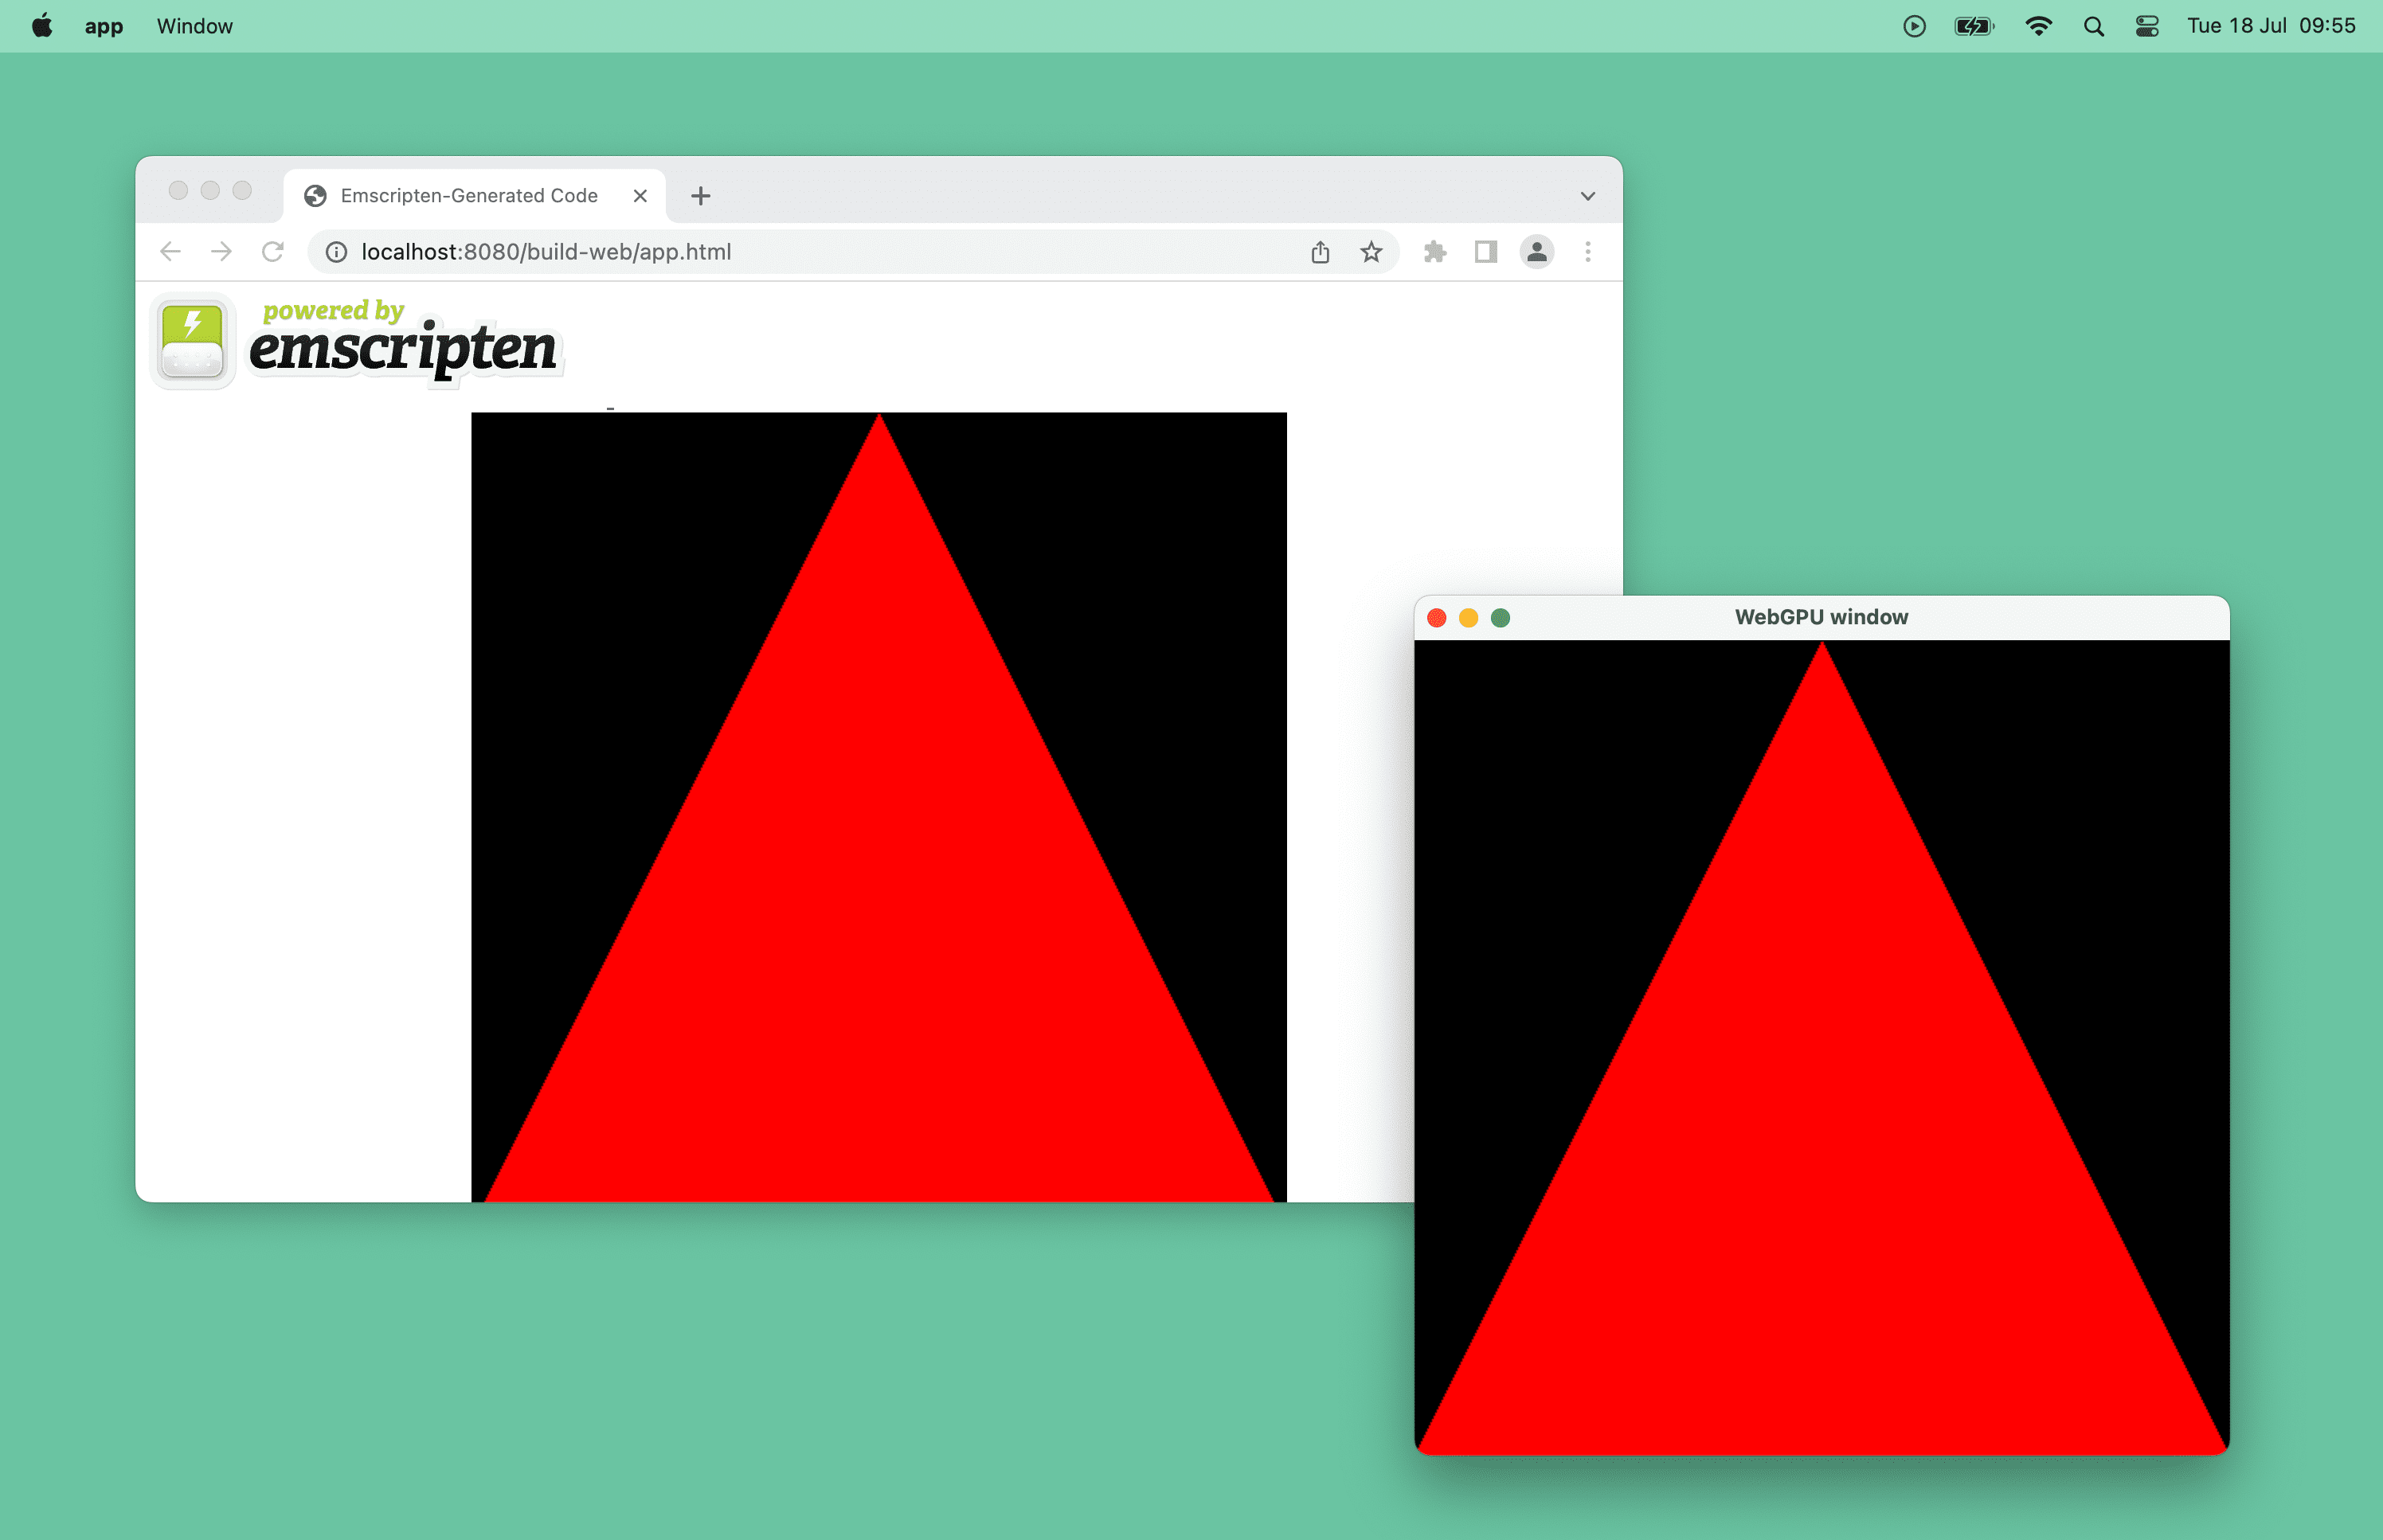 <ph type="x-smartling-placeholder">
工作原理
如需查看已完成的应用,请访问 WebGPU 跨平台应用代码库。
该应用是一个极简的 C++ 示例,展示了如何使用 WebGPU 从单个代码库构建桌面和 Web 应用。在后台,它通过一个名为 webgpu_cpp.h 的 C++ 封装容器,使用 WebGPU 的 webgpu.h 作为与平台无关的硬件抽象层。
在 Web 上,该应用是基于 Emscripten 构建的,后者具有在 JavaScript API 之上实现 webgpu.h 的绑定。在特定平台(例如 macOS 或 Windows)上,您可以针对 Dawn(Chromium 的跨平台 WebGPU 实现)构建此项目。值得一提的是,wgpu-native 也存在,这是 webgpu.h 的 Rust 实现方式,但本文档并未使用。
开始使用
首先,您需要使用 C++ 编译器和 CMake,以标准方式处理跨平台构建。在专用文件夹内,
main.cpp 源文件和 CMakeLists.txt build 文件。
目前,main.cpp 文件应包含一个空的 main() 函数。
int main() {}
CMakeLists.txt 文件包含项目的基本信息。最后一行指定可执行文件名称为“app”其源代码为 main.cpp。
cmake_minimum_required(VERSION 3.13) # CMake version check
project(app)                         # Create project "app"
set(CMAKE_CXX_STANDARD 20)           # Enable C++20 standard

add_executable(app "main.cpp")
运行 cmake -B build,在“build/”目录中创建 build 文件子文件夹和 cmake --build build,以实际构建应用并生成可执行文件。
# Build the app with CMake.
$ cmake -B build && cmake --build build

# Run the app.
$ ./build/app
应用会运行,但还没有输出,因为您需要一种方法在屏幕上绘制内容。
《Get Dawn》
如需绘制三角形,您可以利用 Chromium 的跨平台 WebGPU 实现 Dawn。其中包括用于绘制到屏幕的 GLFW C++ 库。下载 Dawn 的一种方法是将其作为 git 子模块添加到您的代码库中。以下命令会在“dawn/”中子文件夹。
$ git init
$ git submodule add https://dawn.googlesource.com/dawn
然后,将其附加到 CMakeLists.txt 文件,如下所示:
- CMake
DAWN_FETCH_DEPENDENCIES选项会提取所有 Dawn 依赖项。 dawn/子文件夹包含在目标中。- 您的应用将依赖于
dawn::webgpu_dawn、glfw和webgpu_glfw目标,以便您稍后在main.cpp文件中使用这些目标。
…
set(DAWN_FETCH_DEPENDENCIES ON)
add_subdirectory("dawn" EXCLUDE_FROM_ALL)
target_link_libraries(app PRIVATE dawn::webgpu_dawn glfw webgpu_glfw)
打开窗口
现在 Dawn 已可供使用,接下来请使用 GLFW 在屏幕上绘制内容。为方便起见,此库包含在 webgpu_glfw 中,可让您编写与平台无关的代码管理窗口。
打开名为“WebGPU 窗口”的窗口分辨率为 512x512 时,请按如下所示更新 main.cpp 文件。请注意,此处使用 glfwWindowHint() 不请求特定的图形 API 初始化。
#include <GLFW/glfw3.h>

const uint32_t kWidth = 512;
const uint32_t kHeight = 512;

void Start() {
  if (!glfwInit()) {
    return;
  }

  glfwWindowHint(GLFW_CLIENT_API, GLFW_NO_API);
  GLFWwindow* window =
      glfwCreateWindow(kWidth, kHeight, "WebGPU window", nullptr, nullptr);

  while (!glfwWindowShouldClose(window)) {
    glfwPollEvents();
    // TODO: Render a triangle using WebGPU.
  }
}

int main() {
  Start();
}
现在重新构建应用和像以前一样运行应用会导致空窗口。你有进步!
<ph type="x-smartling-placeholder"> <ph type="x-smartling-placeholder">
获取 GPU 设备
在 JavaScript 中,navigator.gpu 是访问 GPU 的入口点。在 C++ 中,您需要手动创建一个用于相同目的的 wgpu::Instance 变量。为方便起见,请在 main.cpp 文件的顶部声明 instance,并在 main() 内调用 wgpu::CreateInstance()。
…
#include <webgpu/webgpu_cpp.h>

wgpu::Instance instance;
…

int main() {
  instance = wgpu::CreateInstance();
  Start();
}
由于 JavaScript API 的形状,对 GPU 的访问是异步进行的。在 C++ 中,创建两个名为 GetAdapter() 和 GetDevice() 的辅助函数,分别返回一个具有 wgpu::Adapter 和 wgpu::Device 的回调函数。
#include <iostream>
…

void GetAdapter(void (*callback)(wgpu::Adapter)) {
  instance.RequestAdapter(
      nullptr,
      [](WGPURequestAdapterStatus status, WGPUAdapter cAdapter,
         const char* message, void* userdata) {
        if (status != WGPURequestAdapterStatus_Success) {
          exit(0);
        }
        wgpu::Adapter adapter = wgpu::Adapter::Acquire(cAdapter);
        reinterpret_cast<void (*)(wgpu::Adapter)>(userdata)(adapter);
  }, reinterpret_cast<void*>(callback));
}

void GetDevice(void (*callback)(wgpu::Device)) {
  adapter.RequestDevice(
      nullptr,
      [](WGPURequestDeviceStatus status, WGPUDevice cDevice,
          const char* message, void* userdata) {
        wgpu::Device device = wgpu::Device::Acquire(cDevice);
        device.SetUncapturedErrorCallback(
            [](WGPUErrorType type, const char* message, void* userdata) {
              std::cout << "Error: " << type << " - message: " << message;
            },
            nullptr);
        reinterpret_cast<void (*)(wgpu::Device)>(userdata)(device);
  }, reinterpret_cast<void*>(callback));
}
为了便于访问,请在 main.cpp 文件的顶部声明 wgpu::Adapter 和 wgpu::Device 两个变量。更新 main() 函数以调用 GetAdapter() 并将其结果回调函数分配给 adapter,然后调用 GetDevice() 并将其结果回调函数分配给 device,然后再调用 Start()。
wgpu::Adapter adapter;
wgpu::Device device;
…

int main() {
  instance = wgpu::CreateInstance();
  GetAdapter([](wgpu::Adapter a) {
    adapter = a;
    GetDevice([](wgpu::Device d) {
      device = d;
      Start();
    });
  });
}
绘制三角形
JavaScript API 中不会公开交换链,因为浏览器会进行处理。使用 C++ 时,您需要手动创建。再次为方便起见,在 main.cpp 文件的顶部声明一个 wgpu::Surface 变量。在 Start() 中创建 GLFW 窗口后,调用方便的 wgpu::glfw::CreateSurfaceForWindow() 函数来创建 wgpu::Surface(类似于 HTML 画布),并通过调用 InitGraphics() 中新的辅助 ConfigureSurface() 函数对其进行配置。您还需要调用 surface.Present() 以在 when 循环中显示下一个纹理。这不会产生明显的影响,因为尚未进行渲染。
#include <webgpu/webgpu_glfw.h>
…

wgpu::Surface surface;
wgpu::TextureFormat format;

void ConfigureSurface() {
  wgpu::SurfaceCapabilities capabilities;
  surface.GetCapabilities(adapter, &capabilities);
  format = capabilities.formats[0];

  wgpu::SurfaceConfiguration config{
      .device = device,
      .format = format,
      .width = kWidth,
      .height = kHeight};
  surface.Configure(&config);
}

void InitGraphics() {
  ConfigureSurface();
}

void Render() {
  // TODO: Render a triangle using WebGPU.
}

void Start() {
  …
  surface = wgpu::glfw::CreateSurfaceForWindow(instance, window);

  InitGraphics();

  while (!glfwWindowShouldClose(window)) {
    glfwPollEvents();
    Render();
    surface.Present();
    instance.ProcessEvents();
  }
}
现在最好使用以下代码创建渲染流水线。为便于访问,请在 main.cpp 文件的顶部声明 wgpu::RenderPipeline 变量,并在 InitGraphics() 中调用辅助函数 CreateRenderPipeline()。
wgpu::RenderPipeline pipeline;
…

const char shaderCode[] = R"(
    @vertex fn vertexMain(@builtin(vertex_index) i : u32) ->
      @builtin(position) vec4f {
        const pos = array(vec2f(0, 1), vec2f(-1, -1), vec2f(1, -1));
        return vec4f(pos[i], 0, 1);
    }
    @fragment fn fragmentMain() -> @location(0) vec4f {
        return vec4f(1, 0, 0, 1);
    }
)";

void CreateRenderPipeline() {
  wgpu::ShaderModuleWGSLDescriptor wgslDesc{};
  wgslDesc.code = shaderCode;

  wgpu::ShaderModuleDescriptor shaderModuleDescriptor{
      .nextInChain = &wgslDesc};
  wgpu::ShaderModule shaderModule =
      device.CreateShaderModule(&shaderModuleDescriptor);

  wgpu::ColorTargetState colorTargetState{.format = format};

  wgpu::FragmentState fragmentState{.module = shaderModule,
                                    .targetCount = 1,
                                    .targets = &colorTargetState};

  wgpu::RenderPipelineDescriptor descriptor{
      .vertex = {.module = shaderModule},
      .fragment = &fragmentState};
  pipeline = device.CreateRenderPipeline(&descriptor);
}

void InitGraphics() {
  …
  CreateRenderPipeline();
}
最后,在调用每一帧的 Render() 函数中向 GPU 发送渲染命令。
void Render() {
  wgpu::SurfaceTexture surfaceTexture;
  surface.GetCurrentTexture(&surfaceTexture);

  wgpu::RenderPassColorAttachment attachment{
      .view = surfaceTexture.texture.CreateView(),
      .loadOp = wgpu::LoadOp::Clear,
      .storeOp = wgpu::StoreOp::Store};

  wgpu::RenderPassDescriptor renderpass{.colorAttachmentCount = 1,
                                        .colorAttachments = &attachment};

  wgpu::CommandEncoder encoder = device.CreateCommandEncoder();
  wgpu::RenderPassEncoder pass = encoder.BeginRenderPass(&renderpass);
  pass.SetPipeline(pipeline);
  pass.Draw(3);
  pass.End();
  wgpu::CommandBuffer commands = encoder.Finish();
  device.GetQueue().Submit(1, &commands);
}
现在,使用 CMake 重新构建应用并运行它会导致窗口中期待已久的红色三角形!休息一下——这是值得的。
<ph type="x-smartling-placeholder">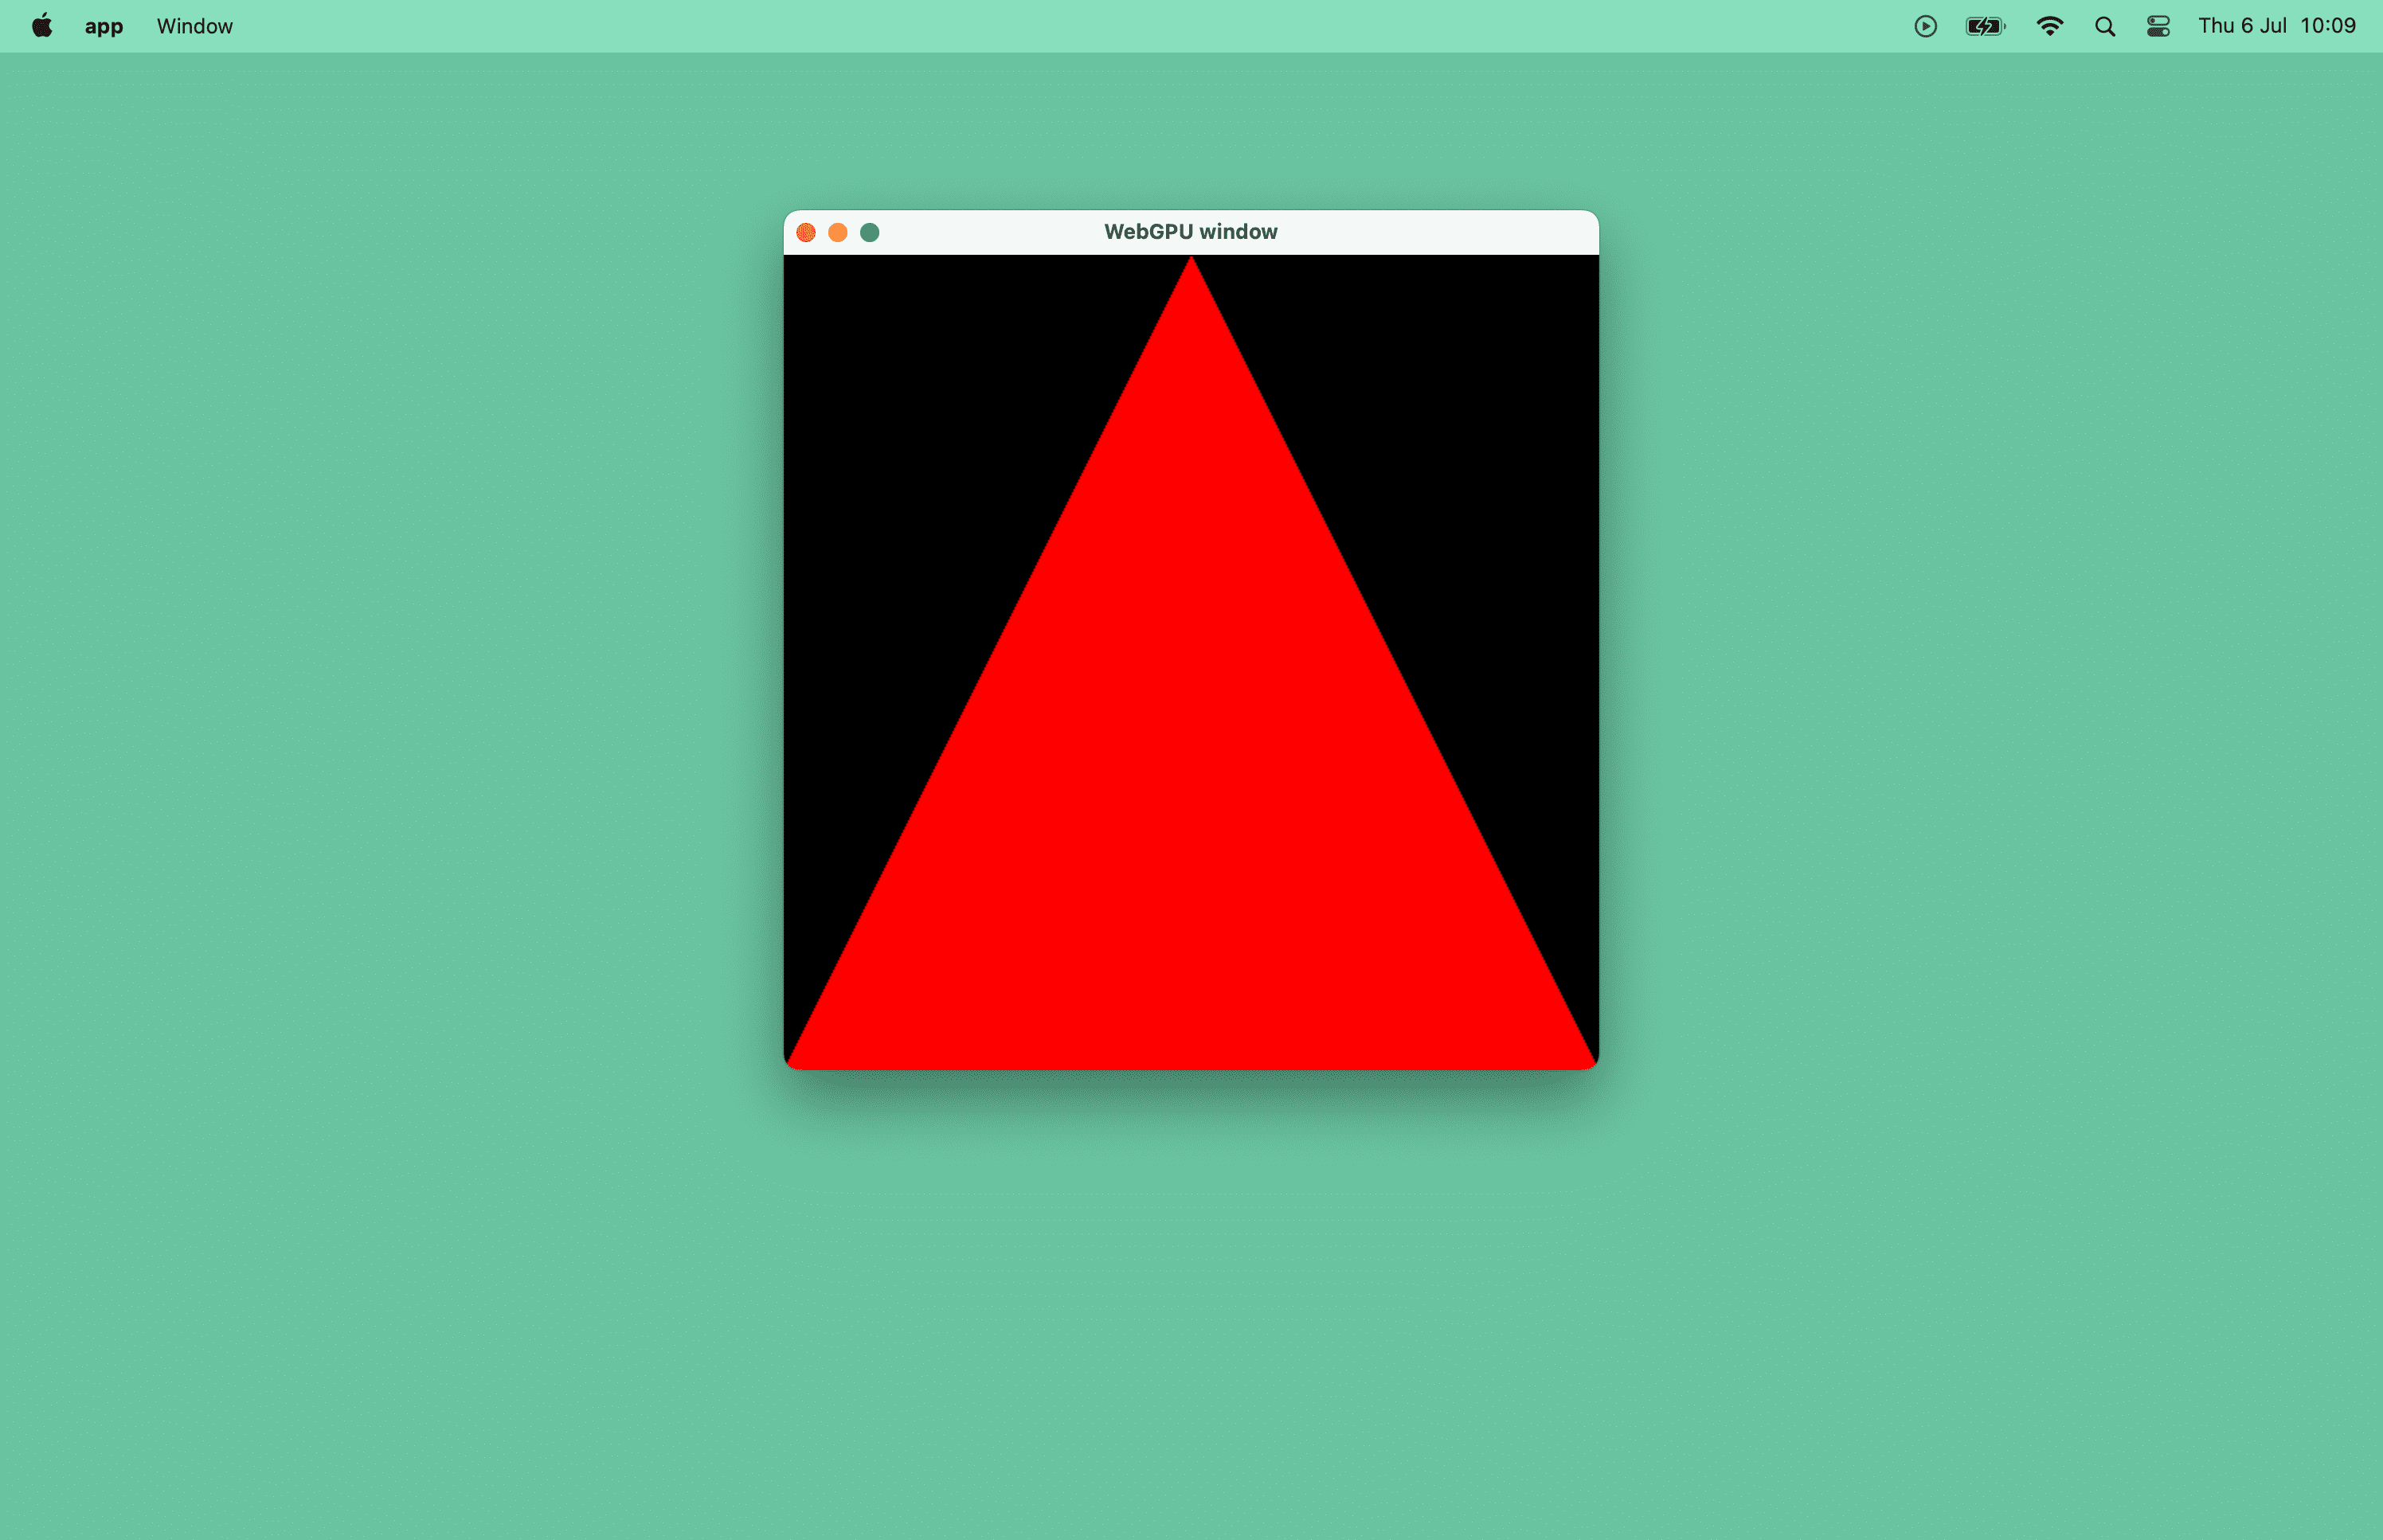 <ph type="x-smartling-placeholder">
编译为 WebAssembly
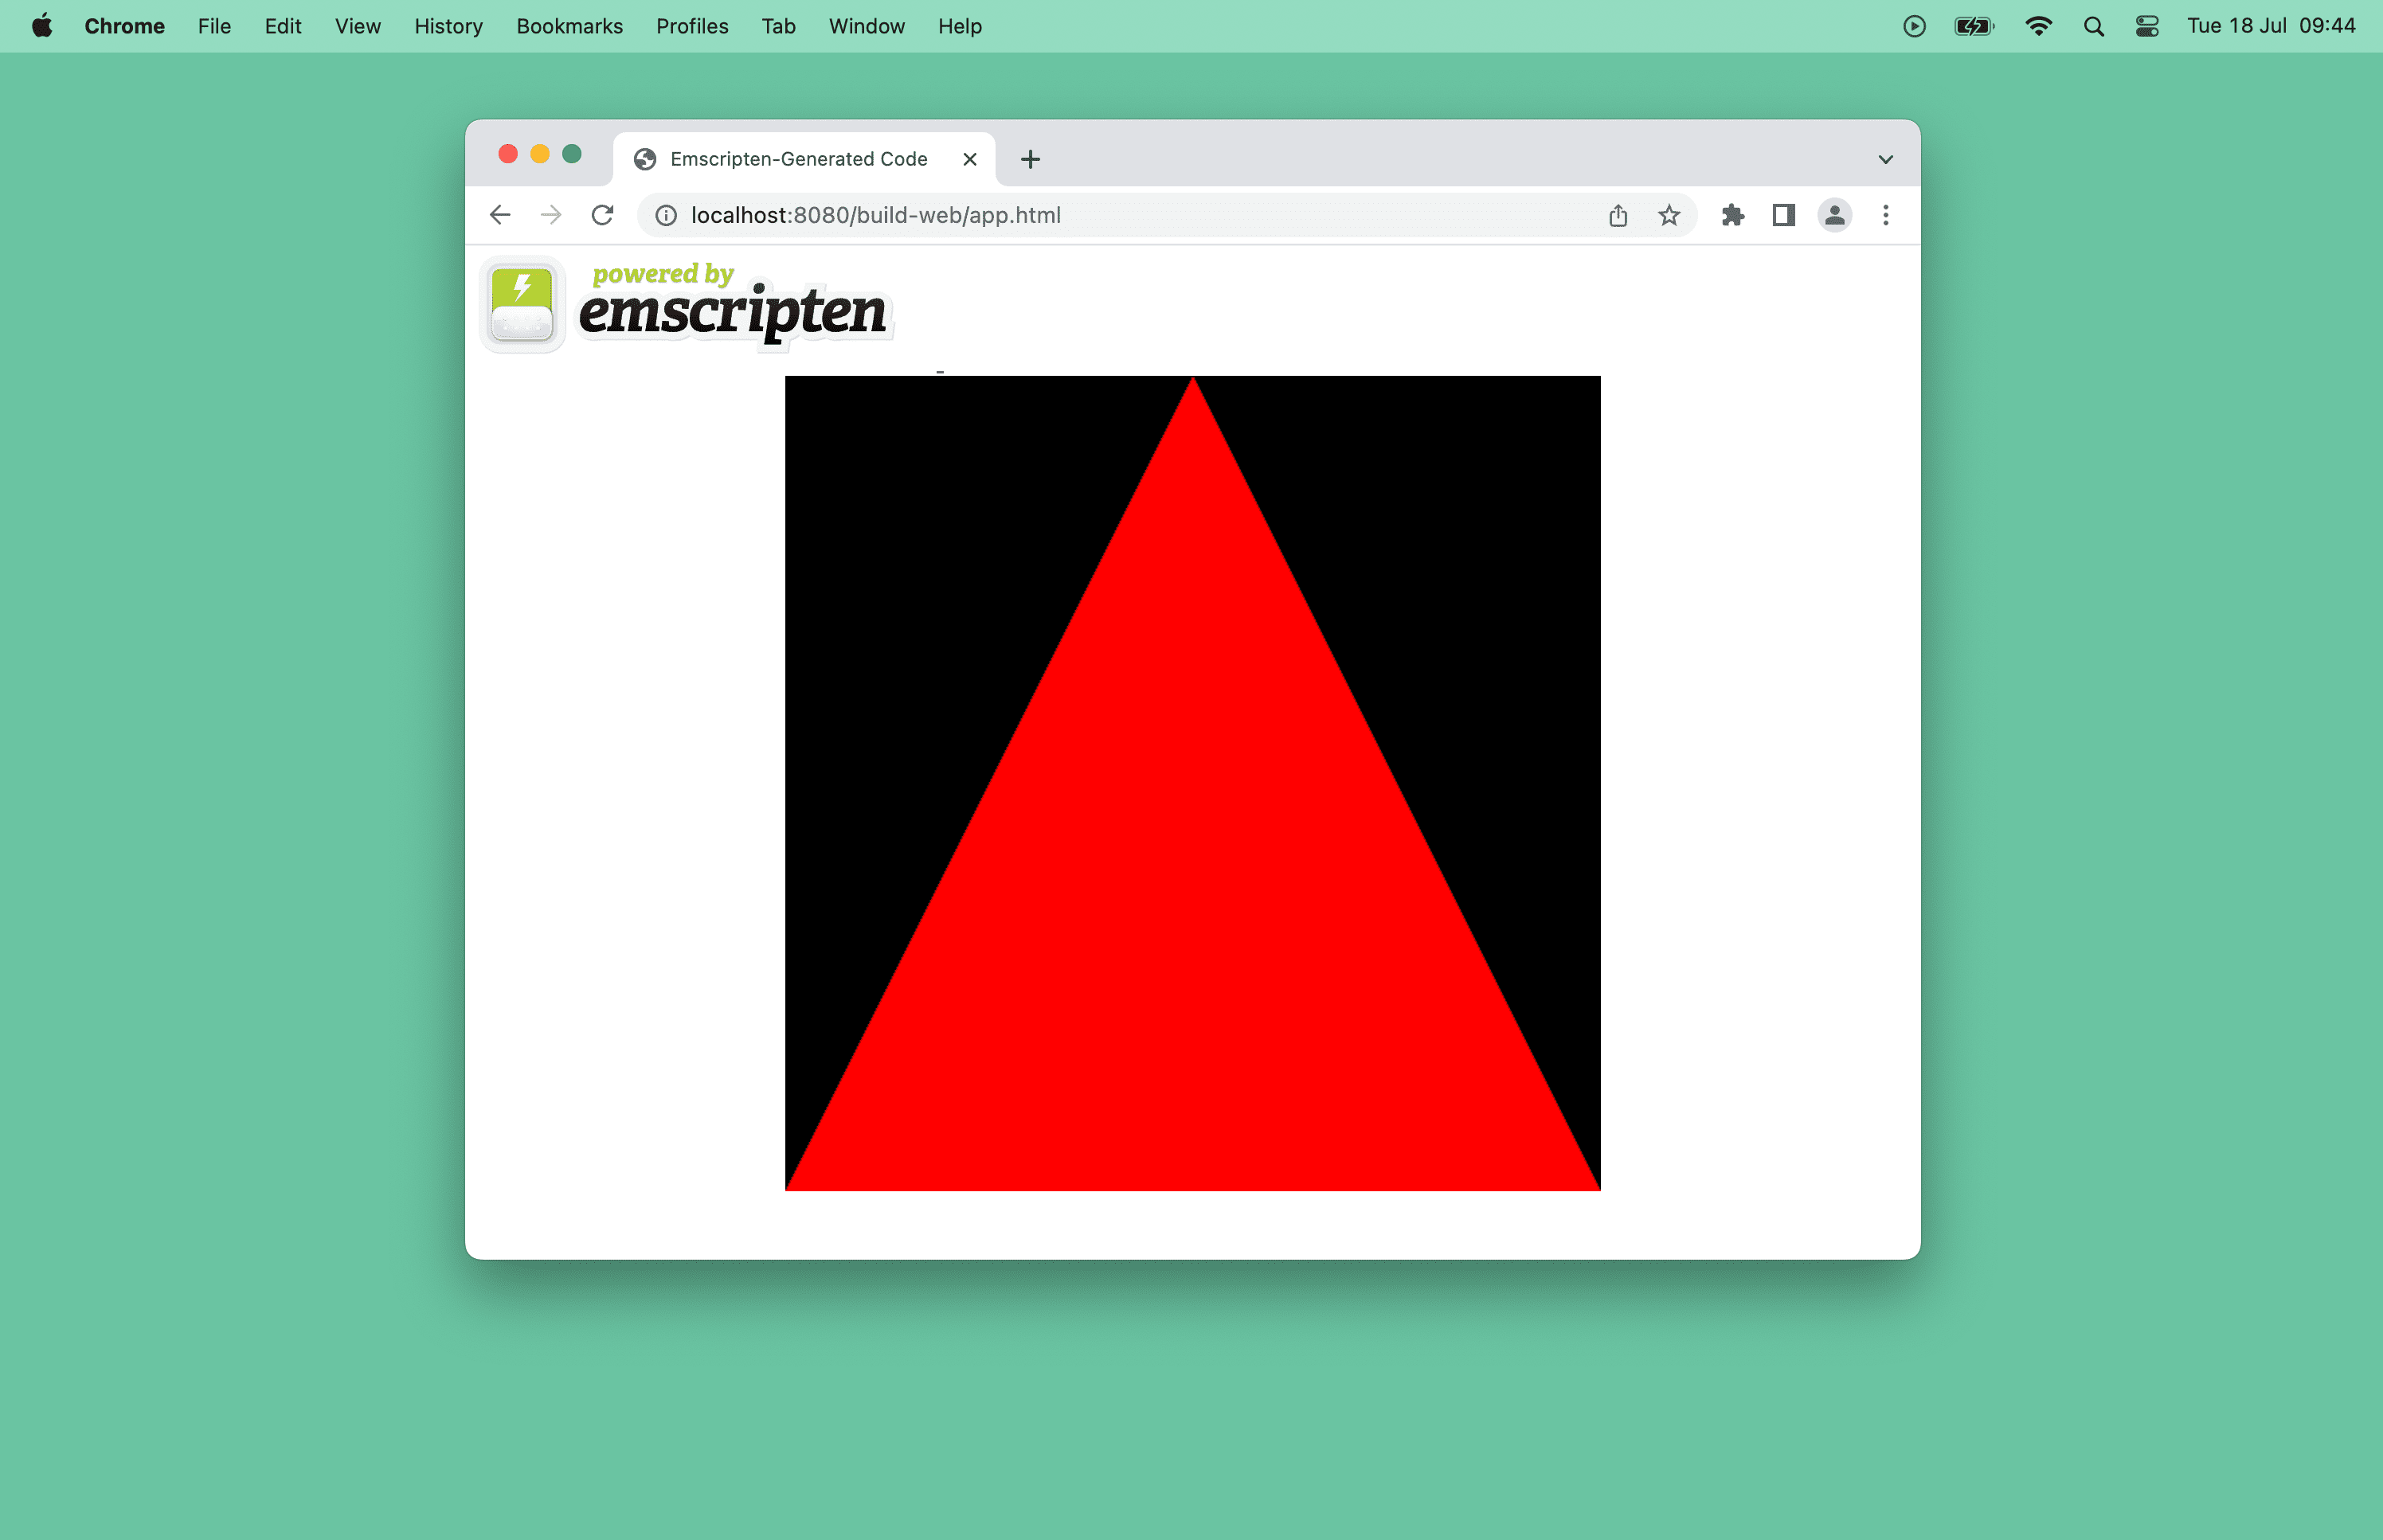
现在我们来看看调整现有代码库,在浏览器窗口中绘制这个红色三角形所需的最少更改。同样,该应用是基于 Emscripten 构建的。Emscripten 是一个用于将 C/C++ 程序编译到 WebAssembly 的工具,该工具具有在 JavaScript API 之上实现 webgpu.h 的绑定。
更新 CMake 设置
安装 Emscripten 后,按如下方式更新 CMakeLists.txt build 文件。
您只需更改突出显示的代码即可。
set_target_properties用于自动添加“html”为目标文件添加文件扩展名。也就是说,您需要生成一个“app.html”文件。- 如需在 Emscripten 中启用 WebGPU 支持,必须使用
USE_WEBGPU应用链接选项。否则,您的main.cpp文件将无法访问webgpu/webgpu_cpp.h文件。 - 此处还必须提供
USE_GLFW应用链接选项,以便您可以重复使用 GLFW 代码。
cmake_minimum_required(VERSION 3.13) # CMake version check
project(app)                         # Create project "app"
set(CMAKE_CXX_STANDARD 20)           # Enable C++20 standard

add_executable(app "main.cpp")

if(EMSCRIPTEN)
  set_target_properties(app PROPERTIES SUFFIX ".html")
  target_link_options(app PRIVATE "-sUSE_WEBGPU=1" "-sUSE_GLFW=3")
else()
  set(DAWN_FETCH_DEPENDENCIES ON)
  add_subdirectory("dawn" EXCLUDE_FROM_ALL)
  target_link_libraries(app PRIVATE dawn::webgpu_dawn glfw webgpu_glfw)
endif()
更新代码
在 Emscripten 中,创建 wgpu::surface 需要 HTML 画布元素。为此,请调用 instance.CreateSurface() 并指定 #canvas 选择器,以匹配 Emscripten 生成的 HTML 页面中相应的 HTML 画布元素。
调用 emscripten_set_main_loop(Render) 以确保以适当的平滑速率调用 Render() 函数,而不是使用 when 循环,从而与浏览器和监控器正确对齐。
#include <GLFW/glfw3.h>
#include <webgpu/webgpu_cpp.h>
#include <iostream>
#if defined(__EMSCRIPTEN__)
#include <emscripten/emscripten.h>
#else
#include <webgpu/webgpu_glfw.h>
#endif
void Start() {
  if (!glfwInit()) {
    return;
  }

  glfwWindowHint(GLFW_CLIENT_API, GLFW_NO_API);
  GLFWwindow* window =
      glfwCreateWindow(kWidth, kHeight, "WebGPU window", nullptr, nullptr);

#if defined(__EMSCRIPTEN__)
  wgpu::SurfaceDescriptorFromCanvasHTMLSelector canvasDesc{};
  canvasDesc.selector = "#canvas";

  wgpu::SurfaceDescriptor surfaceDesc{.nextInChain = &canvasDesc};
  surface = instance.CreateSurface(&surfaceDesc);
#else
  surface = wgpu::glfw::CreateSurfaceForWindow(instance, window);
#endif

  InitGraphics();

#if defined(__EMSCRIPTEN__)
  emscripten_set_main_loop(Render, 0, false);
#else
  while (!glfwWindowShouldClose(window)) {
    glfwPollEvents();
    Render();
    surface.Present();
    instance.ProcessEvents();
  }
#endif
}
使用 Emscripten 构建应用
使用 Emscripten 构建应用所需的唯一更改是在 cmake 命令前面加上神奇的 emcmake Shell 脚本。这一次,在 build-web 子文件夹中生成应用并启动 HTTP 服务器。最后,打开浏览器并访问 build-web/app.html。
# Build the app with Emscripten.
$ emcmake cmake -B build-web && cmake --build build-web

# Start a HTTP server.
$ npx http-server
后续步骤
未来您可以实现以下目标:
- 提升了 webgpu.h 和 webgpu_cpp.h API 的稳定性。
- Dawn 对 Android 和 iOS 提供初始支持。
在此期间,请提交 Emscripten 的 WebGPU 问题和 Dawn 的问题,并附上相关建议和问题。
资源
您可以随意浏览此应用的源代码。
如果您想深入探索如何使用 WebGPU 从头开始以 C++ 构建原生 3D 应用,请参阅了解适用于 C++ 的 WebGPU 文档和 Dawn Native WebGPU 示例。
如果您对 Rust 感兴趣,还可以探索基于 WebGPU 的 wgpu 图形库。您可以观看他们的 hello-triangle 演示。
致谢
本文由 Corentin Wallez、Kai Ninomiya 和 Rachel Andrew 审核。
摄影:Marc-Olivier Jodoin,拍摄自 Unsplash 网站。