

Chrome 66에서는 웹페이지가 Presentation API를 통해 연결된 보조 디스플레이를 사용하고 Presentation Receiver API를 통해 콘텐츠를 제어할 수 있습니다.
배경
지금까지 웹 개발자는 사용자가 Chrome에서 원격 디스플레이에 표시되는 콘텐츠와 다른 로컬 콘텐츠를 보면서 로컬에서 해당 환경을 제어할 수 있는 환경을 빌드할 수 있었습니다. 예를 들어 TV에서 동영상이 재생되는 동안 youtube.com에서 재생목록을 관리하거나 행아웃 세션에서 전체 화면 프레젠테이션이 표시되는 동안 노트북에서 발표자 메모가 포함된 슬라이드 릴을 볼 수 있습니다.
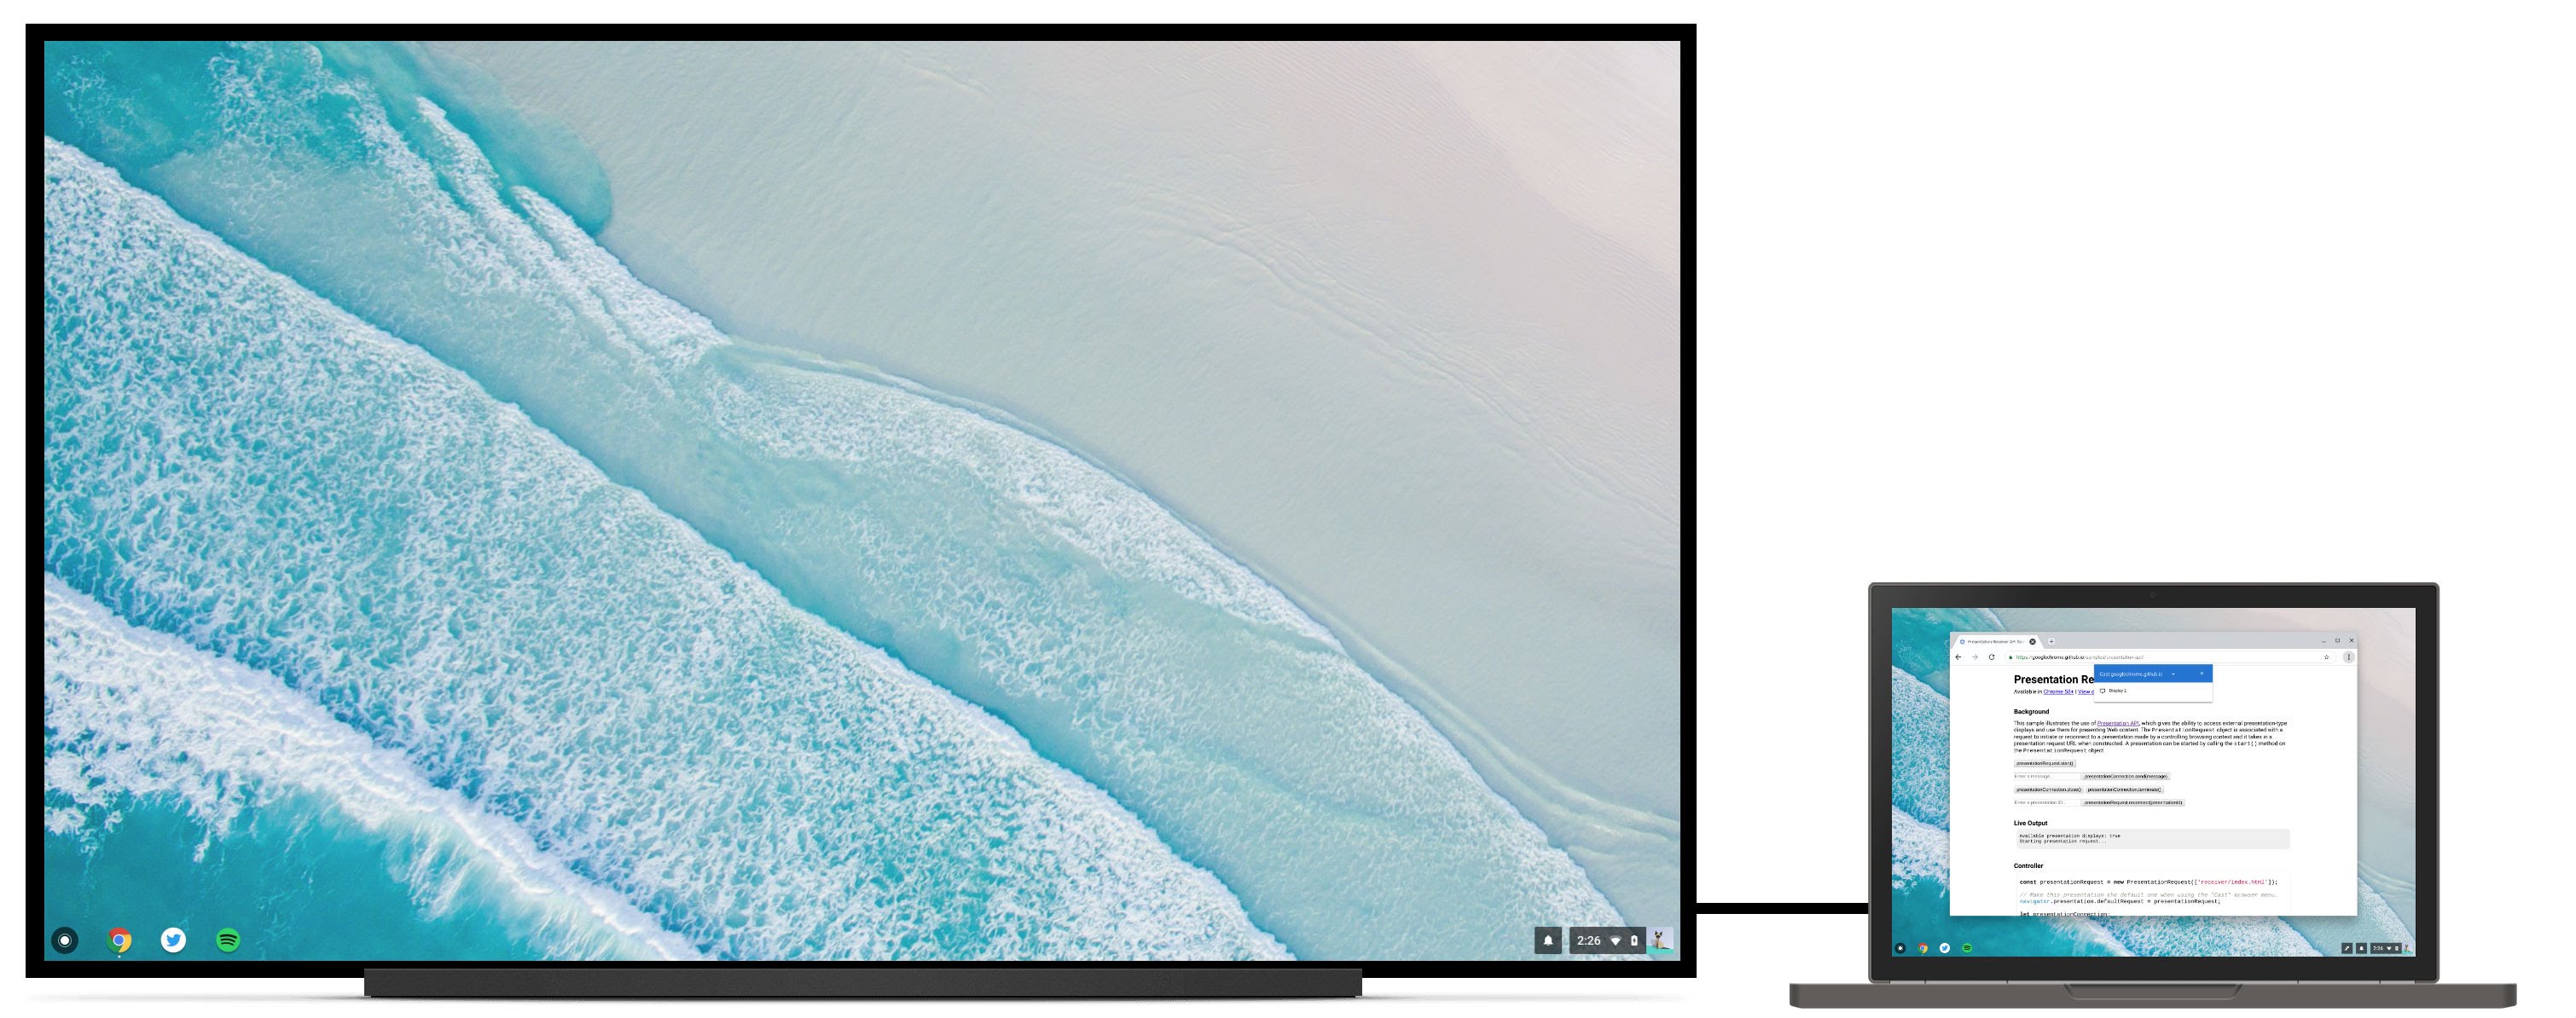
하지만 사용자가 연결된 두 번째 디스플레이에 콘텐츠를 표시하기만 원하는 경우도 있습니다. 예를 들어 HDMI 케이블을 통해 연결된 프로젝터가 설치된 회의실에 있는 사용자를 생각해 보세요. 사용자는 프레젠테이션을 원격 엔드포인트에 미러링하는 대신 프로젝터에서 슬라이드를 전체 화면으로 표시하고 노트북 화면은 발표자 메모와 슬라이드 컨트롤에 사용할 수 있도록 하려 합니다. 사이트 작성자가 매우 원시적인 방식으로 이를 지원할 수는 있지만 (예: 새 창을 띄우고 사용자가 수동으로 보조 디스플레이로 드래그하여 전체 화면으로 최대화해야 함) 번거롭고 로컬 프레젠테이션과 원격 프레젠테이션 간에 일관되지 않은 환경을 제공합니다.
페이지 표시
Presentation API를 사용하여 연결된 보조 디스플레이에 웹페이지를 표시하는 방법을 살펴보겠습니다. 최종 결과는 https://googlechrome.github.io/samples/presentation-api/에서 확인할 수 있습니다.
먼저, 연결된 보조 디스플레이에 표시할 URL이 포함된 새 PresentationRequest 객체를 만듭니다.
const presentationRequest = new PresentationRequest('receiver.html');

In this article, I won’t cover use cases where the parameter passed to
`PresentationRequest` can be an array like `['cast://foo’, 'apple://foo',
'https://example.com']` as this is not relevant there.

We can now monitor presentation display availability and toggle a "Present"
button visibility based on presentation displays availability. Note that we can
also decide to always show this button.

<aside class="caution"><b>Caution:</b> The browser may use more energy while the <code>availability</code> object is alive
and actively listening for presentation display availability changes. Please
use it with caution in order to save energy on mobile.</aside>

```js
presentationRequest.getAvailability()
  .then(availability => {
    console.log('Available presentation displays: ' + availability.value);
    availability.addEventListener('change', function() {
      console.log('> Available presentation displays: ' + availability.value);
    });
  })
  .catch(error => {
    console.log('Presentation availability not supported, ' + error.name + ': ' +
        error.message);
  });
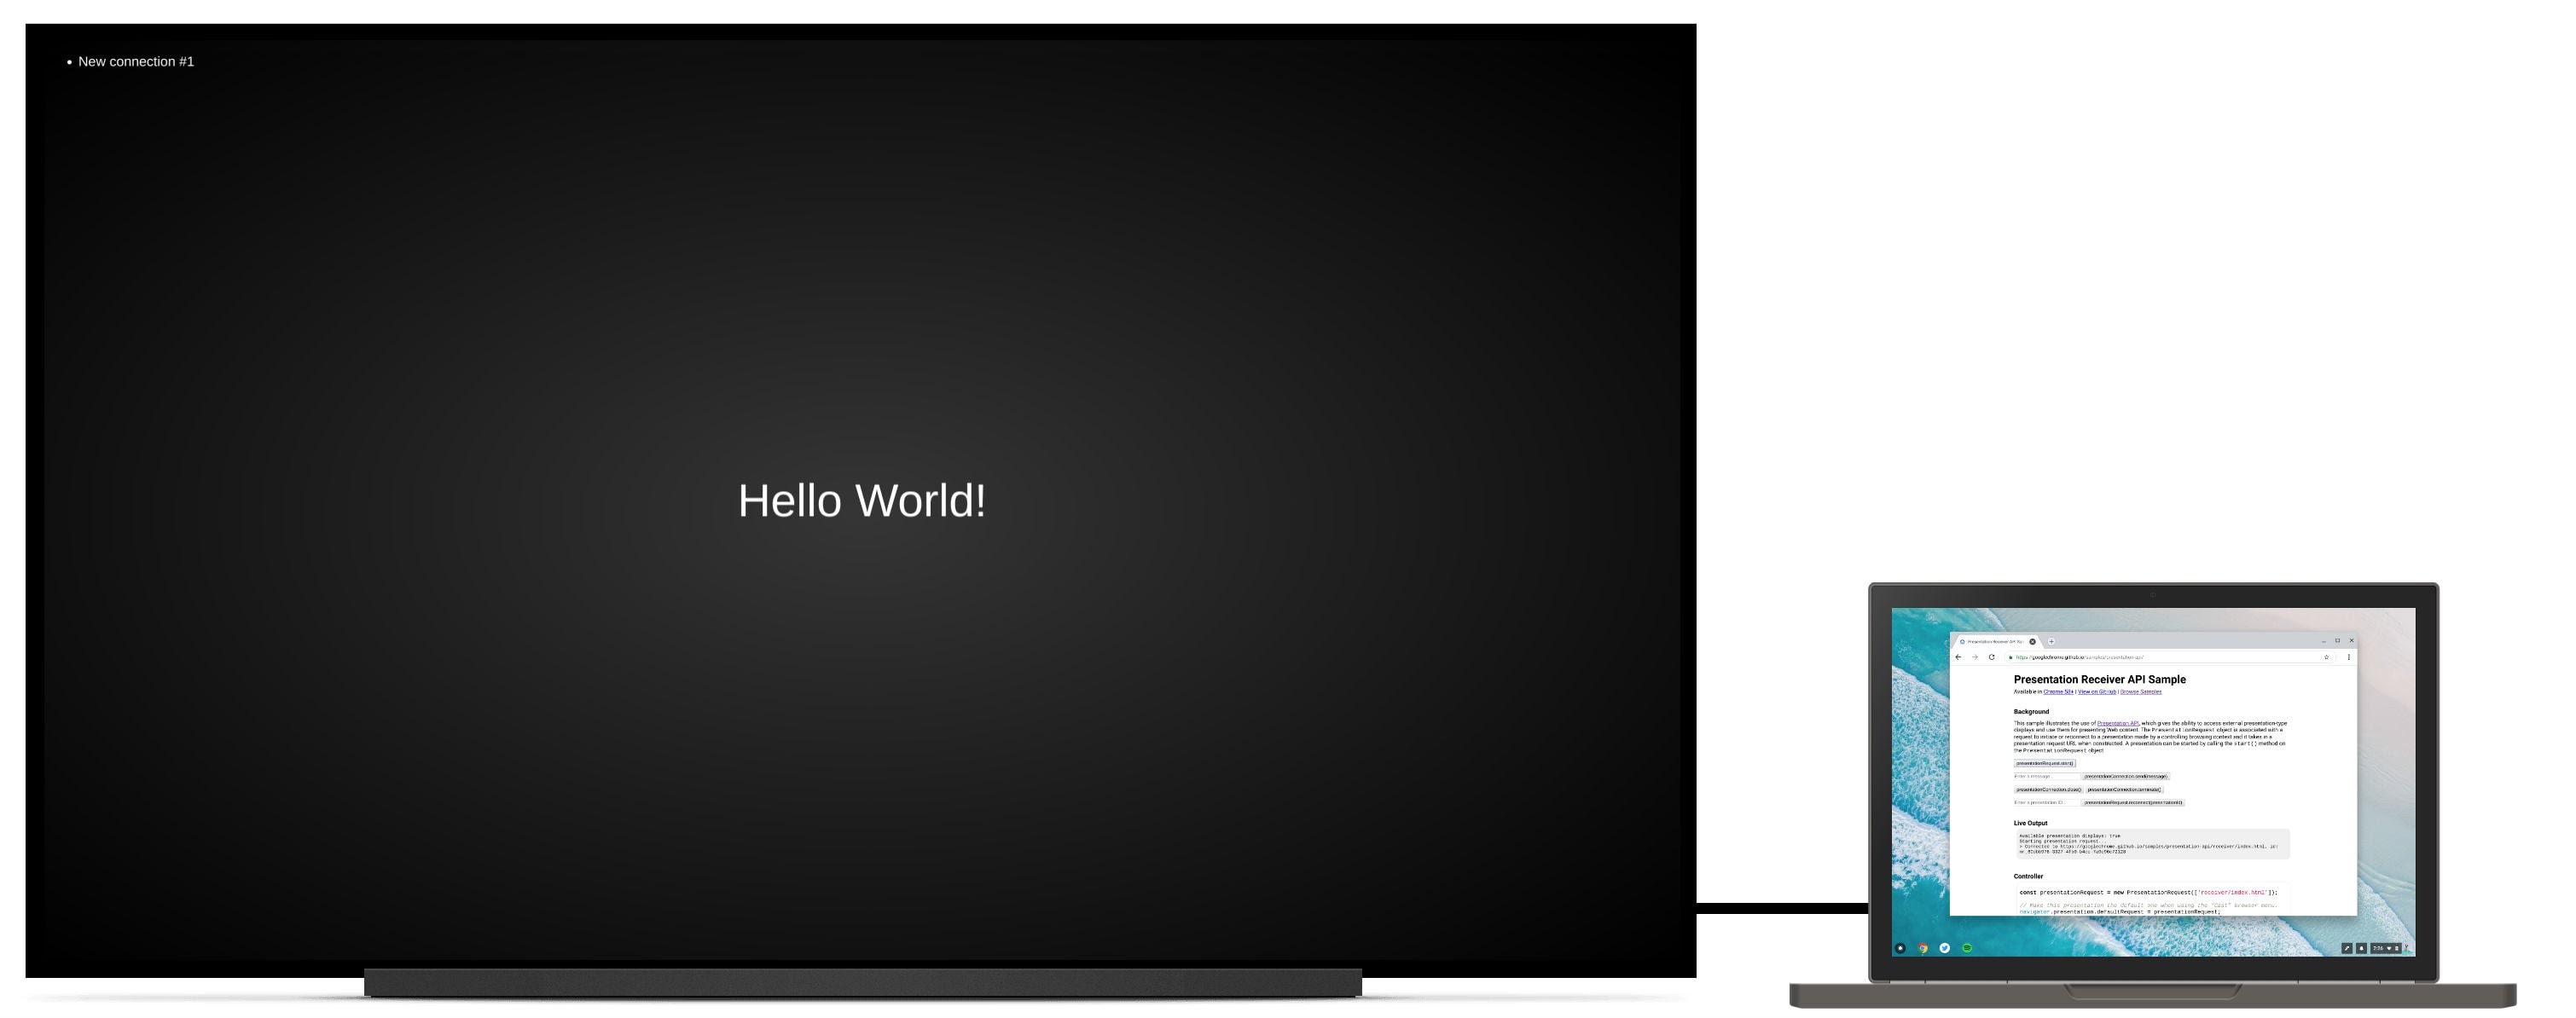
프레젠테이션 표시 메시지를 표시하려면 버튼 클릭과 같은 사용자 동작이 필요합니다. 따라서 버튼 클릭 시 presentationRequest.start()를 호출하고 사용자가 프레젠테이션 디스플레이(예: 이 사용 사례의 경우 두 번째 연결된 디스플레이)를 선택하면 약속이 해결될 때까지 기다립니다.
function onPresentButtonClick() {
  presentationRequest.start()
  .then(connection => {
    console.log('Connected to ' + connection.url + ', id: ' + connection.id);
  })
  .catch(error => {
    console.log(error);
  });
}
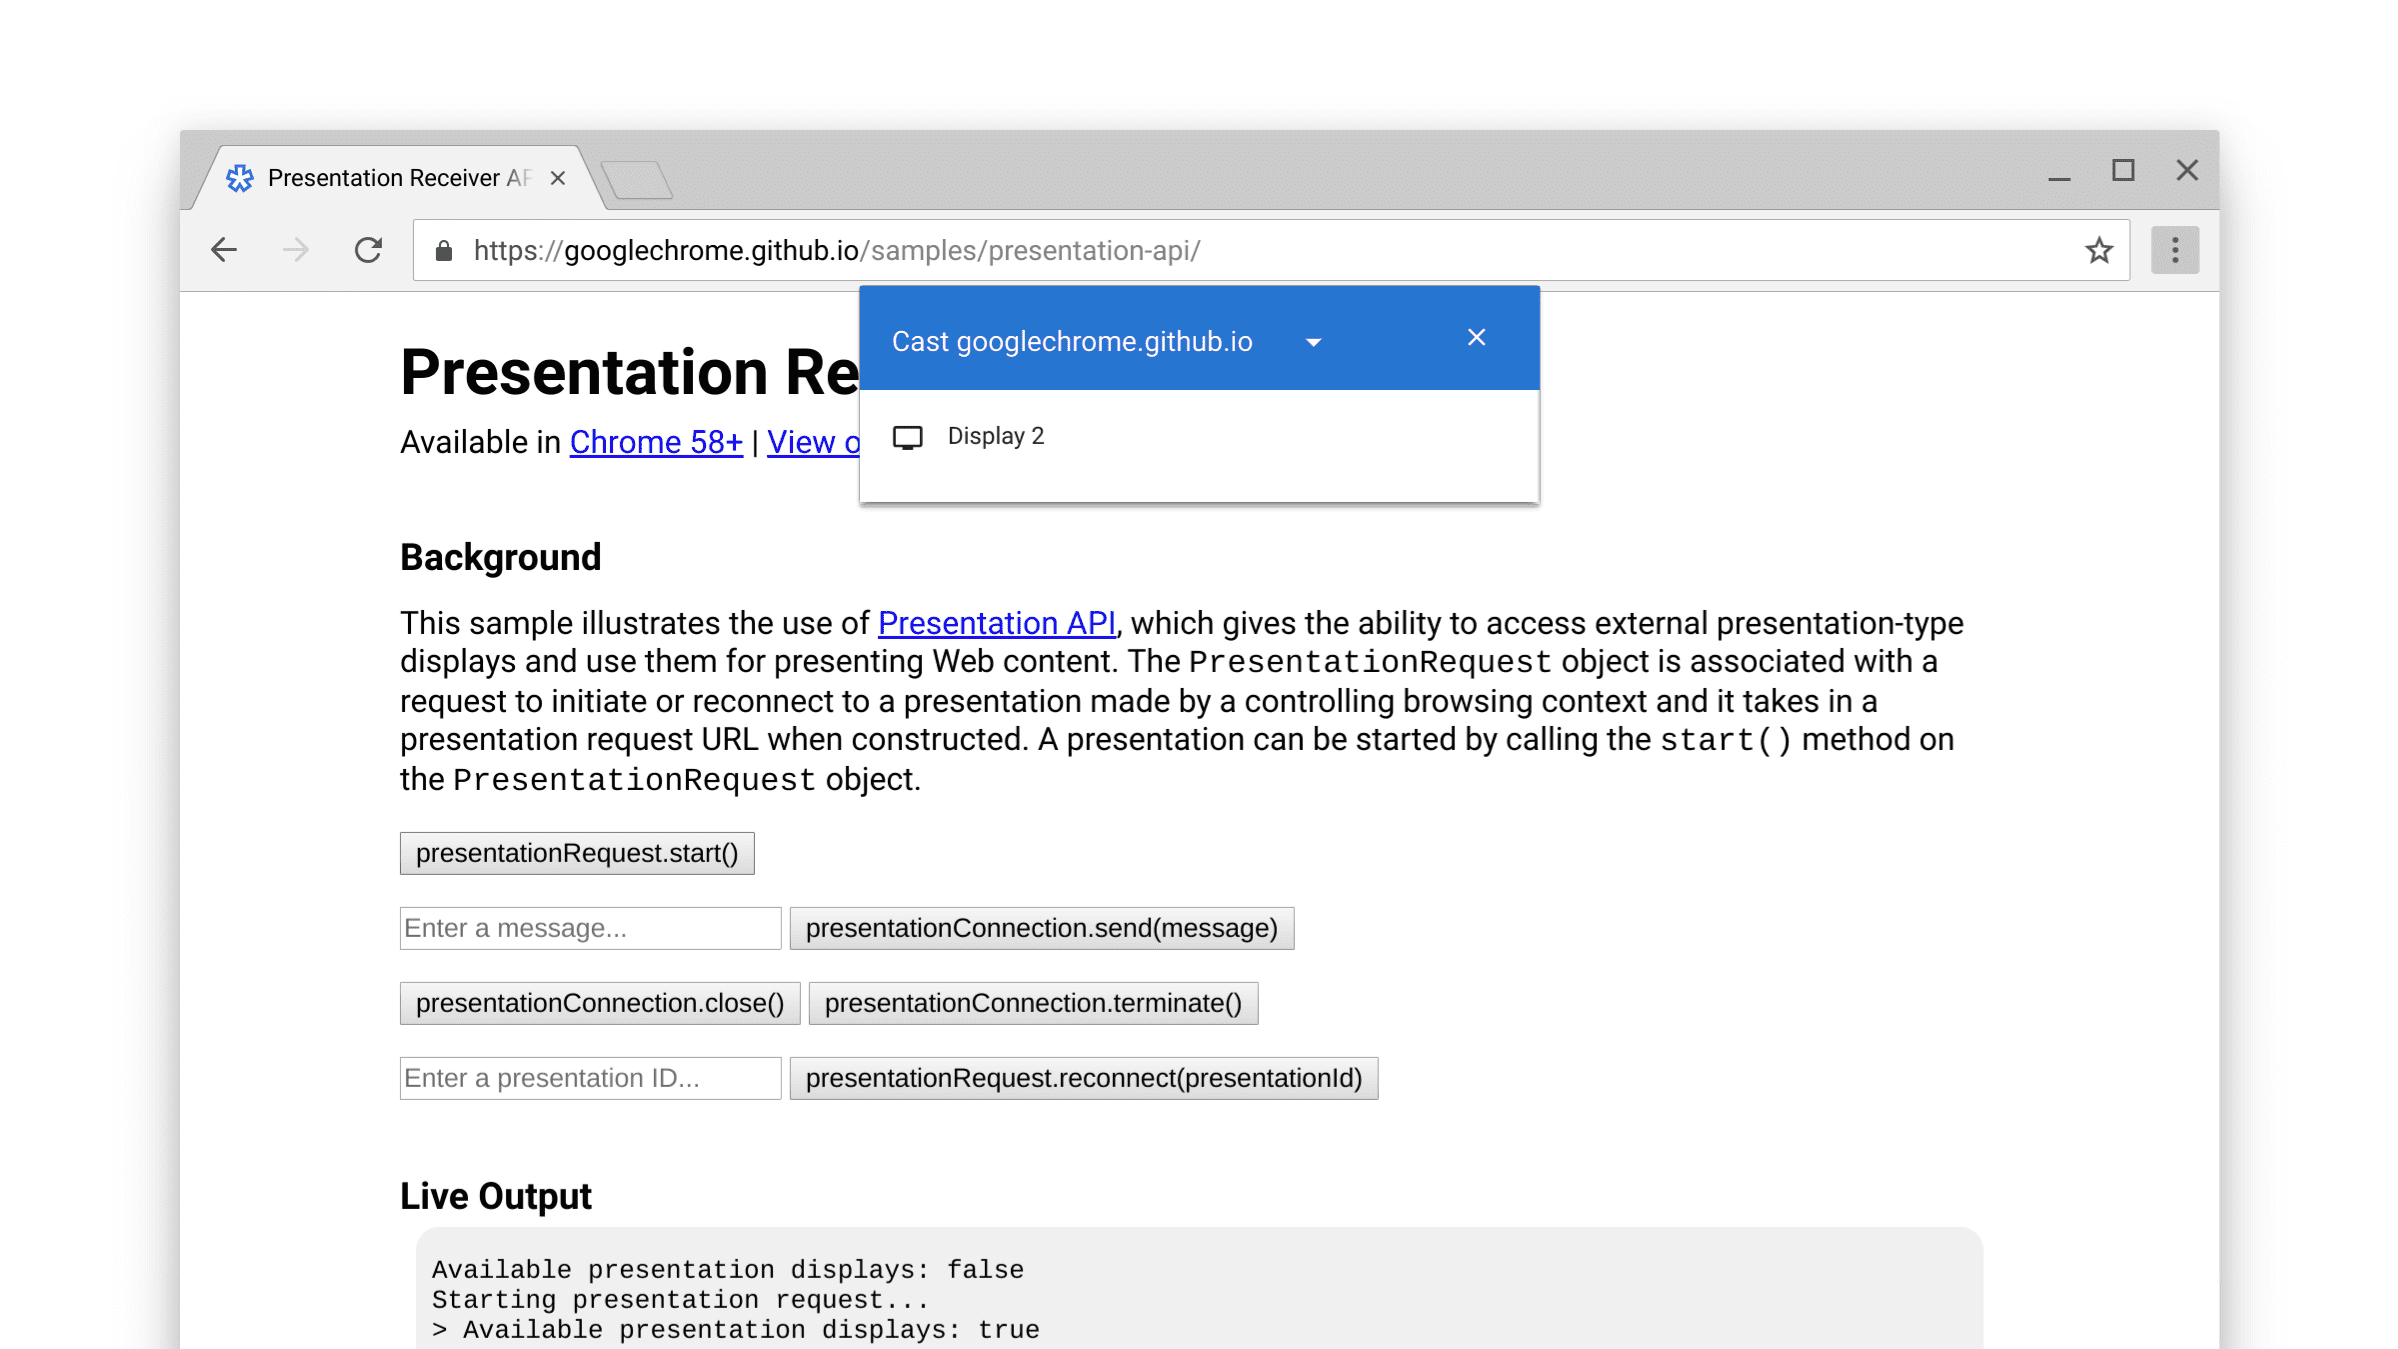
사용자에게 표시되는 목록에는 Chromecast 기기와 같이 광고하는 네트워크에 연결되어 있는 경우 원격 엔드포인트도 포함될 수 있습니다. 미러링된 디스플레이는 목록에 포함되지 않습니다. http://crbug.com/840466을 참고하세요.
promise가 해결되면 PresentationRequest 객체 URL의 웹페이지가 선택한 디스플레이에 표시됩니다. Et voilà!
이제 아래와 같이 '닫기' 및 '종료' 이벤트를 모니터링할 수 있습니다. presentationRequest.reconnect(presentationId)를 사용하여 '닫힌' presentationConnection에 다시 연결할 수 있습니다. 여기서 presentationId는 이전 presentationRequest 객체의 ID입니다.
function onCloseButtonClick() {
  // Disconnect presentation connection but will allow reconnection.
  presentationConnection.close();
}

presentationConnection.addEventListener('close', function() {
  console.log('Connection closed.');
});


function onTerminateButtonClick() {
  // Stop presentation connection for good.
  presentationConnection.terminate();
}

presentationConnection.addEventListener('terminate', function() {
  console.log('Connection terminated.');
});
페이지와 통신
좋긴 한데 컨트롤러 페이지 (방금 만든 페이지)와 수신기 페이지 (PresentationRequest 객체에 전달한 페이지) 간에 메시지를 전달하려면 어떻게 해야 하나요?
먼저 navigator.presentation.receiver.connectionList를 사용하여 수신기 페이지에서 기존 연결을 가져오고 아래와 같이 수신 연결을 리슨합니다.
// Receiver page

navigator.presentation.receiver.connectionList
.then(list => {
  list.connections.map(connection => addConnection(connection));
  list.addEventListener('connectionavailable', function(event) {
    addConnection(event.connection);
  });
});

function addConnection(connection) {

  connection.addEventListener('message', function(event) {
    console.log('Message: ' + event.data);
    connection.send('Hey controller! I just received a message.');
  });

  connection.addEventListener('close', function(event) {
    console.log('Connection closed!', event.reason);
  });
}
메시지를 수신하는 연결은 리슨할 수 있는 'message' 이벤트를 실행합니다.
메시지는 문자열, Blob, ArrayBuffer 또는 ArrayBufferView일 수 있습니다.
전송하는 것은 컨트롤러 페이지 또는 수신기 페이지에서 connection.send(message)를 호출하는 것만큼 간단합니다.
// Controller page

function onSendMessageButtonClick() {
  presentationConnection.send('Hello!');
}

presentationConnection.addEventListener('message', function(event) {
  console.log('I just received ' + event.data + ' from the receiver.');
});
https://googlechrome.github.io/samples/presentation-api/에서 샘플을 사용해 보고 작동 방식을 알아보세요. 저만큼 즐겁게 사용하실 수 있을 것입니다.
샘플 및 데모
이 도움말에 사용된 공식 Chrome 샘플을 확인하세요.
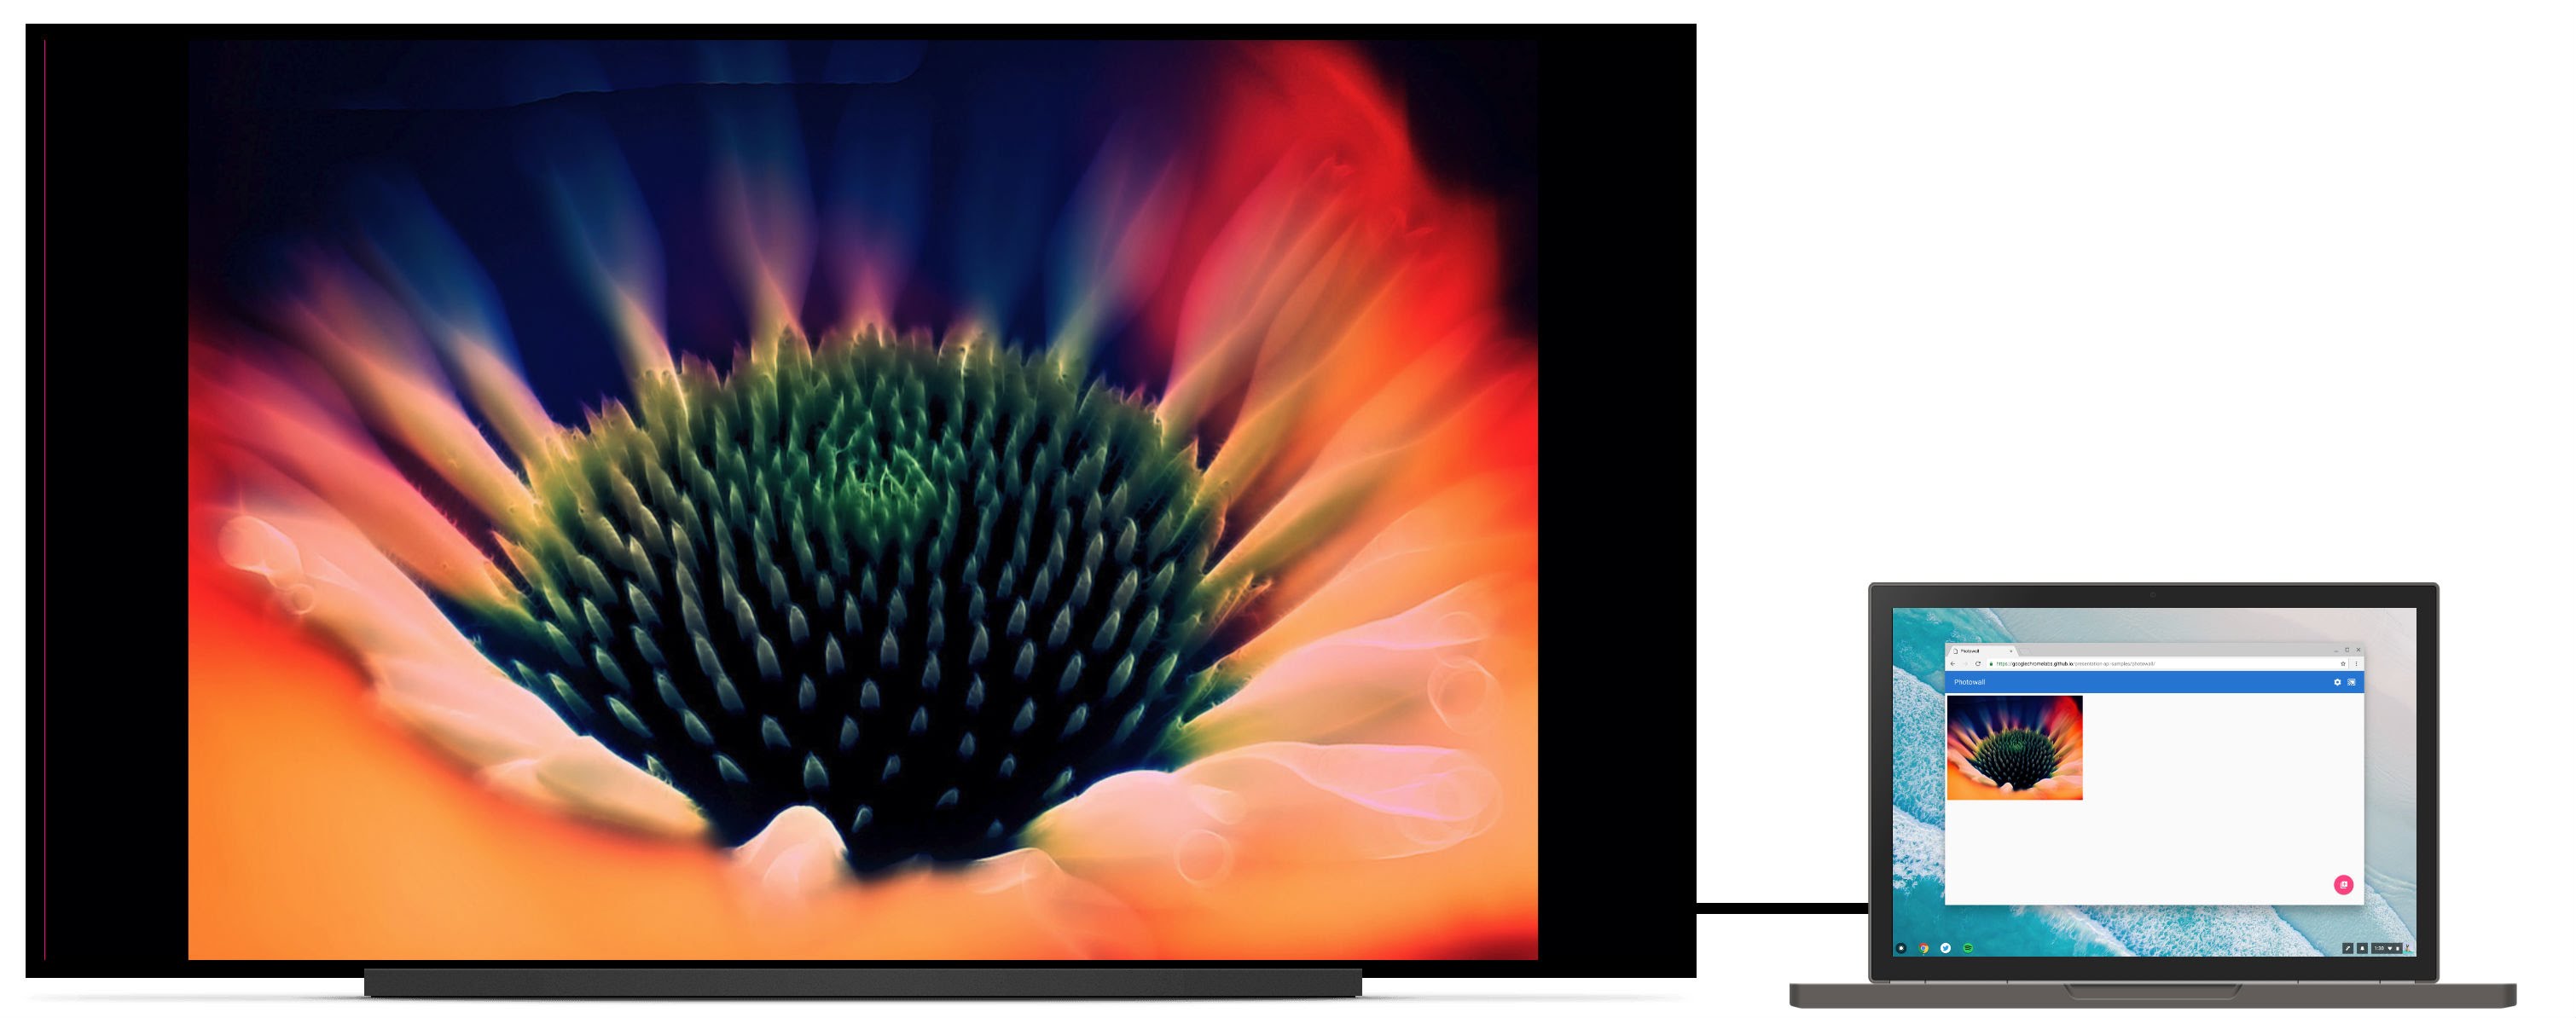
대화형 사진 벽면 데모도 확인해 보세요. 이 웹 앱을 사용하면 여러 명의 컨트롤러가 프레젠테이션 디스플레이에서 사진 슬라이드쇼를 공동으로 표시할 수 있습니다. 코드는 https://github.com/GoogleChromeLabs/presentation-api-samples에서 확인할 수 있습니다.
한 가지 더
Chrome에는 사용자가 웹사이트를 방문하는 동안 언제든지 호출할 수 있는 '전송' 브라우저 메뉴가 있습니다. 이 메뉴의 기본 프레젠테이션을 제어하려면 navigator.presentation.defaultRequest를 이전에 만든 맞춤 presentationRequest 객체에 할당합니다.
// Make this presentation the default one when using the "Cast" browser menu.
navigator.presentation.defaultRequest = presentationRequest;
개발자 팁
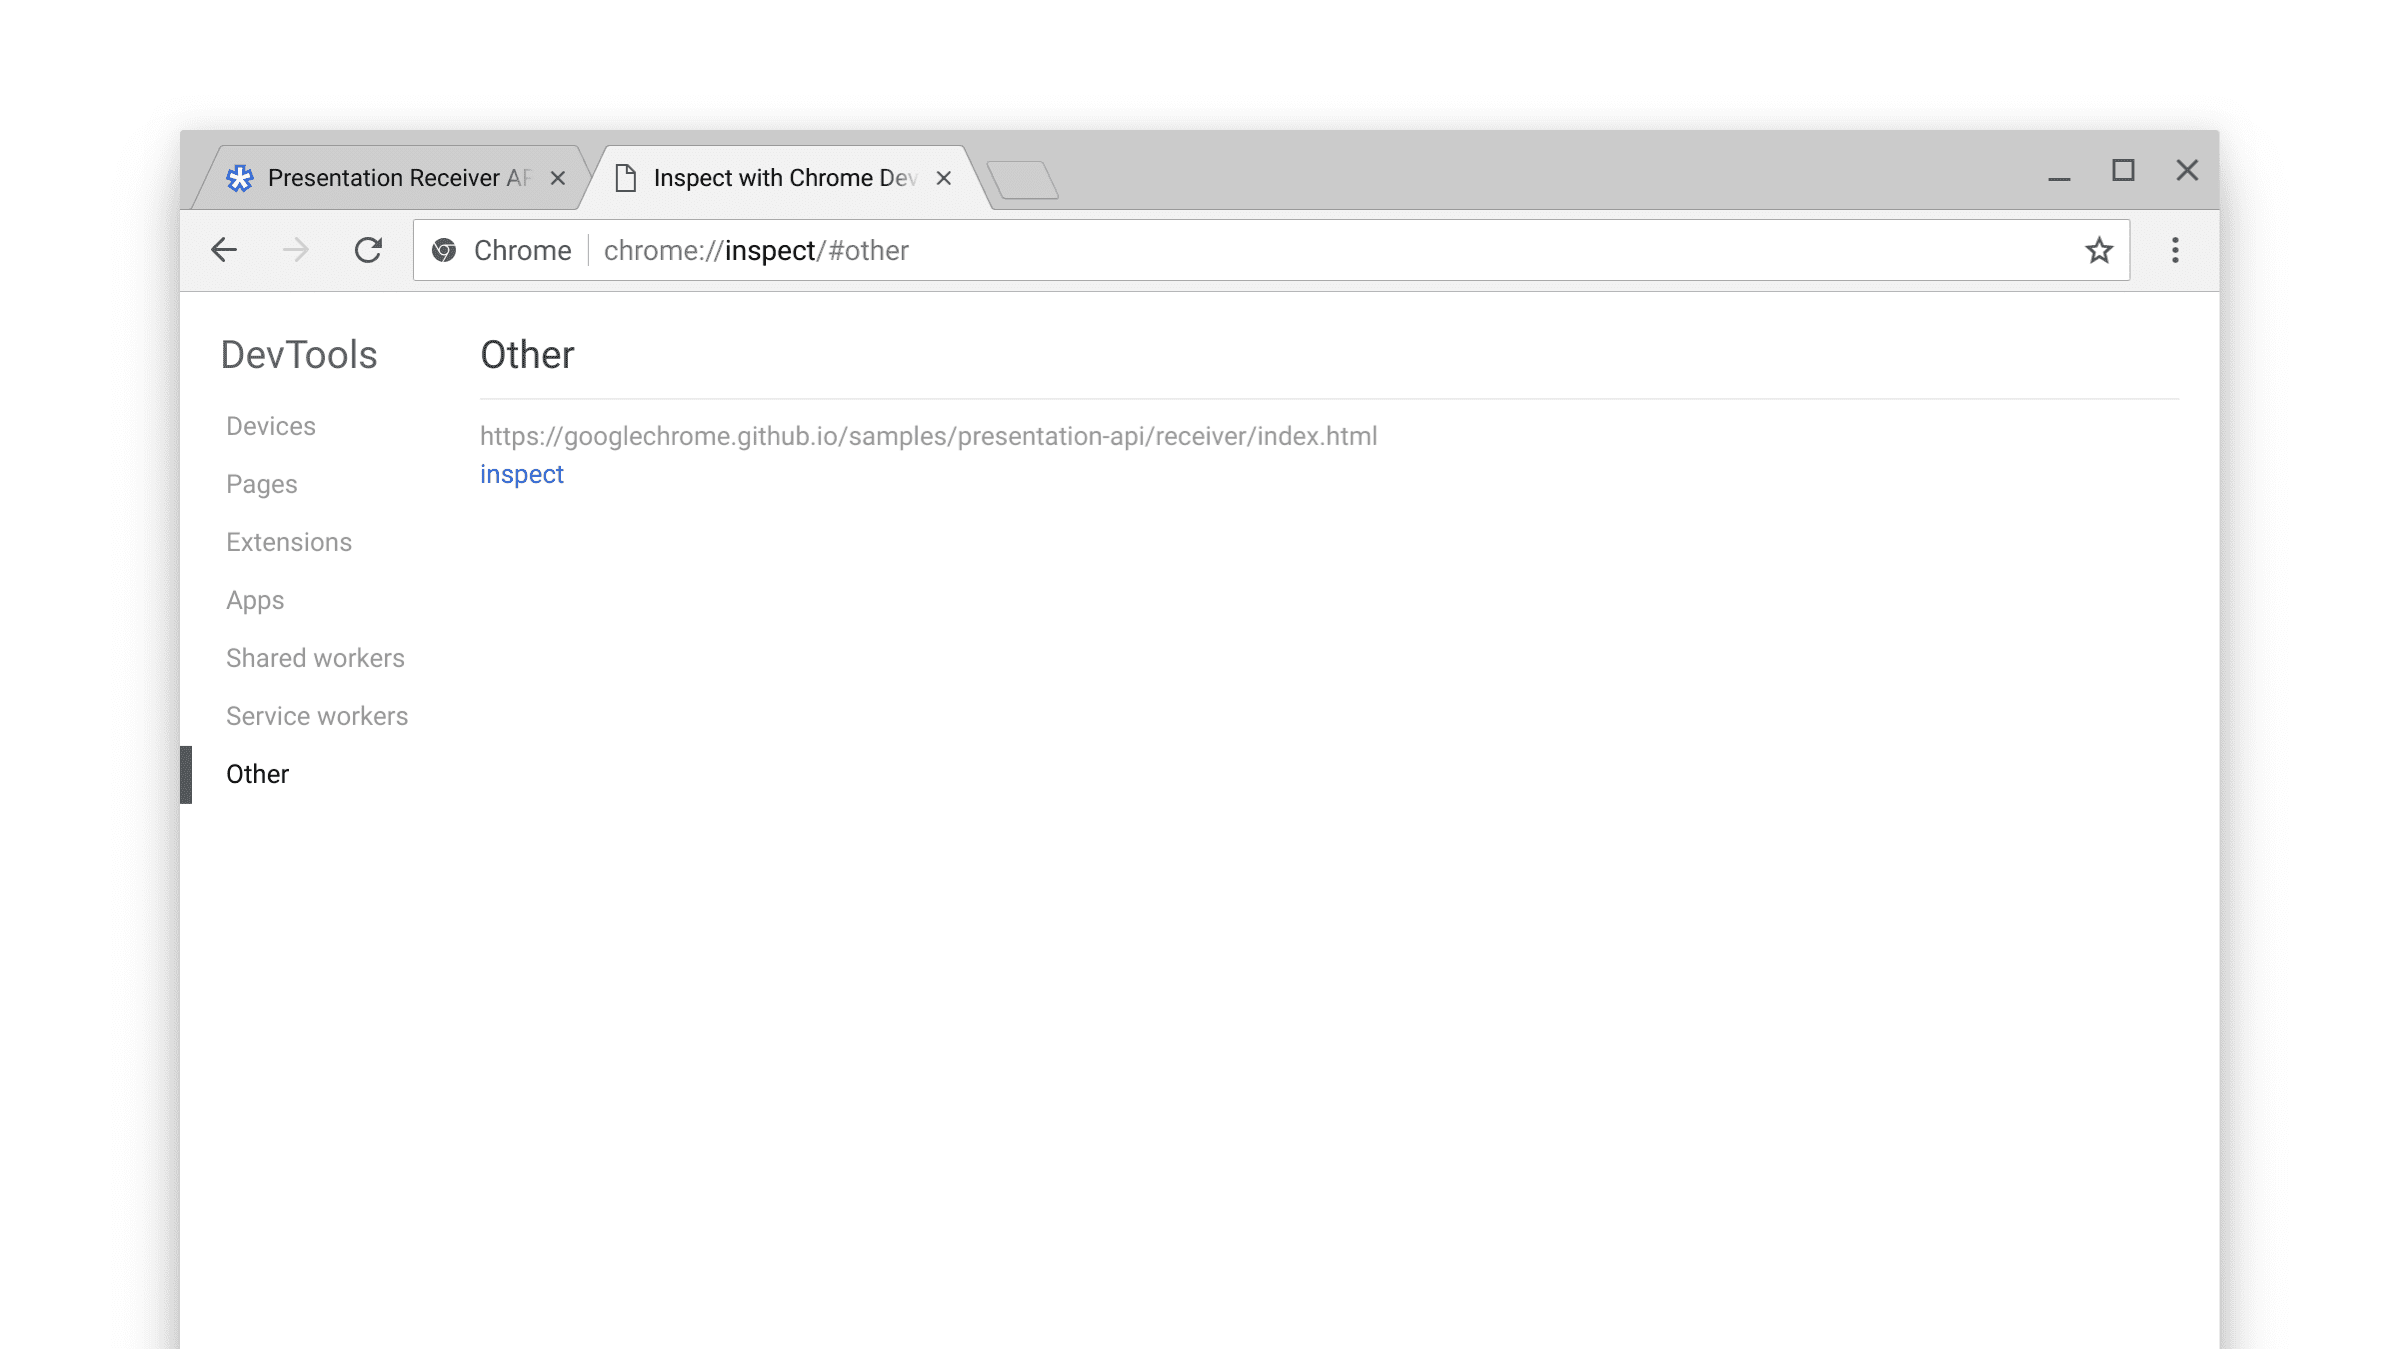
수신기 페이지를 검사하고 디버그하려면 내부 chrome://inspect 페이지로 이동하여 '기타'를 선택하고 현재 표시된 URL 옆에 있는 '검사' 링크를 클릭합니다.
내부 검색/사용 가능 여부 프로세스를 자세히 알아보려면 내부 chrome://media-router-internals 페이지를 확인해 보세요.
다음 단계
Chrome 66부터 ChromeOS, Linux, Windows 플랫폼이 지원됩니다. Mac 지원은 나중에 제공될 예정입니다.
리소스
- Chrome 기능 상태: https://www.chromestatus.com/features#presentation%20api
- 구현 버그: https://crbug.com/?q=component:Blink>PresentationAPI
- Presentation API 사양: https://w3c.github.io/presentation-api/
- 사양 문제: https://github.com/w3c/presentation-api/issues