![Sofia Emelianova](https://web.dev/images/authors/sofiayem.jpg) Sofia Emelianova [GitHub](https://github.com/sofiayem)

<br />

Toggle various overlays and speed up DOM tree navigation with this comprehensive reference of badges in the **Elements** panel.

## Show or hide badges

To show or hide certain badges:

1. [Open DevTools](https://developer.chrome.com/docs/devtools/open#elements).
2. Right-click an element in the DOM tree and check one or several badges in the **Badge settings** sub-menu.

![The 'Badge settings' menu.](https://developer.chrome.com/static/docs/devtools/elements/badges/image/badges-menu.png)

The **Elements** panel shows the selected badges next to the appropriate elements in the DOM tree. The next sections explain every badge.

## View-source

The `view-source` badge is next to the `<html>` tag at the root of the HTML page. Click it to view the source of your page in the **Sources** panel.

![The 'view source' badge.](https://developer.chrome.com/static/docs/devtools/elements/badges/image/view-source-badge.png)

This badge provides an alternative workflow to the **View Page Source** option in Chrome's page context (right-click) menu:

1. In Chrome, right-click \> **Inspect** a page.
2. In the **Elements** panel, click the `view-source` badge next to the `<html>` tag.
3. Inspect the page source in the **Sources** panel.

## Grid

An HTML element is a [grid container](https://developer.mozilla.org/docs/Web/CSS/CSS_Grid_Layout) if its `display` CSS property is set to `grid` or `inline-grid`. Such elements have `grid` badges next to them that toggle the corresponding overlays.

Toggle the overlay on the following preview:
<iframe allow="camera; clipboard-read; clipboard-write; encrypted-media; geolocation; microphone; midi;" loading="lazy" src="https://codepen.io/sofiayem/embed/YzarzKV?height=270&amp;theme-id=light&amp;default-tab=result&amp;editable=true" style="height: 100%; width: 100%; border: 0;" title="Pen YzarzKV by sofiayem on Codepen">See the Pen &amp;amp;lt;a href="https://codepen.io/sofiayem/embed/YzarzKV"&amp;amp;gt;Pen YzarzKV by sofiayem on Codepen&amp;amp;lt;/a&amp;amp;gt;</iframe>

1. [Inspect the element](https://developer.chrome.com/docs/devtools/open#inspect) in the preview.
2. In the DOM tree, click the `grid` badge next to the element and observe the overlay.

![Grid overlay.](https://developer.chrome.com/static/docs/devtools/elements/badges/image/grid-overlay-8d2df6219f8e2.png)

The overlay shows columns, rows, their numbers, and gaps.

To learn how to debug grid layout, see [Inspect CSS grid](https://developer.chrome.com/docs/devtools/css/grid).

## Subgrid

A [subgrid](https://developer.mozilla.org/docs/Web/CSS/CSS_grid_layout/Subgrid) is a nested grid that uses the same tracks as its parent grid. An element is a subgrid container if one or both of its `grid-template-columns`, `grid-template-rows` properties are set to `subgrid`. Such elements have `subgrid` badges next to them that toggle the corresponding overlays.

Toggle the overlay on the following preview:
<iframe allow="camera; clipboard-read; clipboard-write; encrypted-media; geolocation; microphone; midi;" loading="lazy" src="https://codepen.io/sofiayem/embed/KKrajpZ?height=255&amp;theme-id=light&amp;default-tab=result&amp;editable=true" style="height: 100%; width: 100%; border: 0;" title="Pen KKrajpZ by sofiayem on Codepen">See the Pen &amp;amp;lt;a href="https://codepen.io/sofiayem/embed/KKrajpZ"&amp;amp;gt;Pen KKrajpZ by sofiayem on Codepen&amp;amp;lt;/a&amp;amp;gt;</iframe>

1. [Inspect the element](https://developer.chrome.com/docs/devtools/open#inspect) in the preview.
2. In the DOM tree, click the `subgrid` badge next to the element and observe the overlay.

![Subgrid overlay.](https://developer.chrome.com/static/docs/devtools/elements/badges/image/subgrid-overlay-e63c41a794e62.png)

The overlay shows columns, rows, their numbers, and gaps of a subgrid.

## Flex

An HTML element is a [flex container](https://developer.mozilla.org/docs/Web/CSS/CSS_Flexible_Box_Layout) if its `display` CSS property is set to `flex` or `inline-flex`. Such elements have `flex` badges next to them that toggle the corresponding overlays.

Toggle the overlay on the following preview:
<iframe allow="camera; clipboard-read; clipboard-write; encrypted-media; geolocation; microphone; midi;" loading="lazy" src="https://codepen.io/sofiayem/embed/XWEeWdb?height=200&amp;theme-id=light&amp;default-tab=result&amp;editable=true" style="height: 100%; width: 100%; border: 0;" title="Pen XWEeWdb by sofiayem on Codepen">See the Pen &amp;amp;lt;a href="https://codepen.io/sofiayem/embed/XWEeWdb"&amp;amp;gt;Pen XWEeWdb by sofiayem on Codepen&amp;amp;lt;/a&amp;amp;gt;</iframe>

1. [Inspect the element](https://developer.chrome.com/docs/devtools/open#inspect) in the preview.
2. In the DOM tree, click the `flex` badge next to the element and observe the overlay.

![Flex overlay.](https://developer.chrome.com/static/docs/devtools/elements/badges/image/flex-overlay-28c3ff9ba0681.png)

The overlay shows child element positions.

To learn how to debug flex layouts, see [Inspect and debug CSS flexbox](https://developer.chrome.com/docs/devtools/css/flexbox).

## Ad

DevTools can detect some [ad frames and tag them](https://chromium.googlesource.com/chromium/src/+/master/docs/ad_tagging.md). Such frames have `ad` badges next to them.

Discover an ad in the following preview:
<iframe allow="camera; clipboard-read; clipboard-write; encrypted-media; geolocation; microphone; midi;" loading="lazy" src="https://codepen.io/sofiayem/embed/rNdGNYx?height=200&amp;theme-id=light&amp;default-tab=result&amp;editable=true" style="height: 100%; width: 100%; border: 0;" title="Pen rNdGNYx by sofiayem on Codepen">See the Pen &amp;amp;lt;a href="https://codepen.io/sofiayem/embed/rNdGNYx"&amp;amp;gt;Pen rNdGNYx by sofiayem on Codepen&amp;amp;lt;/a&amp;amp;gt;</iframe>

1. [Inspect the element](https://developer.chrome.com/docs/devtools/open#inspect) in the preview.
2. In the DOM tree, find an element with the `ad` badge next to it.

![Ad badge.](https://developer.chrome.com/static/docs/devtools/elements/badges/image/ad-badge-545cab6b91ed3.png)

The `ad` badge is not clickable but if you hover over it, you will see a tooltip that provides context on why the element was identified as an ad, such as:

![Ad badge's tooltip.](https://developer.chrome.com/static/docs/devtools/elements/badges/image/ad-badge-tooltip.png)

- **Script ancestry**: Which scripts were involved in creating the element.
- **Filter list rules** : The specific rule from a filter list (for example, `EasyList`) that matched the element or the resource it loaded.

You can also use the **Rendering** tab to [highlight ad frames](https://developer.chrome.com/docs/devtools/rendering/apply-effects#highlight_ad_frames) in red.

## Scroll

An HTML element is a [scroll container](https://developer.mozilla.org/docs/Glossary/Scroll_container) if its `overflow` CSS property is set to `scroll`, or `auto` when there's enough content to cause overflow. Such elements have `scroll` badges next to them.

![Scroll badge on a DOM tree node.](https://developer.chrome.com/static/docs/devtools/elements/badges/image/scroll-example.png)

## Scroll-snap

Scroll containers can have [CSS properties that configure snap points](https://developer.mozilla.org/docs/Web/CSS/CSS_Scroll_Snap). Such elements have `scroll-snap` badges next to them that toggle the corresponding overlays.

Toggle the overlay on the following preview:
<iframe allow="camera; clipboard-read; clipboard-write; encrypted-media; geolocation; microphone; midi;" loading="lazy" src="https://codepen.io/sofiayem/embed/eYMGYLz?height=200&amp;theme-id=light&amp;default-tab=result&amp;editable=true" style="height: 100%; width: 100%; border: 0;" title="Pen eYMGYLz by sofiayem on Codepen">See the Pen &amp;amp;lt;a href="https://codepen.io/sofiayem/embed/eYMGYLz"&amp;amp;gt;Pen eYMGYLz by sofiayem on Codepen&amp;amp;lt;/a&amp;amp;gt;</iframe>

1. [Inspect the element](https://developer.chrome.com/docs/devtools/open#inspect) in the preview.
2. In the DOM tree, click the `scroll-snap` badge next to the element.
3. Try scrolling the element to the right and observe the overlay.

![Scroll-snap overlay.](https://developer.chrome.com/static/docs/devtools/elements/badges/image/scroll-snap-overlay-44fee77dd4db2.png)

The overlay shows element positions and snap points.

## Container

An HTML element is a [container](https://developer.mozilla.org/docs/Web/CSS/CSS_Container_Queries) if it has the `container-type` CSS property. Such elements have `container` badges next to them that toggle the corresponding overlays.

> [!NOTE]
> **Note:** CSS container queries is an experimental feature. To enable its support in DevTools, under `chrome://flags`, set the `Enable CSS Container Queries` experiment to `Enabled`. Otherwise, the next preview doesn't work.

Toggle the overlay on the following preview:
<iframe allow="camera; clipboard-read; clipboard-write; encrypted-media; geolocation; microphone; midi;" loading="lazy" src="https://codepen.io/sofiayem/embed/mdxByda?height=350&amp;theme-id=light&amp;default-tab=result&amp;editable=true" style="height: 100%; width: 100%; border: 0;" title="Pen mdxByda by sofiayem on Codepen">See the Pen &amp;amp;lt;a href="https://codepen.io/sofiayem/embed/mdxByda"&amp;amp;gt;Pen mdxByda by sofiayem on Codepen&amp;amp;lt;/a&amp;amp;gt;</iframe>

1. [Inspect the element](https://developer.chrome.com/docs/devtools/open#inspect) in the preview.
2. In the DOM tree, click the `container` badge next to the element.
3. Try resizing the element by dragging its bottom-right corner and observe the layout change and overlay.

![Container overlay.](https://developer.chrome.com/static/docs/devtools/elements/badges/image/container-overlay-e2267f5c5f966.png)

The overlay shows child element positions.

To learn how to debug container queries, see [Inspect and debug CSS container queries](https://developer.chrome.com/docs/devtools/css/container-queries).

## Slot

The [`<slot>` HTML element](https://developer.mozilla.org/docs/Web/HTML/Element/slot) is a placeholder that you can fill with your own content. Together with the `<template>` element, `<slot>` lets you create separate DOM trees and present them together. Slot content elements have `slot` badges next to them that serve as links to the corresponding slots.

Discover the `slot` badge in the following preview:
<iframe allow="camera; clipboard-read; clipboard-write; encrypted-media; geolocation; microphone; midi;" loading="lazy" src="https://codepen.io/sofiayem/embed/OJvxyzB?height=250&amp;theme-id=light&amp;default-tab=result&amp;editable=true" style="height: 100%; width: 100%; border: 0;" title="Pen OJvxyzB by sofiayem on Codepen">See the Pen &amp;amp;lt;a href="https://codepen.io/sofiayem/embed/OJvxyzB"&amp;amp;gt;Pen OJvxyzB by sofiayem on Codepen&amp;amp;lt;/a&amp;amp;gt;</iframe>

1. [Inspect the element](https://developer.chrome.com/docs/devtools/open#inspect) in the preview.
2. In the DOM tree, click the `slot` badge next to the element to locate the corresponding slot. ![Slot and reveal badges.](https://developer.chrome.com/static/docs/devtools/elements/badges/image/slot-reveal-badges-301af5f4d4128.png)

   > [!IMPORTANT]
   > **Key point:** The `slot` badge has a paired `reveal` badge that takes you back.

3. Get back to the slot's content by clicking the `reveal` badge.

## Top-layer

This badge helps you understand the concept of the [top layer](https://developer.chrome.com/blog/what-is-the-top-layer) and visualize it. The top layer renders content on top of all other layers, regardless of [`z-index`](https://developer.mozilla.org/docs/Web/CSS/CSS_Positioning/Understanding_z_index/Adding_z-index). When you open a [`<dialog>` element](https://web.dev/articles/building-a-dialog-component) using the [`.showModal()` method](https://developer.mozilla.org/docs/Web/API/HTMLDialogElement/showModal), the browser puts it into the top layer.

To help you visualize top layer elements, the **Elements** panel adds a `#top-layer` container to the DOM tree after the closing `</html>` tag.

Top layer elements have `top-layer (N)` badges next to them, where `N` is the element's index number. The badges are links to the corresponding elements in the `#top-layer` container.

Discover the `top-layer (N)` badge in the following preview:
<iframe allow="camera; clipboard-read; clipboard-write; encrypted-media; geolocation; microphone; midi;" loading="lazy" src="https://codepen.io/sofiayem/embed/ExEGRvR?height=250&amp;theme-id=light&amp;default-tab=result&amp;editable=true" style="height: 100%; width: 100%; border: 0;" title="Pen ExEGRvR by sofiayem on Codepen">See the Pen &amp;amp;lt;a href="https://codepen.io/sofiayem/embed/ExEGRvR"&amp;amp;gt;Pen ExEGRvR by sofiayem on Codepen&amp;amp;lt;/a&amp;amp;gt;</iframe>

1. In the preview, click **Open dialog**.
2. [Inspect the dialog](https://developer.chrome.com/docs/devtools/open#inspect).
3. In the DOM tree, click the `top-layer (1)` badge next to the `<dialog>` element. The **Elements** panel takes you to the corresponding element in the `#top-layer` container after the closing `</html>` tag. ![The top-layer container and badge.](https://developer.chrome.com/static/docs/devtools/elements/badges/image/the-top-layer-container-502d91ad6dd13.png)

   > [!IMPORTANT]
   > **Key point:** The `top-layer (N)` badge has a paired `reveal` badge that takes you back.

4. Get back to the `<dialog>` element by clicking the `reveal` badge next to the element or its `::backdrop`.

## Media

The `media` badge is turned off by default. [When turned on](https://developer.chrome.com/docs/devtools/elements/badges#show-or-hide), it appears next to `<audio>` and `<video>` elements. Click this badge to open the **Media** panel and debug your media.

![The media badge turned on in badge settings and displayed next to the video element.](https://developer.chrome.com/static/docs/devtools/elements/badges/image/media-badge.png)

For more information, see [Debug media players with the Media panel](https://developer.chrome.com/docs/devtools/media-panel).

## Popover

A [popover](https://web.dev/learn/css/popover-and-dialog) is any element with a `popover` attribute, and is useful for a wide range of interactive patterns, including tooltips, alerts, toasts and more. Such elements have `popover` badges next to them.

This badge toggles a [`top-layer`](https://developer.chrome.com/docs/devtools/elements/badges#top-layer) badge next to it that links to the corresponding elements in the `#top-layer` container.

Discover the `popover` badge in the following preview:
<iframe allow="camera; clipboard-read; clipboard-write; encrypted-media; geolocation; microphone; midi;" loading="lazy" src="https://codepen.io/web-dot-dev/embed/OPyZpJL?height=250&amp;theme-id=light&amp;default-tab=result&amp;editable=true" style="height: 100%; width: 100%; border: 0;" title="Pen OPyZpJL by web-dot-dev on Codepen"> </iframe>

1. In the preview, click **TOGGLE POPOVER**.
2. [Inspect the popover](https://developer.chrome.com/docs/devtools/open#inspect) that appears.
3. In the DOM tree, click the `popover` badge next to the `<div popover>` element. The **Elements** panel shows you `top-layer` badge.
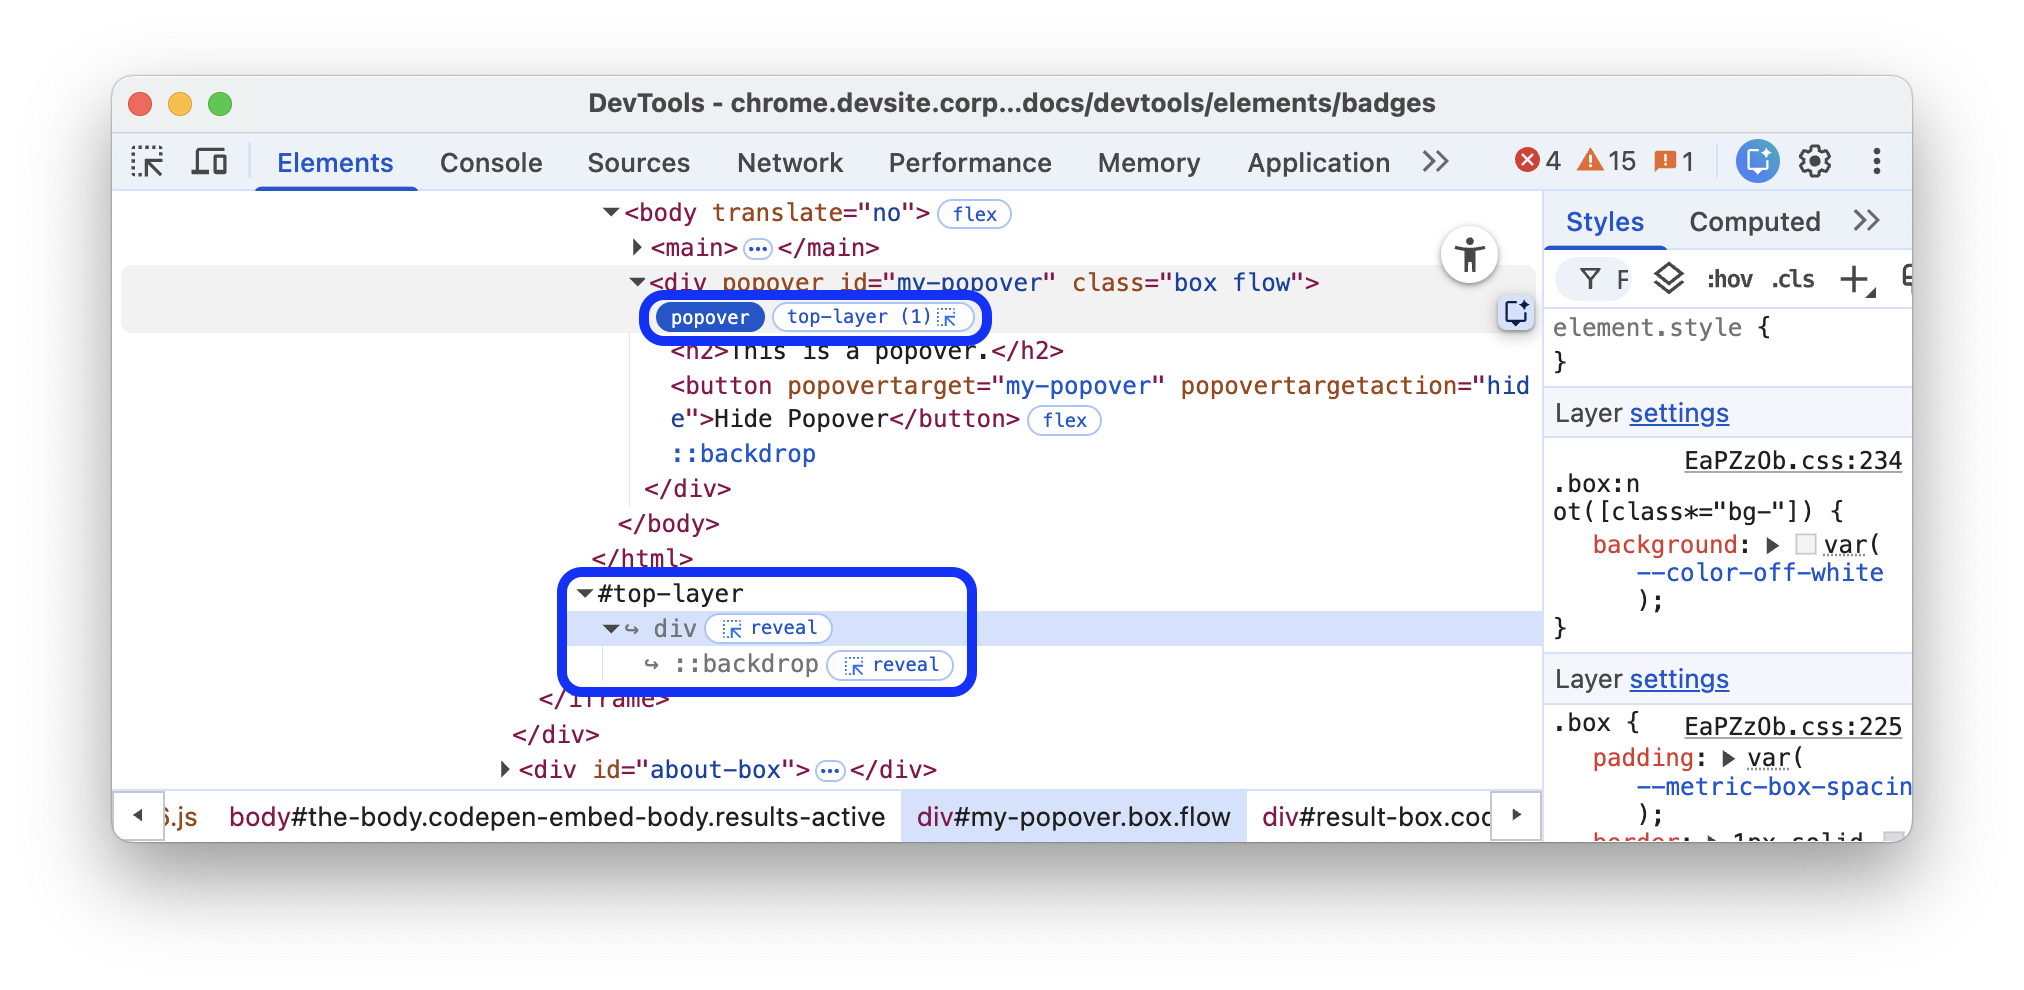
   ![The popover badge next to the element with a popover attribute.](https://developer.chrome.com/static/docs/devtools/elements/badges/image/popover-badge.png)
4. Follow the steps in the [\`Top layer](https://developer.chrome.com/docs/devtools/elements/badges#top-layer) section.

To learn more, see also <https://web.dev/learn/css/popover-and-dialog>.

## Starting-style

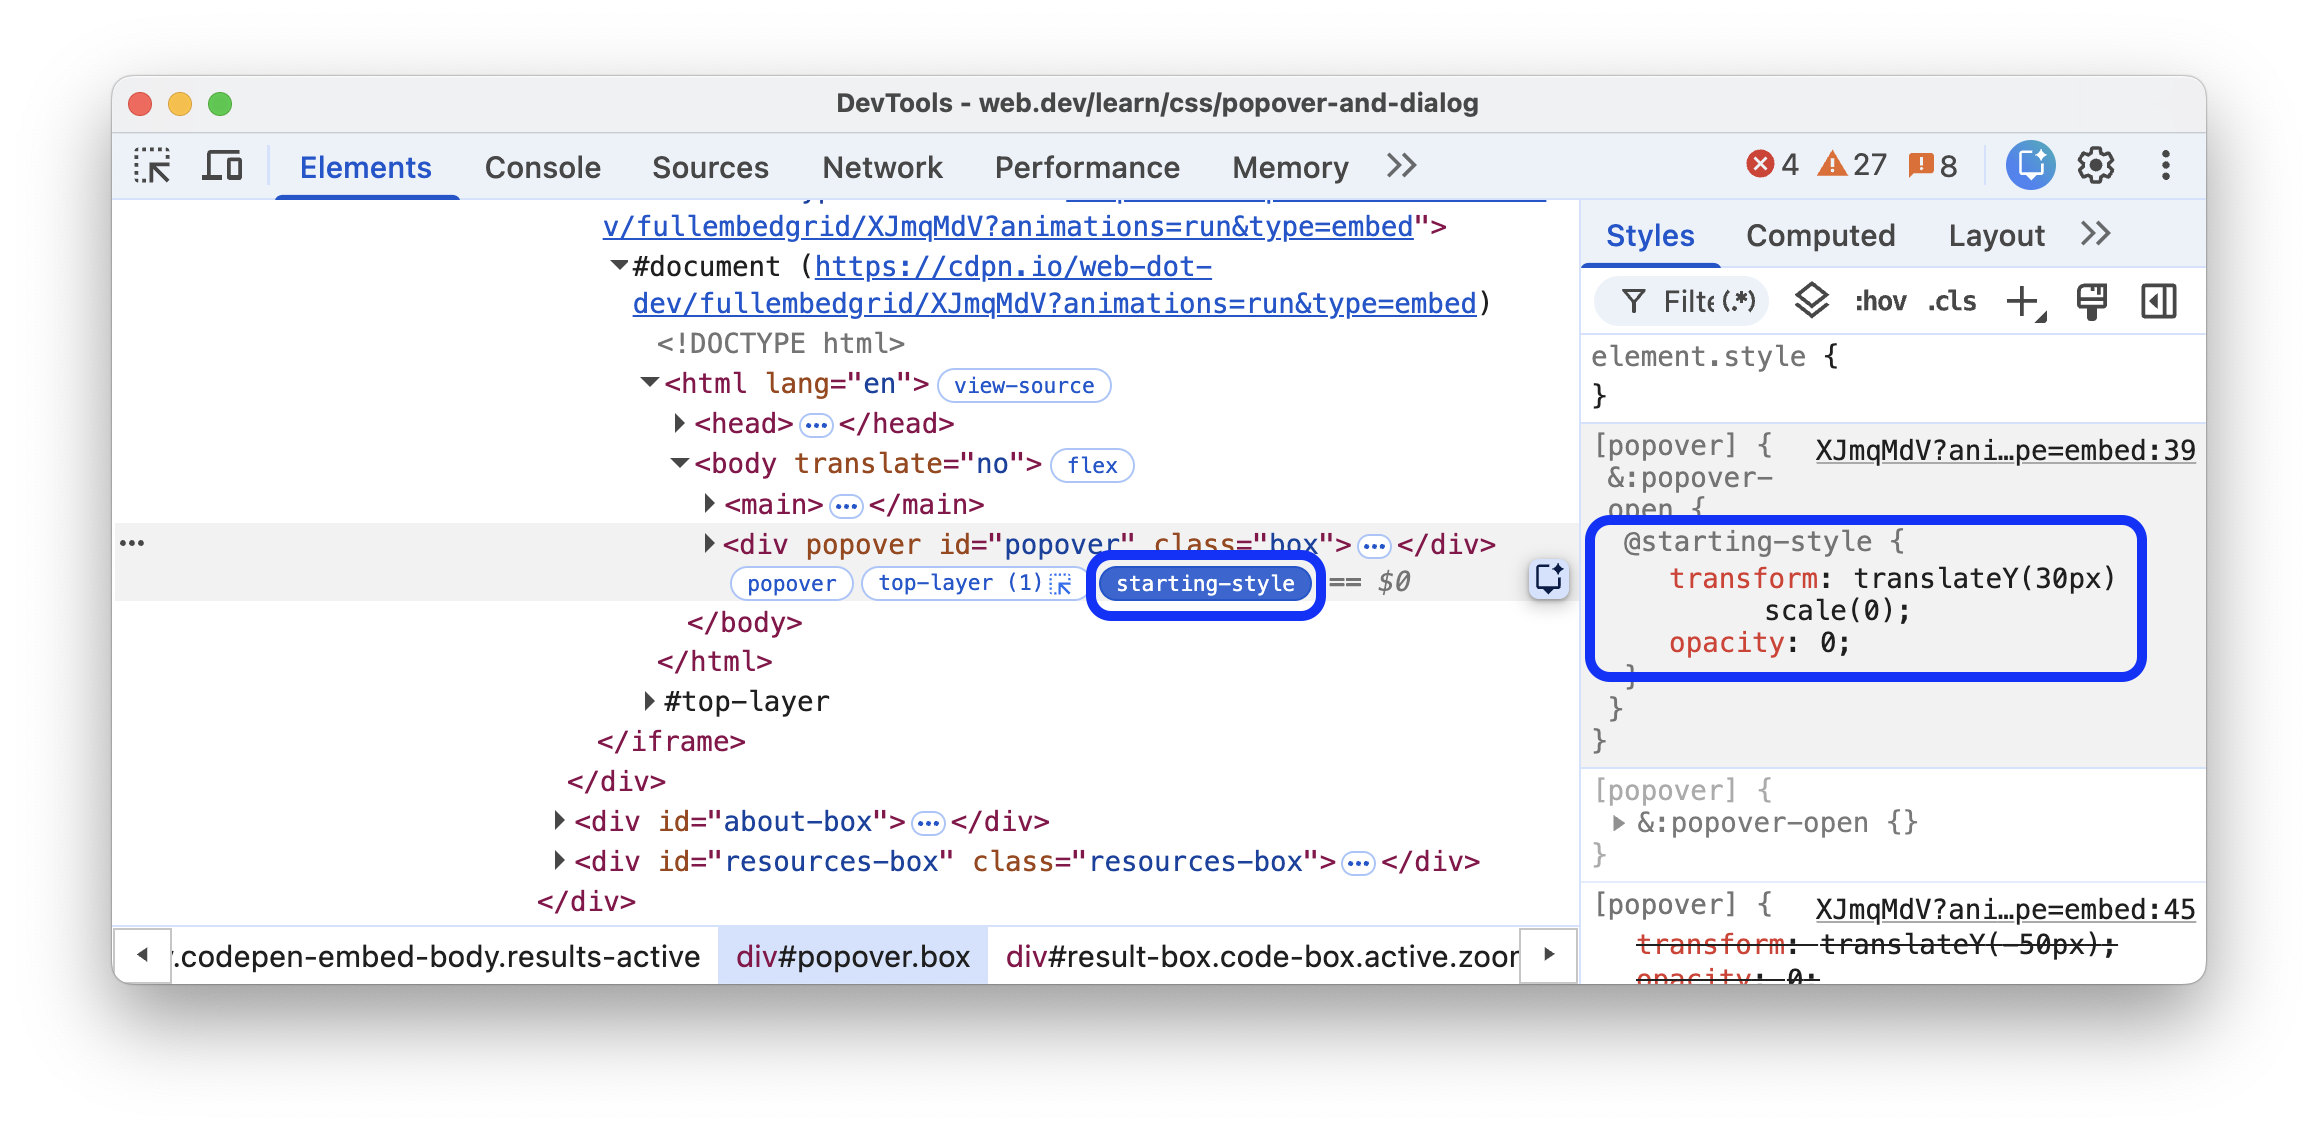
The[`@starting-style` rule](https://web.dev/blog/baseline-entry-animations#setting_up_entry_effects_with_starting-style) defines the initial styles on an element before it's rendered on the page. This is required for elements that [animate in](https://web.dev/learn/css/popover-and-dialog#animating_popovers) from `display: none`, as they need a state from which to animate in. Such elements have `starting-style` badges next to them.

This badge toggles the styles in the `@starting-style` rule, so you can see the animation in action.

Discover the `starting-style` badge in the following preview:
<iframe allow="camera; clipboard-read; clipboard-write; encrypted-media; geolocation; microphone; midi;" loading="lazy" src="https://codepen.io/web-dot-dev/embed/XJmqMdV?height=250&amp;theme-id=light&amp;default-tab=result&amp;editable=true" style="height: 100%; width: 100%; border: 0;" title="Pen XJmqMdV by web-dot-dev on Codepen"> </iframe>

1. In the preview, click **OPEN POPOVER**.
2. [Inspect the popover](https://developer.chrome.com/docs/devtools/open#inspect) that appears.
3. In the DOM tree, toggle the `starting-style` badge next to the `<div popover>` element.

   ![The starting-style badge next to the element with the @starting-style rule.](https://developer.chrome.com/static/docs/devtools/elements/badges/image/starting-style-badge.png)
4. Observe the animation in action and the styles being applied in the **Elements** \> **Styles** tab.

To learn more, see also [Animating popovers](https://web.dev/learn/css/popover-and-dialog#animating_popovers).

## Custom-element

[Custom HTML elements](https://developer.mozilla.org/docs/Web/API/Web_components/Using_custom_elements) identified by hyphenated tag names or `is="..."` attributes for customized built-in elements have `custom-element` badges next to them in the DOM tree.

Click the badge to go to the relevant code in the **Sources** panel.
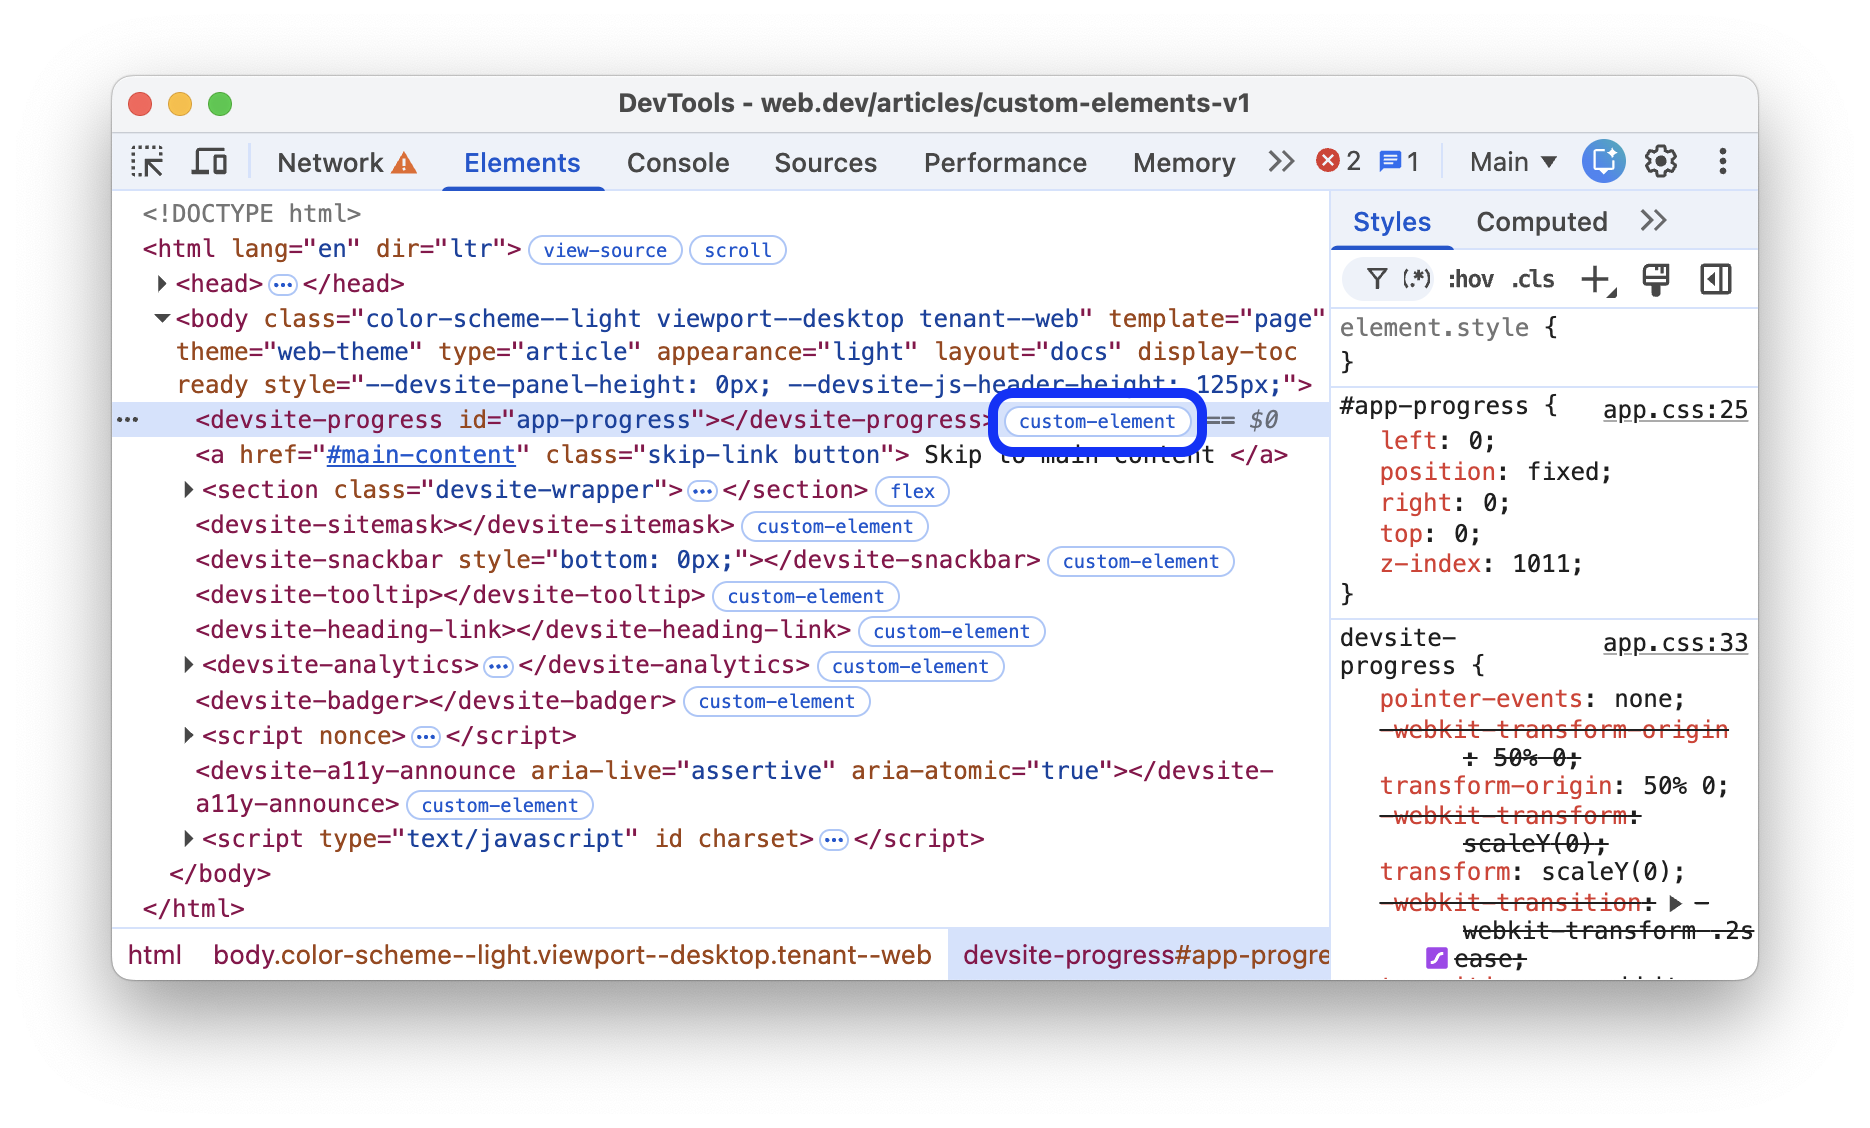
![The custom-element badge next to custom HTML elements in the DOM tree.](https://developer.chrome.com/static/docs/devtools/elements/badges/image/custom-element-badge.png)