![Kayce Basques](https://web.dev/images/authors/kaycebasques.jpg) Kayce Basques [X](https://twitter.com/kaycebasques) [GitHub](https://github.com/kaycebasques) ![Jecelyn Yeen](https://web.dev/images/authors/jecelynyeen.jpg) Jecelyn Yeen [X](https://twitter.com/jecfish) [GitHub](https://github.com/jecfish) [Bluesky](https://bsky.app/profile/jec.fish) [Homepage](https://jec.fish/) ![Sofia Emelianova](https://web.dev/images/authors/sofiayem.jpg) Sofia Emelianova [GitHub](https://github.com/sofiayem)

<br />

Discover new workflows in this comprehensive reference of Chrome DevTools features related to
viewing and changing CSS.

See [View and change CSS](https://developer.chrome.com/docs/devtools/css.md.txt) to learn the basics.

## Select an element

The **Elements** panel of DevTools lets you view or change the CSS of one element at a time.

![An example of a selected element.](https://developer.chrome.com/static/docs/devtools/css/reference/image/an-example-a-selected-el-73f5c083a4f5.png)

On the screenshot, the `h1` element that's highlighted blue in the **DOM Tree** is the selected element.
To the right, the element's styles are shown in the **Styles** tab. To the left, the element is
highlighted in the viewport, but only because the mouse is hovering over it in the **DOM
Tree**.

See [View an element's CSS](https://developer.chrome.com/docs/devtools/css.md.txt#view) for a tutorial.

There are many ways to select an element:

- In your viewport, right-click the element and select **Inspect**.
- In DevTools, click **Select an element** ![Select an element](https://developer.chrome.com/static/docs/devtools/css/reference/image/select-element-69114a4bac4eb.png) or press <kbd>Command</kbd>+<kbd>Shift</kbd>+<kbd>C</kbd> (Mac) or <kbd>Control</kbd>+<kbd>Shift</kbd>+<kbd>C</kbd> (Windows, Linux), and then click the element in the viewport.
- In DevTools, click the element in the **DOM Tree**.
- In DevTools, run a query like `document.querySelector('p')` in the **Console** , right-click the result, and then select **Reveal in Elements panel**.

## View CSS

Use the **Elements** \> **Styles** and **Computed** tabs to view CSS rules and [diagnose CSS issues](https://developer.chrome.com/docs/devtools/css/issues.md.txt).

### Navigate with links

The **Styles** tab displays links in various places to various other places, including but not limited to:

- Next to CSS rules, to style sheets and CSS sources. Such links open the **Sources** panel. If the style sheet is minified, see [Make a minified file readable](https://developer.chrome.com/docs/devtools/javascript/reference.md.txt#format).
- In the **Inherited from ...** sections, to parent elements.
- In `var()` calls, to [custom property](https://developer.mozilla.org/docs/Web/CSS/Using_CSS_custom_properties) declarations.
- In `animation` shorthand properties, to `@keyframes`.
- **Learn more** links in documentation tooltips.
- And more.

Here are some of them highlighted:

![Various links highlighted.](https://developer.chrome.com/static/docs/devtools/css/reference/image/various-links-highlighted-4c3e7fc090e71.png)

Links may be styled differently. If you're not sure if something is a link, try clicking it to find out.

### View tooltips with CSS documentation, specificity, and custom property values

**Elements** \> **Styles** shows tooltips with useful information when you hover over specific elements.

#### View CSS documentation

To see a tooltip with a short CSS description, hover over the property name in the **Styles** tab.

> [!NOTE]
> **Note:** DevTools pulls the descriptions for tooltips from [VS Code Custom Data](https://github.com/microsoft/vscode-custom-data).

![The tooltip with documentation on a CSS property.](https://developer.chrome.com/static/docs/devtools/css/reference/image/the-tooltip-documentatio-6b2a6e53019d.png)

Click **Learn more** to go to an [MDN CSS Reference](https://developer.mozilla.org/docs/Web/CSS/Reference) on this property.

To turn the tooltips off, check ![Checkbox.](https://developer.chrome.com/static/docs/devtools/css/reference/image/checkbox-77f41b03c49d4.svg) **Don't show**.

To turn them back on, check ![Settings.](https://developer.chrome.com/static/docs/devtools/css/reference/image/settings-e706bdd6eac57.svg) [**Settings** \> **Preferences** \> **Elements**](https://developer.chrome.com/docs/devtools/settings/preferences.md.txt#elements) \> ![Checkbox.](https://developer.chrome.com/static/docs/devtools/css/reference/image/checkbox-09aebe032b9fa.svg) **Show CSS documentation tooltip**.

#### View selector specificity

Hover over a selector in the **Styles** tab---including parent selectors in [nested CSS rules](https://developer.mozilla.org/docs/Web/CSS/CSS_nesting/Using_CSS_nesting), inherited nested rules, and `@nested-declarations` rules---to see a tooltip with its [specificity](https://developer.mozilla.org/docs/Web/CSS/Specificity) weight and highlight matching elements in the viewport.

![The tooltip with specificity weight of a matched selector.](https://developer.chrome.com/static/docs/devtools/css/reference/image/tooltip-specificity.png)

#### View the values of custom properties

Hover over a [`--custom-property`](https://developer.mozilla.org/docs/Web/CSS/--*) to see its value in a tooltip.

![The value of a custom property in a tooltip.](https://developer.chrome.com/static/docs/devtools/css/reference/image/the-value-a-custom-prope-a0809a607a4e6.png)

### View invalid, overridden, inactive, and other CSS

The **Styles** tab recognizes many kinds of CSS issues and highlights them in different ways.

See [Understand CSS in the Styles tab](https://developer.chrome.com/docs/devtools/css/issues.md.txt#css-in-styles).

### View only the CSS that's actually applied to an element

The **Styles** tab shows you all of the rules that apply to an element, including declarations that
have been overridden. When you're not interested in overridden declarations, use the **Computed**
tab to view only the CSS that's actually being applied to an element.

1. [Select an element](https://developer.chrome.com/docs/devtools/css/reference.md.txt#select).
2. Go to the **Computed** tab in the **Elements** panel.

![The Computed tab.](https://developer.chrome.com/static/docs/devtools/css/reference/image/the-computed-tab-577802944e549.svg)

Check the **Show All** checkbox to see all properties.

See [Understand CSS in the Computed tab](https://developer.chrome.com/docs/devtools/css/issues.md.txt#css-in-computed).

### View CSS properties in alphabetical order

Use the **Computed** tab. See [View only the CSS that's actually applied to an element](https://developer.chrome.com/docs/devtools/css/reference.md.txt#computed).

### View inherited CSS properties

Check the **Show All** checkbox in the **Computed** tab. See [View only the CSS that's actually
applied to an element](https://developer.chrome.com/docs/devtools/css/reference#computed).

Alternatively, scroll the **Styles** tab and find sections named `Inherited from <element_name>`.

![View the Inherited from... section of the Styles tab.](https://developer.chrome.com/static/docs/devtools/css/reference/image/view-inherited-secti-14a231c5d8876.png)

### View CSS at-rules

At-rules are CSS statements that let you control CSS behavior. **Elements** \> **Styles** shows the following at-rules in dedicated sections:

- [`@property`](https://developer.chrome.com/docs/devtools/css/reference.md.txt#property)
- [`@supports`](https://developer.chrome.com/docs/devtools/css/reference.md.txt#supports)
- [`@scope`](https://developer.chrome.com/docs/devtools/css/reference.md.txt#scope)
- [`@font-palette-values`](https://developer.chrome.com/docs/devtools/css/reference.md.txt#font-palette-values)
- [`@position-try`](https://developer.chrome.com/docs/devtools/css/reference.md.txt#position-try)

#### View `@property` at-rules

The [`@property` CSS at-rule](https://web.dev/articles/at-property) lets you define [CSS custom properties](https://developer.mozilla.org/docs/Web/CSS/--*) explicitly and register them in a style sheet without running any JavaScript.

Hover over the name of such property in the **Styles** tab, to see a tooltip with the property's value, descriptors, and a link to its registration in the collapsible `@property` section at the bottom of the **Styles** tab.

To edit an `@property` rule, [double-click](https://developer.chrome.com/docs/devtools/css/reference.md.txt#change-declaration) its name or value.

#### View `@supports` at-rules

The **Styles** tab shows you the `@supports` CSS at-rules if they are applied to an element. For example, inspect the following element:

![View @supports at-rules.](https://developer.chrome.com/static/docs/devtools/css/reference/image/view-supports-rules-6917ba69c664.png)

If your browser supports the `lab()` function, the element is green, otherwise it's purple.

> [!NOTE]
> **Note** : At the time of writing, only Safari [supports the CIELAB color space](https://caniuse.com/?search=lab).

#### View `@scope` at-rules

The **Styles** tab shows you [CSS `@scope` at-rules](https://drafts.csswg.org/css-cascade-6/#scope-atrule) if they are applied to an element.

The new `@scope` at-rules are a part of the [CSS Cascading and Inheritance Level 6 specification](https://drafts.csswg.org/css-cascade-6/). These rules allow you to scope CSS styles, in other words, explicitly apply styles to specific elements.

> [!NOTE]
> **Note** : The `@scope` at-rule feature is experimental. To test it, enable the **Experimental Web Platform features** flag in `chrome://flags/#enable-experimental-web-platform-features`. Otherwise, the next preview doesn't work.

View the `@scope` rule in the following preview:
<iframe allow="camera; clipboard-read; clipboard-write; encrypted-media; geolocation; microphone; midi;" loading="lazy" src="https://codepen.io/sofiayem/embed/YzaBqOo?height=270&amp;theme-id=light&amp;default-tab=result&amp;editable=true" style="height: 100%; width: 100%; border: 0;" title="Pen YzaBqOo by sofiayem on Codepen">See the Pen <a href="https://codepen.io/sofiayem/embed/YzaBqOo">Pen YzaBqOo by sofiayem on Codepen</a></iframe>

1. [Inspect the text](https://developer.chrome.com/docs/devtools/open.md.txt#elements) on the card in the preview.
2. On the **Styles** tab, find the `@scope` rule.

![The @scope rule.](https://developer.chrome.com/static/docs/devtools/css/reference/image/the-scope-rule-34e293f5772f7.png)

In this example, the `@scope` rule overrides the global CSS `background-color` declaration for all `<p>` elements inside elements with a `card` class.

To edit the `@scope` rule, double-click it.

#### View `@font-palette-values` at-rules

The [`@font-palette-values` CSS at-rule](https://developer.mozilla.org/docs/Web/CSS/@font-palette-values) lets you customize the default values of the `font-palette` property. **Elements** \> **Styles** shows this at-rule in a dedicated section.

View the `@font-palette-values` section in the next preview:
<iframe allow="camera; clipboard-read; clipboard-write; encrypted-media; geolocation; microphone; midi;" loading="lazy" src="https://codepen.io/sofiayem/embed/ZEPpYLa?height=270&amp;theme-id=light&amp;default-tab=result&amp;editable=true" style="height: 100%; width: 100%; border: 0;" title="Pen ZEPpYLa by sofiayem on Codepen">See the Pen <a href="https://codepen.io/sofiayem/embed/ZEPpYLa">Pen ZEPpYLa by sofiayem on Codepen</a></iframe>

1. [Inspect the second line of text](https://developer.chrome.com/docs/devtools/open.md.txt#elements) in the preview.
2. In **Styles** , find the `@font-palette-values` section.

![The @font-palette-values rule.](https://developer.chrome.com/static/docs/devtools/css/reference/image/at-font-palette-values.png)

In this example, the `--New` font palette values override the default ones of the colored font.

To edit your custom values, double-click them.

#### View `@position-try` at-rules

The [`@position-try` CSS rule](https://www.w3.org/TR/css-anchor-position-1/#fallback-rule) along with the `position-try-options` property lets you define alternative anchor positions for elements. To learn more, see [Introducing the CSS anchor positioning API](https://developer.chrome.com/blog/anchor-positioning-api.md.txt).

**Elements** \> **Styles** resolves and links the following:

- `position-try-options` property values to a dedicated `@position-try --name` section.
- `position-anchor` property values and `anchor()` arguments to the corresponding elements with `popovertarget` attributes.

Inspect the `position-try-options` values and `@position-try` sections in the next preview:
<iframe height="450" style="width: 100%;" scrolling="no" title="Anchored submenu demo" src="https://codepen.io/web-dot-dev/embed/mdYdpOM?height=450&amp;theme-id=light&amp;default-tab=result&amp;editable=true" frameborder="no" loading="lazy" allowtransparency="true" allowfullscreen="true">
See the Pen <a href="https://codepen.io/web-dot-dev/pen/mdYdpOM">Anchored submenu demo</a> by web.dev (<a href="https://codepen.io/web-dot-dev">@web-dot-dev</a>)
on <a href="https://codepen.io">CodePen</a>.
</iframe> Demo using anchor with `popover`

1. In the preview, open the submenu, that is, click **YOUR ACCOUNT** then **STOREFRONT**.
2. [Inspect](https://developer.chrome.com/docs/devtools/open.md.txt#elements) the element with `id="submenu"` in the preview.
3. In **Styles** , find the `position-try-options` property and click its `--bottom` value. The **Styles** tab takes you to the corresponding `@position-try` section.
4. Click the `position-anchor` value link or the same `anchor()` arguments. The **Elements** panel selects the element with the corresponding `popovertarget` attribute and the **Styles** tab shows the element's CSS.

![The position-try-options property, the @position-try section, and the element with the popover target attribute.](https://developer.chrome.com/static/docs/devtools/css/reference/image/at-position-try.png)

To edit values, double-click them.

### View an element's box model

To view [the box model](https://developer.mozilla.org/docs/Learn/CSS/Introduction_to_CSS/Box_model) of an element, go to the **Styles** tab and click the ![Show sidebar.](https://developer.chrome.com/static/docs/devtools/css/reference/image/show-sidebar-5cab73251eaec.png) **Show sidebar** button in the action bar.

![he Box Model diagram.](https://developer.chrome.com/static/docs/devtools/css/reference/image/he-box-model-diagram-c955156cbf7bd.png)

To change a value, double-click on it.

### Search and filter an element's CSS

Use the **Filter** box on the **Styles** and **Computed** tabs to search for specific CSS
selectors (including parent selectors in nested rules), properties, or values.

![Filtering the Styles tab.](https://developer.chrome.com/static/docs/devtools/css/reference/image/filtering-styles-pane-71985003686a3.png)

To also search inherited properties in the **Computed** tab, check the **Show All** checkbox.

![Filtering inherited properties in the Computed tab.](https://developer.chrome.com/static/docs/devtools/css/reference/image/filtering-inherited-prope-d8ade73eced61.png)

To navigate the **Computed** tab, group the filtered properties in collapsible categories by checking **Group**.

![Grouping filtered properties.](https://developer.chrome.com/static/docs/devtools/css/reference/image/grouping-filtered-propert-cfff44ce0eae1.png)

### Emulate a focused page

If you switch focus from the page to DevTools, some overlay elements automatically hide if they are triggered by focus. For example, drop-down lists, menus, or date pickers. The **Emulate a focused page** option lets you debug such an element as if it is in focus.

> [!CAUTION]
> **Caution:** With this option turned on, the `document.visibilityState` is set to `visible` and the `visibilitychange` event doesn't fire. For more information, see [Page Visibility API](https://developer.mozilla.org/docs/Web/API/Page_Visibility_API).

Try emulating a focused page on this [demo page](https://jec.fish/demo/disappearing-pop-up):

1. Focus the input element. Another element appears under it.
2. [Open DevTools](https://developer.chrome.com/docs/devtools/open.md.txt). The DevTools window is now in focus instead of the page, so the element disappears again.
3. In **Elements** \> **Styles** , click **:hov** , check **Emulate a focused page** , and make sure the input [element is selected](https://developer.chrome.com/docs/devtools/css/reference.md.txt#select). You can now inspect the element under it.

![Before and after turning on the 'Emulate a focused page' option.](https://developer.chrome.com/static/docs/devtools/css/reference/image/emulate-focused-page.png)

You can also find [the same option on the **Rendering** panel](https://developer.chrome.com/docs/devtools/rendering/apply-effects.md.txt#emulate_a_focused_page).

To discover more ways to freeze an element, see [Freeze screen and inspect disappearing elements](https://developer.chrome.com/blog/devtools-tips-35.md.txt).

### Toggle a pseudo-class

To toggle a pseudo-class:

1. [Select an element](https://developer.chrome.com/docs/devtools/css/reference.md.txt#select).
2. On the **Elements** panel, go to the **Styles** tab.
3. Click **:hov**.
4. Check the pseudo-class that you want to turn on.

![Toggling the hover pseudostate on an element.](https://developer.chrome.com/static/docs/devtools/css/reference/image/hover-pseudostate.png)

In this example, you can see that DevTools applies the `background-color` declaration to the element, even though the element is not actually hovered over.

The **Styles** tab shows the following pseudo-classes for all elements:

- [`:active`](https://developer.mozilla.org/docs/Web/CSS/:active)
- [`:focus`](https://developer.mozilla.org/docs/Web/CSS/:focus)
- [`:focus-within`](https://developer.mozilla.org/docs/Web/CSS/:focus-within)
- [`:target`](https://developer.mozilla.org/docs/Web/CSS/:target)
- [`:hover`](https://developer.mozilla.org/docs/Web/CSS/:hover)
- [`focus-visible`](https://developer.mozilla.org/docs/Web/CSS/:focus-visible)

Additionally, some elements may have their own pseudo-classes. When you select such an element, the **Styles** tab shows a **Force specific element state** section that you can expand and turn on pseudo-classes specific to the element.

![The `Force specific element state` section of a 'textarea' element.](https://developer.chrome.com/static/docs/devtools/css/reference/image/specific-pseudo-classes.png)

See [Add a pseudostate to a class](https://developer.chrome.com/docs/devtools/css.md.txt#pseudostates) for an interactive tutorial.

### View inherited highlight pseudo-elements

[Pseudo-elements](https://developer.mozilla.org/docs/Web/CSS/Pseudo-elements) let you style specific parts of elements. Highlight pseudo-elements are document portions with a "selected" status and they are styled as "highlighted" to indicate this status to the user. For example, such pseudo-elements are `::selection`, `::spelling-error`, `::grammar-error`, and `::highlight`.

As mentioned in the [specification](https://drafts.csswg.org/css-pseudo-4/#highlight-cascade), when multiple styles conflict, cascade determines the winning style.

> [!NOTE]
> **Note:** To enable this feature, run Chrome with the `--enable-blink-features=HighlightInheritance` flag.

To better understand the inheritance and priority of the rules, you can view the inherited highlight pseudo-elements:

1. [Inspect the text below](https://developer.chrome.com/docs/devtools/open.md.txt#elements).

   I inherited the style of my parent's highlight pseudo-element. Select me!
2. Select a portion of the text above.

3. In the **Styles** tab, scroll down to find the `Inherited from ::selection pseudo of...` section.

![View the Inherited section of the Styles tab.](https://developer.chrome.com/static/docs/devtools/css/reference/image/view-inherited-section-39e27567deeca.png)

### View cascade layers

[Cascade layers](https://developer.chrome.com/blog/cascade-layers.md.txt) enable more explicit control of your CSS files to prevent style-specificity conflicts. This is useful for large codebases, design systems, and when managing third-party styles in applications.

To view cascade layers, [inspect](https://developer.chrome.com/docs/devtools/open.md.txt#elements) the next element and open **Elements** \> **Styles**.

In the **Styles** tab, view the 3 cascade layers and their styles: `page`, `component` and `base`.

![Cascade layers.](https://developer.chrome.com/static/docs/devtools/css/reference/image/cascade-layers-74c8f50cbd767.png)

To view the layer order, click the layer name or the ![Toggle layers.](https://developer.chrome.com/static/docs/devtools/css/reference/image/toggle-layers-8acefd1497ffa.svg) **Toggle CSS layers view** button.

The `page` layer has the highest specificity, therefore the element's background is green.

### View a page in print mode

To view a page in print mode:

1. Open the [Command Menu](https://developer.chrome.com/docs/devtools/command-menu.md.txt).
2. Start typing `Rendering` and select `Show Rendering`.
3. For the **Emulate CSS Media** drop-down, select **print**.

### View used and unused CSS with the Coverage tab

The Coverage tab shows you what CSS a page actually uses.

1. Press <kbd>Command</kbd>+<kbd>Shift</kbd>+<kbd>P</kbd> (Mac) or <kbd>Control</kbd>+<kbd>Shift</kbd>+<kbd>P</kbd> (Windows, Linux, ChromeOS) while DevTools is in focus to open the Command Menu.
2. Start typing `coverage`.

   ![Opening the Coverage tab from the Command Menu.](https://developer.chrome.com/static/docs/devtools/css/reference/image/opening-coverage-tab-th-6911eee41119d.png)
3. Select **Show Coverage**. The Coverage tab appears.

   ![The Coverage tab.](https://developer.chrome.com/static/docs/devtools/css/reference/image/the-coverage-tab-96a7792002c0d.png)
4. Click ![Start Instrumenting Coverage And Reload Page.](https://developer.chrome.com/static/docs/devtools/css/reference/image/refresh-icon.svg) **Reload** .
   The page reloads and the **Coverage** tab provides an overview of how much CSS (and JavaScript) is
   used from each file that the browser loads.

   ![An overview of how much CSS (and JavaScript) is used and unused.](https://developer.chrome.com/static/docs/devtools/css/reference/image/an-overview-how-much-css-fab7a11feb973.png)

   Green represents used CSS. Red represents unused CSS.
5. Click a CSS file to see a line-by-line breakdown of what CSS it uses in the preview above.

   ![A line-by-line breakdown of used and unused CSS.](https://developer.chrome.com/static/docs/devtools/css/reference/image/a-line-line-breakdown-u-44b66fb47a1d9.png)

   On the screenshot, lines 55 to 57 and 65 to 67 of `devsite-google-blue.css` are unused, whereas lines 59 to 63 are used.

### Force print preview mode

See [Force DevTools Into Print Preview Mode](https://developer.chrome.com/docs/devtools/css/print-preview).

## Copy CSS

From a single drop-down menu in the **Styles** tab, you can copy separate [CSS rules, declarations, properties, values](https://developer.mozilla.org/docs/Learn/CSS/First_steps/What_is_CSS#css_syntax)

Additionally, you can copy CSS properties in JavaScript syntax. This option is handy if you're using [CSS-in-JS](https://developer.chrome.com/blog/css-in-js.md.txt) libraries.

To copy CSS:

1. [Select an element](https://developer.chrome.com/docs/devtools/css/reference.md.txt#select).
2. In the **Elements** \> **Styles** tab, right-click a CSS property. ![Copy CSS drop-down menu.](https://developer.chrome.com/static/docs/devtools/css/reference/image/copy-css-drop-down-menu-feae06af965cc.png)
3. Select one of the following options from the drop-down menu:

   - **Copy declaration** . Copies the property and its value in CSS syntax: `css
     property: value;`
   - **Copy property** . Copies only the `property` name.
   - **Copy value** . Copies only the `value`.
   - **Copy rule** . Copies the entire CSS rule: `css
     selector[, selector] {
     property: value;
     property: value;
     ...
     }`
   - **Copy declaration as JS** . Copies the property and its value in JavaScript syntax: `js
     propertyInCamelCase: 'value'`
   - **Copy all declarations** . Copies all properties and their values in the CSS rule: `css
     property: value;
     property: value;
     ...`
   - **Copy all declarations as JS**. Copies all properties and their values in JavaScript syntax:
     \`\`\`js
     propertyInCamelCase: 'value',
     propertyInCamelCase: 'value',
     ...

   - **Copy all CSS changes** . [Copies the changes](https://developer.chrome.com/docs/devtools/css/reference.md.txt#copy-css-changes) you make in the **Styles** tab across all declarations.

   - **View computed value** . Takes you to the [**Computed** tab](https://developer.chrome.com/docs/devtools/css/reference.md.txt#computed).

## Change CSS

This section lists all the ways you can change CSS in **Elements** \> **Styles**.

Additionally, you can:

- [Override CSS across page loads](https://developer.chrome.com/docs/devtools/overrides.md.txt).
- [Save modified CSS to your local sources in a workspace](https://developer.chrome.com/docs/devtools/workspaces.md.txt).

### Change CSS with code completion

To experiment with more complex combinations of CSS properties, like gradients or box shadows, without remembering their exact syntax, or to quickly build out grid- and flex- layouts, relying on multiple related properties, you can start typing a CSS property and use code completion.

![Using code completion to add a CSS property.](https://developer.chrome.com/static/docs/devtools/css/reference/image/css-code-completion.png)

### Add a CSS declaration to an element

Since the order of declarations affects how an element is styled, you can add declarations in
different ways:

- [Add a inline declaration](https://developer.chrome.com/docs/devtools/css/reference.md.txt#add-declaration-inline). Equivalent to adding a `style` attribute to the element's HTML.
- [Add a declaration to a style rule](https://developer.chrome.com/docs/devtools/css/reference.md.txt#add-declaration-to-rule).

**What workflow should you use?** For most scenarios, you probably want to use the inline
declaration workflow. Inline declarations have higher specificity than external ones, so the inline
workflow ensures that the changes take effect in the element as you'd expect. See [Selector
Types](https://developer.mozilla.org/docs/Web/CSS/Specificity#Selector_Types) for more on specificity.

If you're debugging an element's styles and you need to specifically test what happens when a
declaration is defined in different places, use the other workflow.

#### Add an inline declaration

To add an inline declaration:

1. [Select an element](https://developer.chrome.com/docs/devtools/css/reference.md.txt#select).
2. In the **Styles** tab, click between the brackets of the **element.style** section. The cursor focuses, allowing you to enter text.
3. Enter a property name and press <kbd>Enter</kbd>.
4. Enter a valid value for that property and press <kbd>Enter</kbd>. In the **DOM Tree** , you can
   see that a `style` attribute has been added to the element.
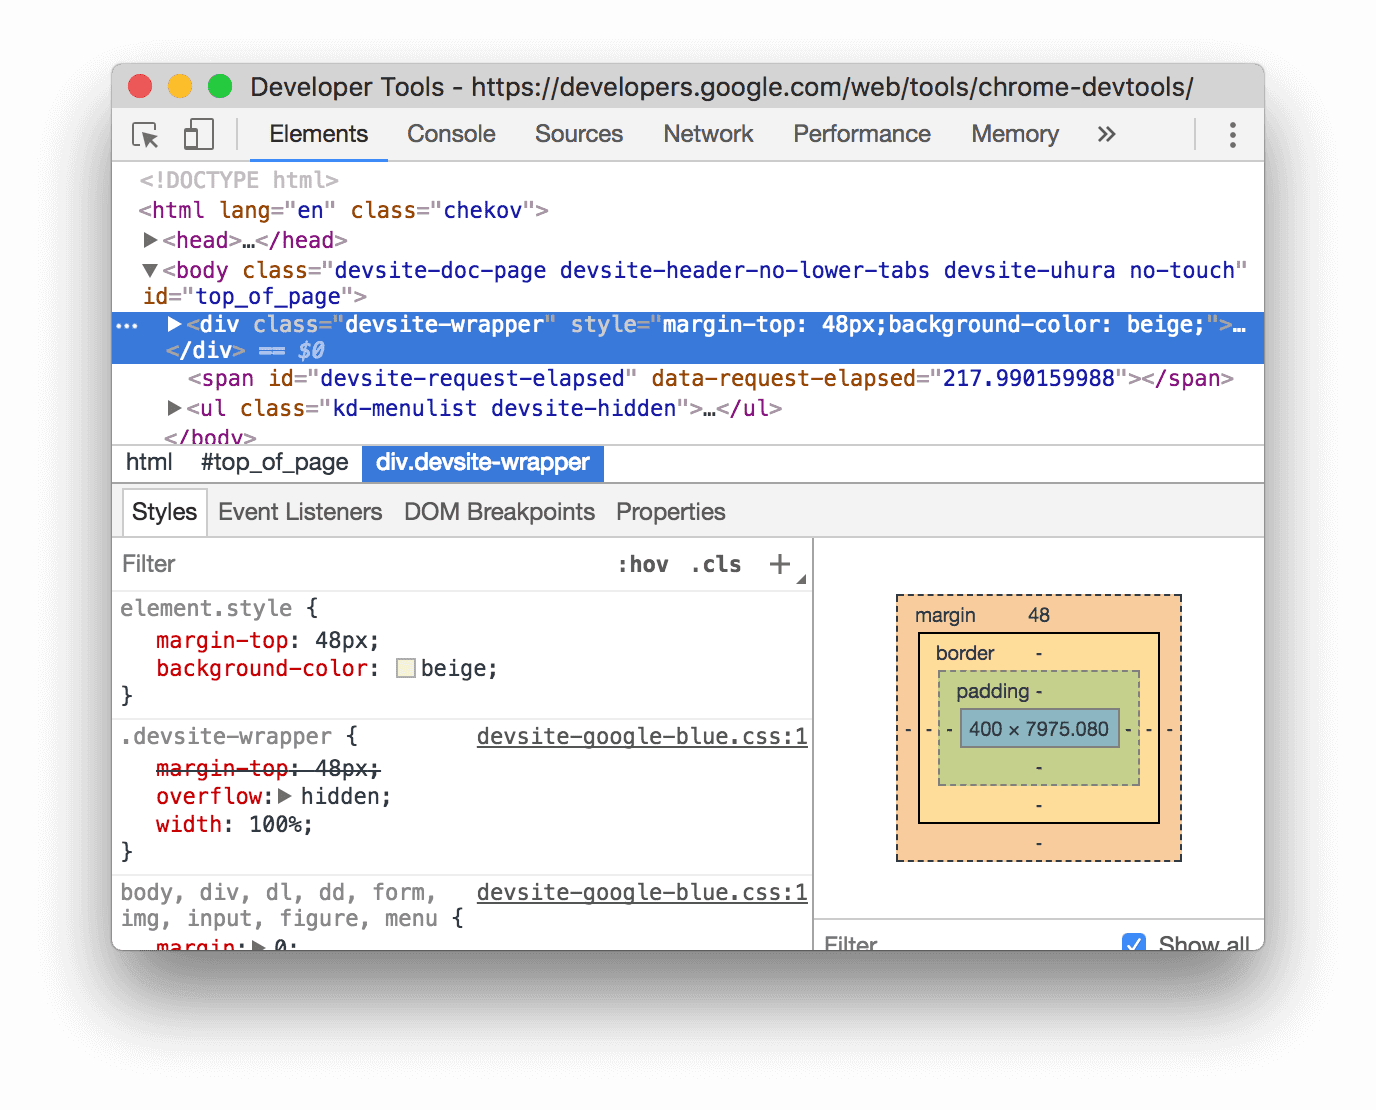
   ![Adding inline declarations.](https://developer.chrome.com/static/docs/devtools/css/reference/image/adding-inline-declaration-6fc22c8e12ca2.png)

   On the screenshot, the `margin-top` and `background-color` properties have been applied to the selected element. In the **DOM Tree** you can see the declarations reflected in the element's `style` attribute.

#### Add a declaration to a style rule

To add a declaration to an existing style rule:

1. [Select an element](https://developer.chrome.com/docs/devtools/css/reference.md.txt#select).
2. In the **Styles** tab, click between the brackets of the style rule to which you want to add the declaration. The cursor focuses, allowing you to enter text.
3. Enter a property name and press <kbd>Enter</kbd>.
4. Enter a valid value for that property and press <kbd>Enter</kbd>.

![Changing the value of a declaration.](https://developer.chrome.com/static/docs/devtools/css/reference/image/changing-value-a-declar-c547eb65b1b93.png)

On the screenshot, a style rule gets the new `border-bottom-style:groove` declaration.

### Change a declaration name or value

Double-click a declaration's name or value to change it. See [Change enumerable values with
keyboard shortcuts](https://developer.chrome.com/docs/devtools/css/reference#values-shortcuts) for shortcuts for quickly incrementing or decrementing a value by 0.1, 1,
10, or 100 units.

### Change enumerable values with keyboard shortcuts

While editing an enumerable value of a declaration, for example, `font-size`, you can use the following keyboard shortcuts to increment the value by a fixed amount:

- <kbd>Option</kbd>+<kbd>Up</kbd> (Mac) or <kbd>Alt</kbd>+<kbd>Up</kbd> (Windows, Linux) to increment by 0.1.
- <kbd>Up</kbd> to change the value by 1, or by 0.1 if the current value is between -1 and 1.
- <kbd>Shift</kbd>+<kbd>Up</kbd> to increment by 10.
- <kbd>Shift</kbd>+<kbd>Command</kbd>+<kbd>Up</kbd> (Mac) or <kbd>Control</kbd>+<kbd>Shift</kbd>+<kbd>Page Up</kbd> (Windows, Linux) to increment the value by 100.

Decrementing also works. Just replace each instance of <kbd>Up</kbd> mentioned earlier with
<kbd>Down</kbd>.

### Change length values

> [!WARNING]
> **Deprecated:** This feature is deprecated in Chrome 123. To temporarily turn it back on again, clear the **Settings** \> **Experiments** \> **Deprecate CSS \<length\> authoring tool in the Styles tab** . Feel free to leave feedback in [crbug/1522657](https://issues.chromium.org/issues/41495618).

You can use your pointer to change any property with length, such as width, height, padding, margin, or border.

To change the length unit:

1. Hover over the unit name and notice that it's underlined.
2. Click the unit name to select a unit from the drop-down.

To change the length value:

1. Hover over the unit value and notice that your pointer changes to a horizontal double-headed arrow.
2. Drag horizontally to increase or decrease the value.

To adjust the value by 10, hold <kbd>Shift</kbd> when dragging.

### Add a class to an element

To add a class to an element:

1. [Select the element](https://developer.chrome.com/docs/devtools/css/reference.md.txt#select) in the **DOM Tree**.
2. Click **.cls**.
3. Enter the name of the class in the **Add New Class** box.
4. Press <kbd>Enter</kbd>.

![The Element Classes section.](https://developer.chrome.com/static/docs/devtools/css/reference/image/the-element-classes-pane-0b7a08e14ab66.svg)

### Emulate light and dark theme preferences and enable automatic dark mode

To toggle [automatic dark mode](https://developer.chrome.com/blog/auto-dark-theme.md.txt) or emulate the user's preference of [light or dark themes](https://web.dev/prefers-color-scheme/):

1. On the **Elements** \> **Styles** tab, click ![Toggle common rendering emulations.](https://developer.chrome.com/static/docs/devtools/css/reference/image/toggle-common-rendering-e-ef2097d725cda.svg)**Toggle common rendering emulations** . ![Toggle common rendering emulations.](https://developer.chrome.com/static/docs/devtools/css/reference/image/toggle-common-rendering-e-230c29d02912e.png)
2. Select one of the following from the drop-down list:

   - **prefers-color-scheme: light**. Indicates that the user prefers the light theme.
   - **prefers-color-scheme: dark**. Indicates that the user prefers the dark theme.
   - **Automatic dark mode** . Displays your page in dark mode even if you didn't implement it. Additionally, sets `prefers-color-scheme` to `dark` automatically.

This drop-down is a shortcut for [Emulate CSS media feature `prefers-color-scheme`](https://developer.chrome.com/docs/devtools/rendering/apply-effects.md.txt#enable-automatic-dark-mode%5D) and [Enable automatic dark mode](https://developer.chrome.com/docs/devtools/rendering/apply-effects.md.txt#enable_automatic_dark_mode) options of the **Rendering** tab.

### Toggle a class

To enable or disable a class on an element:

1. [Select the element](https://developer.chrome.com/docs/devtools/css/reference.md.txt#select) in the **DOM Tree**.
2. Open the **Element Classes** section. See [Add a class to an element](https://developer.chrome.com/docs/devtools/css/reference.md.txt#add-class). Below the **Add New
   Class** box are all of the classes that are being applied to this element.
3. Toggle the checkbox next to the class that you want to enable or disable.

### Add a style rule

To add a new style rule:

1. [Select an element](https://developer.chrome.com/docs/devtools/css/reference.md.txt#select).
2. Click **New Style Rule** ![New Style Rule.](https://developer.chrome.com/static/docs/devtools/css/reference/image/new-style-rule-24ffbd658252a.svg). DevTools inserts a new rule beneath the **element.style** rule.

![Adding a new style rule.](https://developer.chrome.com/static/docs/devtools/css/reference/image/adding-new-style-rule-6e5a4156f661f.png)

On the screenshot, DevTools adds the `h1.devsite-page-title` style rule after clicking **New Style Rule**.

#### Choose which style sheet to add a rule to

When [adding a new style rule](https://developer.chrome.com/docs/devtools/css/reference.md.txt#style-rule), click and hold **New Style Rule**
![New Style Rule.](https://developer.chrome.com/static/docs/devtools/css/reference/image/new-style-rule-5683a22ffbd8c.svg) to choose which style sheet
to add the style rule to.

![Choosing a style sheet.](https://developer.chrome.com/static/docs/devtools/css/reference/image/choosing-stylesheet-88512e57bd5a6.png)

### Toggle a declaration

To toggle a single declaration on or off:

1. [Select an element](https://developer.chrome.com/docs/devtools/css/reference.md.txt#select).
2. In the **Styles** tab, hover over the rule that defines the declaration. Checkboxes appear next to each declaration.
3. Check or clear the checkbox next to the declaration. When you clear a declaration, DevTools crosses it out to indicate that it's no longer active.

![Toggling a declaration.](https://developer.chrome.com/static/docs/devtools/css/reference/image/toggling-declaration-5e172a14bbf21.png)

On the screenshot, the `color` property for the currently-selected element is toggled off.

### Edit the `::view-transition` pseudo-elements during an animation

See the corresponding section in [**Animations**](https://developer.chrome.com/docs/devtools/css/animations.md.txt#view-transition).

For more information, see [Smooth and simple transitions with the View Transitions API](https://developer.chrome.com/docs/web-platform/view-transitions.md.txt).

### Align grid items and their content with the Grid Editor

See the corresponding [section in Inspect CSS grid](https://developer.chrome.com/docs/devtools/css/grid.md.txt#grid-editor).

### Change colors with the Color Picker

See [Inspect and debug HD and non-HD colors with the Color Picker](https://developer.chrome.com/docs/devtools/css/color.md.txt).

### Change angle value with the Angle Clock

The **Angle Clock** provides a GUI for changing `<angle>`s in CSS property values.

To open the **Angle Clock**:

1. [Select an element](https://developer.chrome.com/docs/devtools/css/reference.md.txt#select) with angle declaration.
2. In the **Styles** tab, find the `transform` or `background` declaration that you want to change.
   Click the **Angle Preview** box next to the angle value.

   ![Angle preview.](https://developer.chrome.com/static/docs/devtools/css/reference/image/angle-preview-e8bfe67ae83a1.png)

   The small clocks to the left of `-5deg` and `0.25turn` are the angle previews.
3. Click the preview to open the **Angle Clock**.

   ![Angle clock.](https://developer.chrome.com/static/docs/devtools/css/reference/image/angle-clock-a033714b5f1ec.png)
4. Change the angle value by clicking on the **Angle Clock** circle or scroll your mouse to
   increase / decrease the angle value by 1.

5. There are more keyboard shortcuts to change the angle value. Find out more in the [Styles pane
   keyboard shortcuts](https://developer.chrome.com/docs/devtools/shortcuts#styles).

### Change box and text shadows with the Shadow Editor

[Video](https://www.youtube.com/watch?v=DAD72grzDDc)

The **Shadow Editor** provides a GUI for changing `text-shadow` and `box-shadow` CSS declarations.

To change shadows with the **Shadow Editor**:

1. [Select an element](https://developer.chrome.com/docs/devtools/css/reference.md.txt#select) with a shadow declaration. For example, select the next element.

2. In the **Styles** tab, find a shadow ![Shadow.](https://developer.chrome.com/static/docs/devtools/css/reference/image/shadow-af8251434b605.png) icon next to the `text-shadow` or `box-shadow` declaration.

   ![Shadow icons.](https://developer.chrome.com/static/docs/devtools/css/reference/image/shadow-icons-3049bc1e1ddc5.png)
3. Click the shadow icon to open the **Shadow editor**.

   ![Shadow editor.](https://developer.chrome.com/static/docs/devtools/css/reference/image/shadow-editor-c0adf5d3da674.png)
4. Change the shadow properties:

   - **Type** (only for `box-shadow`). Pick **Outset** or **Inset**.
   - **X and Y offsets**. Drag the blue dot or specify values.
   - **Blur**. Drag the slider or specify a value.
   - **Spread** (only for `box-shadow`). Drag the slider or specify a value.
5. Observe the changes applied to the [element](https://developer.chrome.com/docs/devtools/css/reference.md.txt#shadow-element).

### Edit animation and transition timings with the Easing Editor

The **Easing Editor** provides a GUI for changing the values of [`transition-timing-function`](https://developer.mozilla.org/docs/Web/CSS/transition-timing-function) and [`animation-timing-function`](https://developer.mozilla.org/docs/Web/CSS/animation-timing-function).

To open the **Easing Editor**:

1. [Select an element](https://developer.chrome.com/docs/devtools/css/reference.md.txt#select) with a timing function declaration, like the `<body>` element on this page.
2. In the **Styles** tab, find the purple ![Ease.](https://developer.chrome.com/static/docs/devtools/css/reference/image/ease-1c2db29719d24.png) icon next to the `transition-timing-function`, `animation-timing-function` declarations, or the `transition` shorthand property. ![The Easing Editor icon.](https://developer.chrome.com/static/docs/devtools/css/reference/image/the-easing-editor-icon-d3627352288.png)
3. Click the icon to open the **Easing Editor** : ![The Easing Editor.](https://developer.chrome.com/static/docs/devtools/css/reference/image/the-easing-editor-11b61ac6d3874.png)

### Use presets to adjust timings

To adjust timings with a click, use the presets in the **Easing Editor**:

1. In the **Easing Editor** , to set a [keyword value](https://developer.mozilla.org/docs/Web/CSS/animation-timing-function#values), click one of the picker buttons:
   - **linear** ![The linear button.](https://developer.chrome.com/static/docs/devtools/css/reference/image/the-linear-button-1fb07dfcaa826.png)
   - **ease-in-out** ![The ease-in-out button.](https://developer.chrome.com/static/docs/devtools/css/reference/image/the-ease-out-button-d1241a0939fa4.png)
   - **ease-in** ![The ease-in button.](https://developer.chrome.com/static/docs/devtools/css/reference/image/the-ease-button-f895897bbcfe7.png)
   - **ease-out** ![The ease-out button.](https://developer.chrome.com/static/docs/devtools/css/reference/image/the-ease-button-fd022ff8a5dd5.png)
2. In the **Presets switcher** , click ![Left.](https://developer.chrome.com/static/docs/devtools/css/reference/image/left-bb77beb7883df.svg) or ![Right.](https://developer.chrome.com/static/docs/devtools/css/reference/image/right-446ddbb49af.svg) buttons to pick one of the following presets:

   - Linear presets: `elastic`, `bounce`, or `emphasized`.
   - [Cubic Bezier](https://developer.mozilla.org/docs/Glossary/Bezier_curve) presets:

| Timing keyword | Preset | Cubic Bezier |
|---|---|---|
| ease-in-out | In Out, Sine | `cubic-bezier(0.45, 0.05, 0.55, 0.95)` |
| ease-in-out | In Out, Quadratic | `cubic-bezier(0.46, 0.03, 0.52, 0.96)` |
| ease-in-out | In Out, Cubic | `cubic-bezier(0.65, 0.05, 0.36, 1)` |
| ease-in-out | Fast Out, Slow In | `cubic-bezier(0.4, 0, 0.2, 1)` |
| ease-in-out | In Out, Back | `cubic-bezier(0.68, -0.55, 0.27, 1.55)` |
| ease-in | In, Sine | `cubic-bezier(0.47, 0, 0.75, 0.72)` |
| ease-in | In, Quadratic | `cubic-bezier(0.55, 0.09, 0.68, 0.53)` |
| ease-in | In, Cubic | `cubic-bezier(0.55, 0.06, 0.68, 0.19)` |
| ease-in | In, Back | `cubic-bezier(0.6, -0.28, 0.74, 0.05)` |
| ease-in | Fast Out, Linear In | `cubic-bezier(0.4, 0, 1, 1)` |
| ease-out | Out, Sine | `cubic-bezier(0.39, 0.58, 0.57, 1)` |
| ease-out | Out, Quadratic | `cubic-bezier(0.25, 0.46, 0.45, 0.94)` |
| ease-out | Out, Cubic | `cubic-bezier(0.22, 0.61, 0.36, 1)` |
| ease-out | Linear Out, Slow In | `cubic-bezier(0, 0, 0.2, 1)` |
| ease-out | Out, Back | `cubic-bezier(0.18, 0.89, 0.32, 1.28)` |

### Configure custom timings

To set custom values for timing functions, use the control points on the lines:

- For linear functions, click anywhere on the line to add a control point and drag it. Double-click to remove the point.

  ![Dragging a control point of a linear function.](https://developer.chrome.com/static/docs/devtools/css/reference/image/dragging-control-point-276144679df3a.png)
- For Cubic Bezier functions, drag one of the control points.

  ![Dragging the control points of a Cubic Bezier function.](https://developer.chrome.com/static/docs/devtools/css/reference/image/dragging-control-points-397913a2c68fc.png)

Any change triggers a ball animation in the **Preview** at the top of editor.

## (Experimental) Copy CSS changes

> [!NOTE]
> **Note:** To enable this experimental feature, check **Sync CSS changes in the Styles tab** under ![Settings.](https://developer.chrome.com/static/docs/devtools/css/reference/image/settings-f93bd8edfbe51.svg) **Settings** \> **Experiments** and reload DevTools.

With this experiment enabled, the **Styles** tab highlights your CSS changes in green.

To copy a single CSS declaration change, hover over the highlighted declaration and click the ![Copy.](https://developer.chrome.com/static/docs/devtools/css/reference/image/copy-6c7cdfeef49e5.svg) **Copy** button.

![Copy a CSS declaration change.](https://developer.chrome.com/static/docs/devtools/css/reference/image/copy-css-declaration-cha-88cafb29d2d41.png)

To copy all CSS changes across declarations at once, right-click on any declaration and select **Copy all CSS changes**.

![Copy all CSS changes.](https://developer.chrome.com/static/docs/devtools/css/reference/image/copy-css-changes-702d3c2ce2e8.png)

Additionally, you can [track changes](https://developer.chrome.com/docs/devtools/changes.md.txt) you make with the **Changes** tab.