
このステップでは、次のことを学びます。
- 外部のウェブ コンテンツをサンドボックス化された安全な方法でアプリ内に表示する方法。
この手順を完了の推定所要時間: 10 分
このステップの内容を確認するには、このページの一番下に移動 ↓ をクリックしてください。
WebView タグについて
アプリケーションの中には、外部のウェブ コンテンツをユーザーに直接表示しながら、 アプリのエクスペリエンスが向上しますたとえば、ニュース アグリゲータであれば、外部の 元のサイトの形式、画像、動作がすべてそのまま維持されます。これらとその他の Chrome アプリには webview というカスタム HTML タグがあります。
WebView タグを実装する
ToDo アイテムのテキストで URL を検索し、ハイパーリンクを作成するように ToDo アプリを更新します。リンクがいつ クリックすると、新しい Chrome アプリ ウィンドウが(ブラウザタブではなく)開いて、コンテンツを表示する WebView が表示されます。
許可を更新
manifest.json で、webview 権限をリクエストします。
"permissions": [
  "storage",
  "alarms",
  "notifications",
  "webview"
],
WebView 埋め込みページを作成する
プロジェクト フォルダのルートに新しいファイルを作成し、webview.html という名前を付けます。このファイルは
1 つの <webview> タグを持つ基本的なウェブページ:
<!DOCTYPE html>
<html>
<head>
  <meta charset="utf-8">
</head>
<body>
  <webview style="width: 100%; height: 100%;"></webview>
</body>
</html>
ToDo アイテム内の URL の解析
controller.js の最後に、_parseForURLs() という新しいメソッドを追加します。
  Controller.prototype._getCurrentPage = function () {
    return document.location.hash.split('/')[1];
  };

  Controller.prototype._parseForURLs = function (text) {
    var re = /(https?:\/\/[^\s"<>,]+)/g;
    return text.replace(re, '<a href="$1" data-src="$1">$1</a>');
  };

  // Export to window
  window.app.Controller = Controller;
})(window);
「http://」で始まる文字列は常にまたは「https://」見つかった場合、HTML アンカータグが作成されて URL をラップ アラウンドする。
ToDo リストでハイパーリンクを表示する
controller.js で showAll() を見つけます。以下を使用してリンクを解析するように showAll() を更新します。
以前に追加された _parseForURLs() メソッド:
/**
 * An event to fire on load. Will get all items and display them in the
 * todo-list
 */
Controller.prototype.showAll = function () {
  this.model.read(function (data) {
    this.$todoList.innerHTML = this.view.show(data);
    this.$todoList.innerHTML = this._parseForURLs(this.view.show(data));
  }.bind(this));
};
showActive() と showCompleted() についても同じことを行います。
/**
 * Renders all active tasks
 */
Controller.prototype.showActive = function () {
  this.model.read({ completed: 0 }, function (data) {
    this.$todoList.innerHTML = this.view.show(data);
    this.$todoList.innerHTML = this._parseForURLs(this.view.show(data));
  }.bind(this));
};

/**
 * Renders all completed tasks
 */
Controller.prototype.showCompleted = function () {
  this.model.read({ completed: 1 }, function (data) {
    this.$todoList.innerHTML = this.view.show(data);
    this.$todoList.innerHTML = this._parseForURLs(this.view.show(data));
  }.bind(this));
};
最後に、_parseForURLs() を editItem() に追加します。
Controller.prototype.editItem = function (id, label) {
  ...
  var onSaveHandler = function () {
    ...
      // Instead of re-rendering the whole view just update
      // this piece of it
      label.innerHTML = value;
      label.innerHTML = this._parseForURLs(value);
    ...
  }.bind(this);
  ...
}
引き続き editItem() で、innerText
ラベルの innerHTML:
Controller.prototype.editItem = function (id, label) {
  ...
  // Get the innerHTML of the label instead of requesting the data from the
  // Get the innerText of the label instead of requesting the data from the
  // ORM. If this were a real DB this would save a lot of time and would avoid
  // a spinner gif.
  input.value = label.innerHTML;
  input.value = label.innerText;
  ...
}
WebView を含む新しいウィンドウを開く
_doShowUrl() メソッドを controller.js に追加します。この方法では、新しい Chrome アプリのウィンドウを
chrome.app.window.create(): webview.html をウィンドウ ソースとする:
  Controller.prototype._parseForURLs = function (text) {
    var re = /(https?:\/\/[^\s"<>,]+)/g;
    return text.replace(re, '<a href="$1" data-src="$1">$1</a>');
  };

  Controller.prototype._doShowUrl = function(e) {
    // only applies to elements with data-src attributes
    if (!e.target.hasAttribute('data-src')) {
      return;
    }
    e.preventDefault();
    var url = e.target.getAttribute('data-src');
    chrome.app.window.create(
     'webview.html',
     {hidden: true},   // only show window when webview is configured
     function(appWin) {
       appWin.contentWindow.addEventListener('DOMContentLoaded',
         function(e) {
           // when window is loaded, set webview source
           var webview = appWin.contentWindow.
                document.querySelector('webview');
           webview.src = url;
           // now we can show it:
           appWin.show();
         }
       );
     });
  };

  // Export to window
  window.app.Controller = Controller;
})(window);
chrome.app.window.create() コールバックで、WebView の URL が src タグによってどのように設定されるかに注意してください。
属性です。
最後に、Controller コンストラクタ内にクリック イベント リスナーを追加し、doShowUrl()
ユーザーが次のリンクをクリックする:
function Controller(model, view) {
  ...
  this.router = new Router();
  this.router.init();

  this.$todoList.addEventListener('click', this._doShowUrl);

  window.addEventListener('load', function () {
    this._updateFilterState();
  }.bind(this));
  ...
}
完成した Todo アプリを起動する
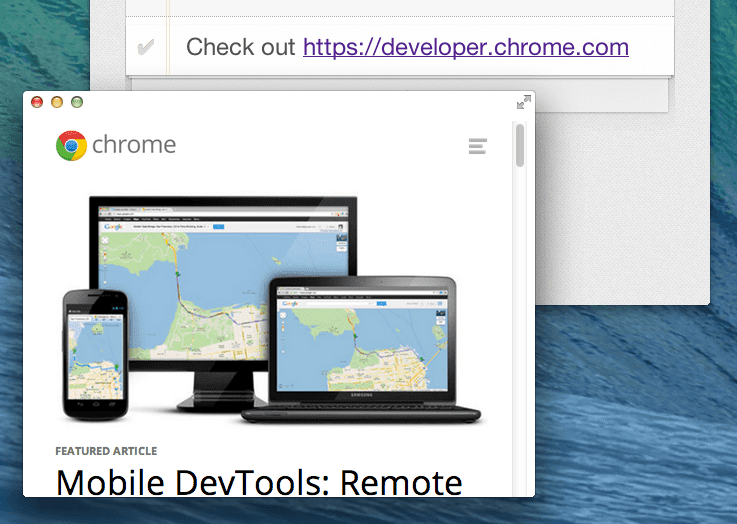
これでステップ 4 は完了です。アプリを再読み込みして、完全な URL で始まる ToDo アイテムを追加すると、 http:// または https:// を使用した場合は、次のように表示されます。
詳細情報
このステップで導入した API の一部の詳細については、以下をご覧ください。
次のステップに進む準備はできましたか?ステップ 5 - ウェブから画像を追加する » に進みます。